
Templates
ePrintcost – Design Online
Within a customer's ePrintcost site, you can create templates. For example, if you create a business card template for a customer, your customer's staff will be able to log into their ePrintcost site and use the template to enter or modify the details that will be printed on the card.
When you set up the template, you decide:
- which objects are going to be editable by your customer, and
- which objects the customer can't change.
With ePrintcost you can set up templates that are tailored to a particular branch of a company, as well as templates that are to be used across the whole company.
On this page:
Table of Contents:
- Design Online
- Tutorial: Creating a Simple Business Card Template
- Uploading a Font
- Editing a Template Page's Properties & Dimensions
- Adding a Spot Colour to the Colour Space Dropbox
- Generating Template Thumbnails
- Refreshing Document Names
- Troubleshooting
Guidelines for Background Images
With Printcost, you can upload customised backgrounds
Design Online
With Design Online, you can create templates for your customers to use. For example, you can create a business card template that has:
- fields for your customer to edit, e.g., Name of Cardholder, Address and Phone Number, and
- image objects that the users can replace and move around the template
- text and graphics that the user cannot edit or move, for example, your customer's logo and company name.
This means that you have complete control over what your customer can change, ensuring that all documents that are created using the template remain consistent.
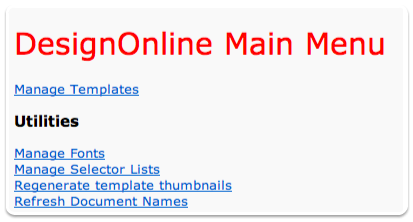
Design Online Main Menu
Accessing the Main Menu
In order to access the Manage Templates and Utilities links under Design Online, you will need an administrator password for ePrintcost. If you have not got one, please contact your supervisor. Printcost staff would have provided your company with an ePrintcost Administrator login and password.
When you log in as an adminstrator, a navigation bar is displayed at the bottom of the page. To display DesignOnline, click DesignOnline.
 DesignOnline
 DesignOnline Main Menu
Main Menu
From the Main Menu, you can:
- manage your templates
- Add, modify or delete template.
- manage fonts
- Add or delete fonts. Note: If the font is being used by a template, it cannot be deleted.
- manage selector lists
- With a selector list, your customers can select standard text items and images from within a child document. You can create selector lists for a template, then share the same list across a number of the customer's templates.
- regenerate template thumbnails
- From time to time, changes that you made to, e.g., a template's thumbnail resolution may not update automatically. If the changes in your template are not reflected in your thumbnails, you can generate new thumbnails.
- refresh document names
- From time to time, the document names of child documents may need updating. Refreshing the document names will marry the template name up with the naming field of the document. When adding a text object, you can nominate the text object as the naming field for the document. This means that content of a child document's naming field will be part of the document name.
Returning to the Main Manu
If at any stage you want to display the Main Menu, e.g., when in the middle of creating a template, at the bottom of the page, click Design Online.
Manage Templates
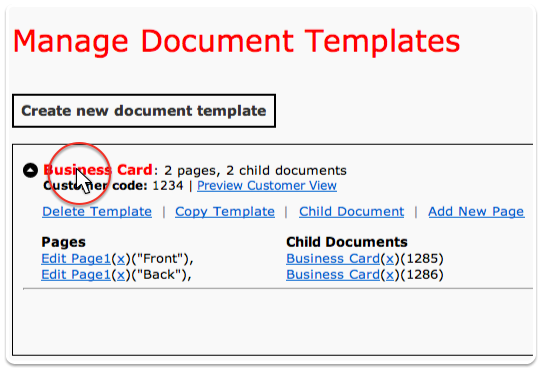 Manage Document Templates
If, on the DesignOnline Main Menu you click Manage Templates, the Manage Document Templates page is displayed. If you have any templates:
- they will be listed here
- and on clicking the name of a template, a range of options will be displayed for the template.
For example (pictured right), on clicking the template named 'Business Card', the following options are displayed:
- Delete Template
- You can delete the template if you or your customer has no further use for it.
- Copy Template
- You can duplicate the template if you want to use it as a basis for creating a new template without losing the original. For example, different branches of your customer's organisation may require slightly different stationery, e.g. where the branding has to stay the same, but the postal details differ.
- Child Document
- Once you have created a template, you can create a document that is based on the template and place an order for that document.
- Add New Page
- For example, if you are printing on both sides of a leaf, you will need two pages.
Pages & Child Documents
In addition to the options above, all of the template's pages and any documents that have been created using the template are listed here.
Editing a Template
To edit the template, click the relevant 'Edit Page1' link.
Deleting a Page from a Template
To delete a page from the template, click the relevant (x) link.
Note: Deleting a page on a template will not affect your child documents. Likewise, any changes made to a template do not flow through to existing child documents.
Editing a Child Document
To edit a child document, click the relevant document name.
Deleting a Child Document
To delete a document, click the relevant child document's (x) link.
Preview Customer View
If you want to see what the customer sees and what the customer can do with your template, click 'Preview Customer View'.
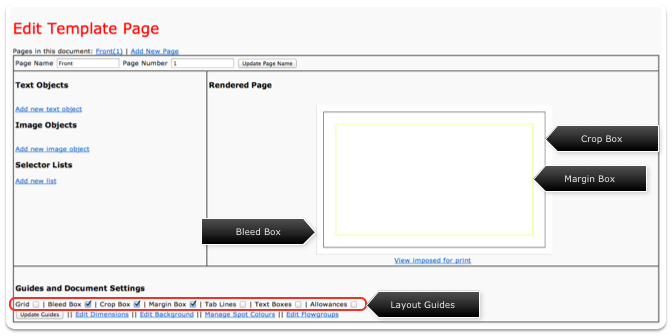
Edit Template Page
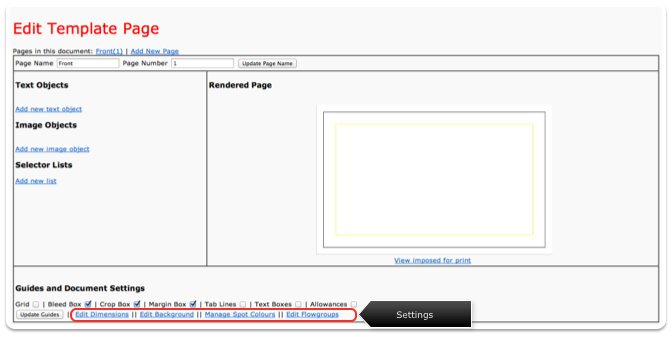 Edit Template Page for a template that is 90 mm x 55 mm with a 3 mm bleed and 5 mm margin.
The Edit Template page is used to create and modify your templates. On clicking Update, any changes you make are displayed in the Rendered Page region.
From the Edit Template page, you can:
- add, edit and delete text objects
- add and delete image objects
- add, edit and delete selector lists
- hide/unhide layout grids and guides
- edit the document's properties, dimensions and settings used for the rendered page and the 'number up' and 'number down', 'imposed width' and 'imposed height' for print ready pdfs (as seen when clicking 'View Imposed for Print' on the rendered page).
- add, edit or delete a background
- manage spot colours
- Note: You can set up spot colours by specifying their CMYK values for representing the colour onscreen. The print ready pdf will have additional pages, one for each spot colour.
- edit flowgroups
- A flowgroup is a group of text objects that move relative to each other, depending on which fields are populated.
Tutorial: Creating a Simple Business Card Template
 A Simple Business Card
The purpose of this tutorial is to help you build familiarity with ePrintcost's template making tools. It is not a procedure that you have to follow step by step and it does not cover every aspect of creating a template. For the purpose of this tutorial, we will be creating a template for a simple business card.
The template will have:
 Logo
Logo
- a background image
- In this case it will resemble an old blackboard.
- a logo
- The logo I'm using has transparency to allow the background to show through. For this I'll be using an eps file that has an alpha channel.
- some text that the customer cannot edit or modify in any way, and
- For example, the customer's address.
- some text that your customer can edit.
- For example, the name of the cardholder.
 Background Image
This tutorial assumes you have the skills to design a busines card, and to lay out type.
Before You Begin
For this template we are going to use:
- a logo file
- Although you can upload an image in any one of a range of formats, ensure the image is a high resolution bitmap or a scalable vector drawing e.g., eps. In ePrintcost, you can set minimum and maximum resolutions per image object.
- a background image, and
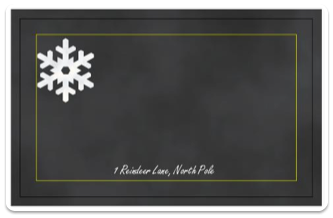
- Ensure the file is a PDF and the resolution of any embedded images is at least 300 dpi. To follow this tutorial, create an an image that includes the bleed and save it as a PDF. For example, a 90 mm x 55 mm card with a bleed of 3 mm will be 96 mm x 61 mm.
- uploaded fonts.
- Note: You can upload your fonts to ePrintcost at any time. If you do, please ensure that you have the necessary font licenses in place.
Stage 1: Logging into ePrintcost
- Using an administrator login, password and web browser, log into the relevant ePrintcost site.
- Note: You can set up a login and password using Printcost. For more information, see Granting ePrintcost Access to a Customer Contact (User).
- On the menu at the bottom of the page, click DesignOnline.
- Result: The Design Online Main Menu page is displayed.
- Click Manage Templates.
- Result: The Manage Document Templates page is displayed.
DesignOnline
Stage 2: Setting Up the Template
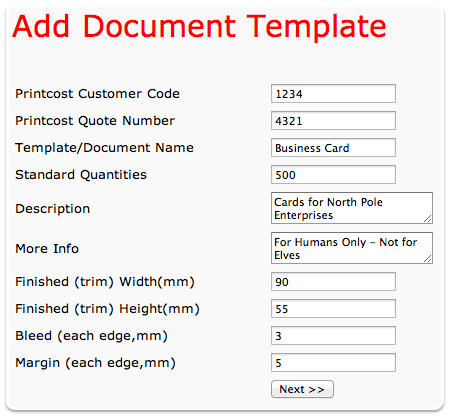
- On the Manage Document Templates Page, click 'Create New Document Template'.
- Result: The Add Document Template page is displayed (pictured below).
- Complete all of the fields and set the dimensions.
- Note: Ensure the customer code, quote number are correct. Enter all dimensions in millimetres.
- The dimensions for this busines card are going to be 90 mm x 55 mm with a 3 mm bleed and 5 mm margin.
- Click Next.
- Result: The Edit Template Page is displayed.
- Note: You can change the dimensions at any time by clicking the Edit Dimensions link (under Guides & Document Settings).
- Note: The entire card including bleed is displayed. To display the bleed box, crop box (black) and margins (yellow), at the bottom of the page under Guides and Document Settings, select the Bleed Box, Crop Box and Margin Box options, then click Update Guides.
 Add Document Template
 Edit Template Page for a template with the BleedBox, Crop Box and Margin Box options selected.
Stage 3: Adding a Background Image
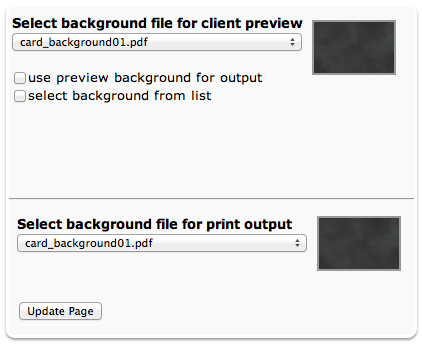
- At the bottom of the page, under Guides and Document Settings, click Edit Background.
- Result: You will be asked to select a background.
- Note: You can upload a number of image files from your computer. For this tutorial, a background image has been prepared and saved as a PDF. Only PDF files can be uploaded for use as a background image.
- To the right of the window, click Choose File, browse to the location of the file and select it.
- Result: Adjacent to the Choose File button, you will be informed that the file has been selected.
- Click Upload.
- Result: You will be informed that the file was uploaded successfully.
- In not automatically selected, from the two droplists on the left, select the background image file that you uploaded.
- Note: These droplists are called 'Select Background File for Client Preview' and Select Background for Print Output.
- Click Update Page.
- Result: The Edit Template Page displays the uploaded background.
 Uploaded Background File Selected
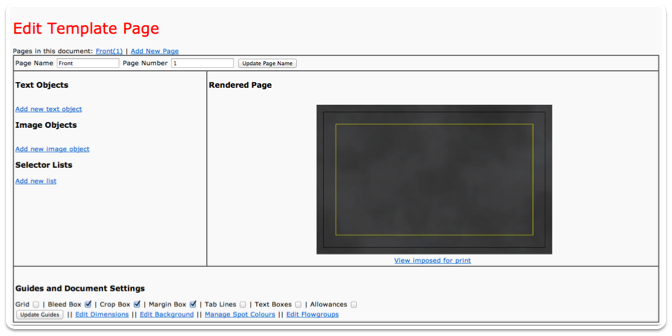 Edit Template Page for a template with the background uploaded.
Stage 4: Adding a Logo
- Under Image Objects, click Add New Image Object.
- Result: The Edit Template page is expanded with controls for adding and editing an image.
- Click Choose File, locate and select the relevant file.
- Result: The selected file will be listed next to the Choose File button.
- Click Save File.
- Result: The uploaded file is displayed.
- Select the Content Locked checkbox
- Note: By locking this logo, customers will not be able change it.
- (Optional) Set the height and width of the logo
- Note: To maintain the proportions of the logo, ensure Constrain Proportions is selected.
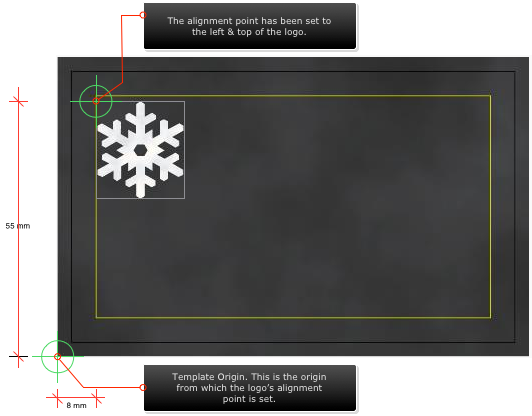
- Specify the logo's alignment point and position this point on the template.
- Note: The logo alignment point is the point of the logo that is used to position the logo on the template
- Note: In this case, the alignment point has been set to the top-left corner of the logo. The alignment point has been horizontally positioned 8 mm and vertically 55 mm from the template's origin.
- Note: The template's origin is the bottom-left corner of the template.
- Select the relevant image type options.
- Note: These are the file types that you can allow your customer to upload.
- Click Insert.
- Result: The logo is displayed on the rendered page.
- Note: When editing, this button is called Update.
 Logo and Logo Placement
 Logo Alignment Point and the Template's Origin
Stage 5: Adding Text that the Customer Cannot Edit
We will be adding a text field and text that customers cannot edit, move or delete.
Note: If, for example, all your text boxes disappear, it will be because a text box wasn't set up properly, or a field was left empty. To fix this, review the previous set of changes and ensure all relevant field values are correct and complete.
 The Address Field
- Under Text Objects, click 'Add new text object'.
- Result: The Edit Template page is expanded with controls for adding and editing a text object.
- Under 'Add Edit Text Objects', complete the Field Name field.
- Note: This field is mandatory. Ensure the field name is unique so that it cannot be confused with other fields.
- Note: I'm using this field for an address, so I have called it the Address field.
- Under 'Add Edit Text Objects', in the Default Content field, type what you want to see printed on the card.
- Note: The text I entered here was the address: 1 Reindeer Lane, North Pole.
- Select the relevant font, make any changes that you require and position the text where you want it to go.
- Note: ePrintcost comes with a range of options adjusting layout of the text, for example, you can specify the kerning, alignment and positioning of the text.
- Specify the colour space that you want to use, and complete the relevant colour fields.
- CMYK: To apply a CMYK colour, first select CMYK from the Colour Space dropbox, and complete the Cyan, Magenta, Yellow & Black fields.
- Spot Colour:To apply a spot colour, first select the relevant spot colour from the Colour Space menu, then in the Spot Colour field, specify the percentage of colour (screening) you require. If you want 100% spot colour, in the Spot Colour field, type 100. If you want, for example, a 50% tint or screen, in the Spot Colour field, type 50.
- Ensure that the Content Locked checkbox is selected.
- Note: This ensures that the customer cannot make any changes to this text.
- When you have finished setting up the text, click Insert.
- Result: The text is displayed on the rendered page.
- Note: If it's not quite right, you can carry on making changes. Click Update to display the changes you make.
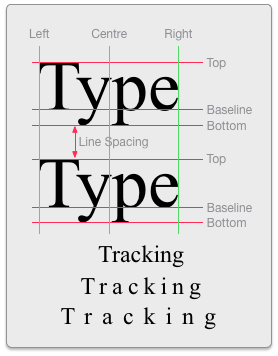 ePrintcost Typography Controls
Stage 6: Adding Text that the Customer Can Change
- Under Text Objects, click 'Add new text object'.
- Result: The Edit Template page is expanded with controls for adding and editing a text object.
- Under 'Add Edit Text Objects', complete the Field Name field.
- Note: This field is mandatory. Ensure the field name is unique so that it cannot be confused with other fields.
- Note: I'm using this field for a person's name, so I have called it the Cardholder field.
- Under 'Add Edit Text Objects', in the Default Content field, type what you want to see printed on the card.
- Note: The text I entered here was the name: Santa Claus.
- Select the relevant font, make any changes that you require and position the text where you want it to go.
- Note: ePrintcost comes with a range of options adjusting layout of the text, for example, you can specify the kerning, alignment and positioning of the text.
- Specify the colour space that you want to use, and complete the relevant colour fields.
- CMYK: To apply a CMYK colour, first select CMYK from the Colour Space dropbox, and complete the Cyan, Magenta, Yellow & Black fields.
- Spot Colour:To apply a spot colour, first select the relevant spot colour from the Colour Space menu, then in the Spot Colour field, specify the percentage of colour (screening) you require. If you want 100% spot colour, in the Spot Colour field, type 100. If you want, for example, a 50% tint or screen, in the Spot Colour field, type 50.
- To calculate the screening, use the following formula: Screening = A% x 255
- where A% = the required tint/screen expressed as a percentage
- for example, where A = 50, 50% x 255 = 127.5
Rounded to the nearest whole number = 128.
- Ensure that the Content Locked checkbox is not selected.
- Note: This ensures that the customer can make any changes to this text.
- When you have finished setting up the text, click Insert.
- Result: The text is displayed on the rendered page.
- Note: If it's not quite right, you can carry on making changes. Click Update to display the changes you make.
 The Completed Business Card
Uploading a Font
When creating a template, you can apply fonts that have been uploaded to the customer's ePrintcost site. Sometimes you may need a font that has not been uploaded. With ePrintcost, you can uploaded the required fonts to the customer's ePrintcost site, for example, a font that is integral or unique to the customer's branding.
Before you begin
Before uploading a font, ensure that:
- you are logged into ePrintcost, and
- the DesignOnline main menu is displayed.
- Note: To display the DesignOnline main menu, at the bottom of the page, click DesignOnline.
To upload a font:
- On the main menu, click Manage Fonts.
- Result: Two links, one for uploading Postscript Type 1 fonts, and the other for uploading Opentype and Truetype fonts are displayed. If there are any fonts already uploaded to the ePtrintcost site, these fonts will also be listed.
- Depending on the type of font you want to upload, click the relevant link.
- Result: The "Upload a… font" window is displayed.
- Note: The Postscript Type 1 font must be MS Windows compatible and have one of the following file extensions: *.pfb or *.pfm. Mac Postscript Type 1 fonts cannot be uploaded. You will need to convert the Mac Postscript font to a Windows *.pfb or *.pfm file if you want to upload it.
- Note: The acceptable file extension for Truetype fonts is *.ttf, and for Opentype fonts, the extension is *.otf. Truetype and Open type fonts can be uploaded from a Mac or PC.
- In the Font Name field, type the name of the font.
- Click Choose File, then locate and select the relevant font file.
- (If required) Complete the Font Allowance field.
- In most instances, leave the Font Allowance field as is. You only need to specify a font allowance when characters end up outside the basic font dimensions. Font allowance is only one way of fixing layout problems.
- Click Upload File.
- Result: The font file is uploaded into ePrintcost and a preview of the font is displayed.
What Next?
To display the list of fonts, including any that you have uploaded, click DesignOnline, then click Manage Fonts.
If you need to change the name of the font, click the relevant font, change the font's name, then click Update Font Parameters. You can also delete the font from this page by clicking 'Delete this Font'.
Editing a Template Page's Properties & Dimensions
Once you have set up a template, you can change the properties and dimensions of the template any time. While it is unlikely that you will do this for an existing template, you may want to, for example, change the dimension of a new template that was copied from an older template.
Changes that are made to a template do not flow through to any of the child documents.
You can:
- edit the Customer Code
- edit Printcost Quote Number
- select whether to gang jobs with the quote number
- edit the standard quantity of an order
- create a new tab on the Manage Document Templates page by specify a unique name in the menu field.
- Specifying the same name for a number of templates, will group these templates together under the same tab on the Manage Document Templates page. This is a useful way of organising a large number of templates.
- edit the template's name, description and more info fields.
- edit the finshed width and height
- edit the bleed
- edit the margin
- edit the tab width
- edit the number across and down
- edit the gutter across and down
- edit the imposed width and height
- edit the margins
- select whether you want centering of the signatures (template images) on the imposed sheet
- select whether to display crop marks
- select whether to show label text
- select whether the PDF preview can be printed
- specify the JPG preview resolution
- Specifying the JPG preview sets the size (onscreen dpi) of the Rendered Page preview.
- specify the thumbnail resolution
- This is the onscreen dpi of the thumbnail in the customer preview.
Before you begin
Before editing a template's properties or dimensions, ensure that:
- you are logged into ePrintcost, and
- the Manage Document Templates page is displayed.
- Note: To display the Manage Document Templates page, at the bottom of the page, click DesignOnline, then click Manage Templates.
To edit a template's properties or dimensions:
- On the Manage Document Templates page, click the relevant template's red name.
- Result: The template's pages and child documents (if any) are listed.
- Click the relevant template page.
- Result: The Edit Template Page is displayed.
- Under Guides and Document Settings, click Edit Dimensions.
- Result: All of the page's properties are displayed:
- Overtype the relevent properties or dimensions and/or select the relevant options.
- Click Update Template
- Result: The relevant changes are saved.
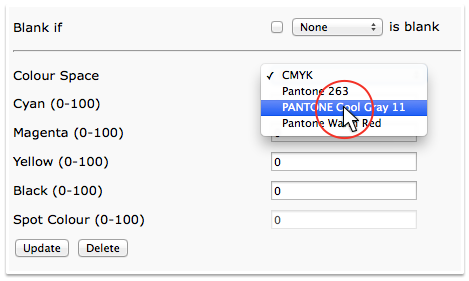 The Colour Space Dropbox
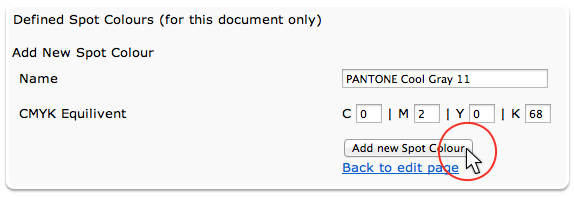
Adding a Spot Colour to the Colour Space Dropbox
With ePrintcost, you can add spot colours and easily apply them to text objects when creating or editing the text objects. The spot colours, once added, will be available from the Colour Space dropbox (right).
Note: The spot colours that you add to a template are only available for selection within that particular template. They won't be available to any other template unless the template is copied, in which case, the copy will inherit the original template's spot colours.
Background Images & Image Objects
When adding a spot colour to ePrintcost, the name of the spot colour must match the name of the corresponding colour that is embedded in any background image or image objects that you are using. This will ensure that elements of the same colour end up on the same separation.
Important: It is the spot colour that you specify by name that will be used for printing, not the process colour equivalent (CMYK values). The CMYK values that you enter (below) are used solely by ePrintcost for displaying (soft-proofing) your templates and child documents onscreen. For printing, please ensure that the spot colour's name is correct, and for soft-proofing within ePrintcost, please ensure that you have entered the corresponding process colour (CMYK) values.
Before you begin
Before adding a spot colour, ensure that, for the relevant template, the Edit Template page is displayed.
 Adding a Colour
To add a spot colour:
- On the Edit Template Page, under Guides and Document Settings, click Manage Spot Colours.
- Result: Any existing spot colours are listed, along with fields for adding a new spot colour.
- In the Name field, type the name of the spot colour.
- Note: If you have a background image or image object with the corresponding colour embedded, ensure the spot colour name that you enter here matches the name of the colour that is embedded in the image.
- In the CMYK fields, enter the corresponding process colour's values.
- The CMYK values that you enter here will only be used to display the text onscreen within ePrintcost. They will not be used for printing.
- Click 'Add New Spot Colour'.
- Result: The new colour is listed at the top of the page and will be available from the Colour Space dropbox.
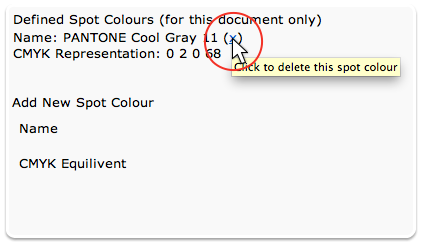
Deleting Spot Colours
To delete a spot colour, click the relevant colour's (x).
 Deleting a Colour
Generating Template Thumbnails
From time to time, changes that you made to, e.g., a template's thumbnail resolution may not update automatically. If the changes in your template are not reflected in your thumbnails, you can generate new thumbnails.
Before you begin
Before generating template thumbnails, ensure that:
- you are logged into ePrintcost, and
- the DesignOnline main menu is displayed.
- Note: To display the DesignOnline main menu, at the bottom of the page, click DesignOnline.
To generate template thumbnails:
- On the DesignOnline Main Menu page, click 'Regenerate Template Thumbnails'
- Result: The Generate Thumbnails page is displayed.
- (Optional) Select 'Reset thumbnail resolution for all templates first'.
- Note: This will set all thumbnails to the same size.
- Click 'Generate New Thumbnails Now'.
- Result: The thumbnails are generated.
Refeshing Document Names
From time to time, the document names of child documents may need updating. When adding a text object, you can nominate the text object as the naming field for the document. This means that content of a child document's naming field will be part of the document name. Refreshing the document names will marry the template name up with the naming field of each child document.
Before you begin
Before refreshing document names, ensure that:
- you are logged into ePrintcost, and
- the DesignOnline main menu is displayed.
- Note: To display the DesignOnline main menu, at the bottom of the page, click DesignOnline.
To refresh document names:
- On the DesignOnline Main Menu page, click 'Refresh Document Names'
- Result: The Refresh Document Names page is displayed.
- Click 'Refresh Document Names Now'
- Result: The list of document names is updated and you can view these wherever child documents are listed.
Troubleshooting
Error messages may automatically be displayed on clicking Update. Some errors cause the text and image objects to disappear while other errors cause the whole template to disappear.
| Problem | Possible Scenario | Solution |
|---|---|---|
| All my text boxes and images have disappeared. | A text object may have too much text in it, or the text object is too small, or the text object's boundary has expanded beyond the template's margins. | Revisit the previous text object that you added or edited and check the amount of text in it. As a quick check to see if this is the offending text object, cut most of the text out of the field, leaving one word, then click Update. If the text and image objects return, then you have found the troublesome text object. If it made no difference, paste the text back into the field where it came from, select another text object and try again. Once you have found the troublesome text object, Check and adjust the following settings until everything reappears:
|
| On clicking update, the template disappeared altogether and the following message was displayed. "An error has occurred: The administrator has been notified. Please go back and try again.. | A field may have been left empty when Update was clicked, for example, a Position value was deleted. | To redisplay the template, click DesignOnline,click Manage Templates, click the relevant template's name, click the relevant page (link), then select the relevant text or image object. Note: The field that was empty will have a value in it now, probably 0.00. |