
Overview
The inventory system integrates with the Purchase Orders module, so that goods received into the warehouse can be checked against the order. Similarly, when the invoice is received, this can be checked electronically against both the delivery note and the purchase order. The inventory enhances order planning by considering the quantity of stock on hand before creating purchase orders. It can also automate the issue of stock to jobs.
Non-Stocked Tickbox
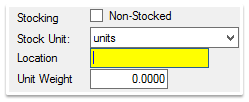 Non-Stocked Checkbox
When the Non-Stocked checkbox is selected for a particular item, the quantity of the item on hand is not tracked, or the item is a service. When not selected for an item, the quantity on hand is tracked by Printcost.
On this page:
Table of Contents:
Definitions
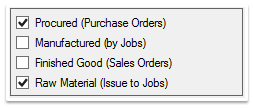 Fulfilment Options
On the Fulfillment window, you can select any or all of the following options:
Setting up a Custom Unit
With Printcost, if you want to sell, purchase, stock or price using a custom unit, e.g., a carton load of items, or a pallet load of cartons, you can. Even though you can also set up your quantities using one unit, you can also price them using another unit.
Before you begin
Before setting up a custom unit, ensure the Catalogue window is displayed. To do this, on the left-menu, click 'Inventory / Orders', then click 'Inventory / Catalogue'.
To set up a custom unit:
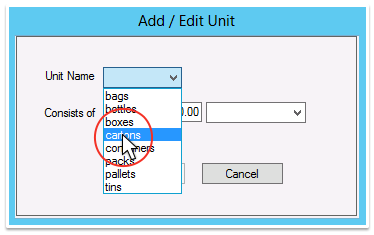 Add / Edit Unit Window
- On the Catalogue window (List view), search for and select the relevant catalogue item.
- Result: The details of the item are displayed.
- Click Fulfilment.
- Result: The Fulfilment details are displayed.
- Note: There four major quadrants to this window. They are Custom Units, Selling Details, Purchasing Details and Production Details.
- Under Custom Units, click Create Unit.
- Result: The Add / Edit Unit window is displayed.
- From the Unit Name dropbox, select the relevant unit name.
- In the 'Consists of' field, specify the number of items in the unit.
- In the adjacent dropbox, select the type of unit.
- Note: Custom units can be based on other custom units, e.g., a pallet unit can be made up of a number of carton units.
- Click OK.
- Result: The custom unit you created is listed under Custom Units.