
Centering Groups
As with flowgroups, the use of a centering group is a smart way to ensure your layout's fidelity is maintained. With centering groups, the justification of text within the group is automatically taken care of when the customer makes changes to the content of the text objects.
Use a centering group when you need to keep a horizontal row of text objects centred on the document. Irrespective of what your customer enters in a group's text object, the group of text objects will automatically centre itself on the same horizontal plane around a specified point.In the example below, there are seven text objects; four are editable by the customer. Irrespective of what the customer enters or changes, the group of text objects will re-centre itself automatically.
Note: Centering Groups is an advanced ePrintcost feature that is designed for a specific purpose. Please only use centering groups for the purpose described on this page. If you want to, for example, centre a set of vertically stacked text objects, please use Relative Positioning.
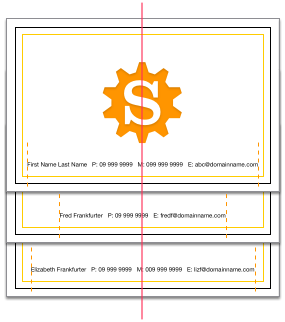 Irrespective of what the user changes, the group of text objects is automatically centred.
On this page:
Table of Contents:
What You Need to Know to Make a Centering Group Work
To get a centering group to work, there isn't much you need to know.
Create a Centering Group
Set up your centering group when you set up the group's first text object. You can set the position of the centering group relative to
- the left-bottom corner of the document (set the absolute position), or
- a point on another object (set a relative position), e.g., the centre of your logo.
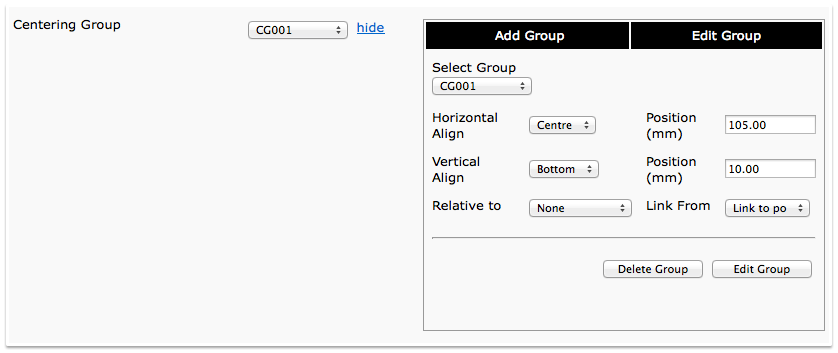
The following centering group was set up as part of the tutorial below. The document is 210 mm wide, so the centre of the group has been placed horizontally 105 mm from the left edge of the document (which is also 105 mm from the right edge of the document). The bottom of the centering group has been set 10 mm from the bottom edge of the document. That is, the group has been given an absolute position.
 Centering Group
Assign the Text Objects to the Centering Group
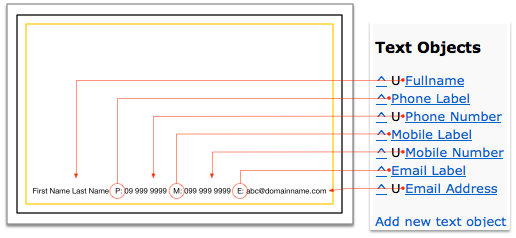
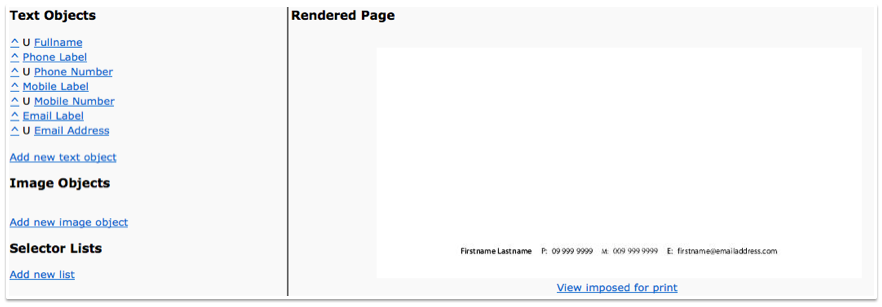
Ensure that all of the text objects you want centered in a group are assigned to the group. The following picture shows a set of text objects that are laid out using the centering group. All of these text objects are assigned to the same centering group.
 Text Objects
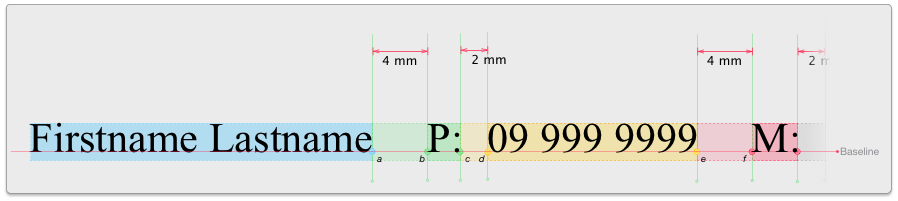
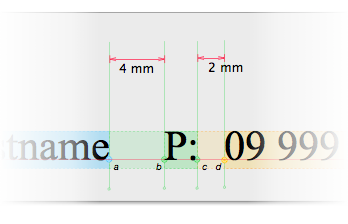
The following picture shows each text object (with the exception of the first one) offset from the text object to its left by either 4 mm or 2 mm, depending on whether it is a label or a field. For example:
- The phone label's Point b is offset from the fullname field's Point a by 4 mm
- The phone number's Point d is offset from the phone label's Point c by 2 mm
- The mobile label's Point f is offset from the phone number's Point e by 4 mm
 Text Objects
Note: The assumption here is that a name will always be printed on the card. Without the name, the group will not be centered.
Tutorial: Creating a Centering Group of Text Objects
One or more text objects can be assigned to a centering group. In the child document, the centred group of text objects automatically re-centres itself each time the customer updates the content of a text object. Multiple text objects can be centered horizontally, or vertically in relation to a position relative to the bottom left corner of the template, or another text object. Used in combination with flowgroups, you can set up a range of text labels and fields that automatically adjust their positions while remaining centred relative to whatever object or point you choose.
In this tutorial, we will be creating:
- a template
- a centering group, and
- seven text objects
Three of the text objects will be labels that the customer cannot edit, and four of the text objects will be fields that the customer can edit. A centering group called CG001 will be set up when setting up the first text object. The remaining text objects will be assigned to CG001 as they are set up.
Last of all, we will set each contact label to be displayed/printed only when the customer has included the relevant contact value (number or email address) in the child document
The text objects will:
- sit side by side, separated by a 4 mm space between field and label, and a 2 mm space between label and field
- aligned vertically using the baseline, and
- will be centered horizontally on the template.
 Distances
Note: This tutorial assumes that you are familiar with creating text objects and positioning them. If you are not, please try the Flowgroup tutorial first.
To create a centering group of text objects:
- Set up a new template 210 mm wide x 100 mm high.
- Note: You can of course set the template to the dimensions you want, but to follow this tutorial, we will be using a template that is 210 mm x 100 mm.
- Click 'Add New Text Object', and use the information below to set up the text object called Fullname.
- Note: You may have to select a different font if you don't have the font used in this tutorial.
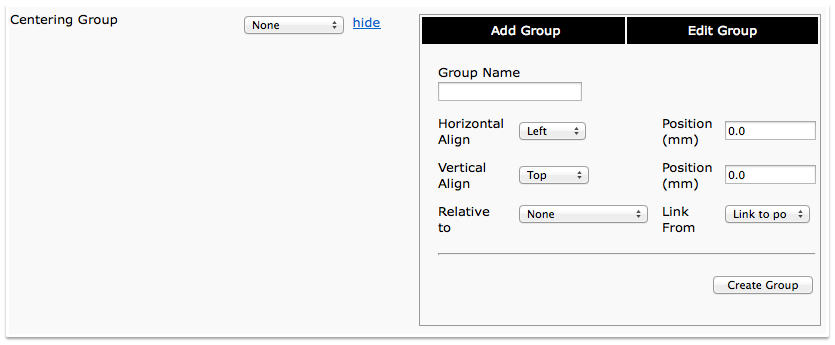
- Under Centering Group, click 'add/edit group'.
- Note: If you clicked 'Insert' to complete the set up of the Fullname field, ensure the Fullname field's details are displayed before clicking 'add/edit group'.
- Result: The Centering Group section is expanded.
- In the Group Name field, type a name for the group.
- Note: For this tutorial, call it CG001
- From the Horizontal Alignment dropbox, select 'Centre' and position the group horizontally at 105 mm.
- Note: 105 mm is half the width of this template.
- From the Vertical Alignment dropbox, select Bottom and position the group vertically at 10 mm.
- Note: We are positiong the centering group relative to the lower-left corner of the template, but you can center it relative to other objects in your templates.
- Click Create Group.
- Result: You will be informed that the group was added. It will be available from the Centering Group dropbox.
- Note: Your settings should look like the ones pictured below.
- From the Centering Group droplist, select CG001.
- Click Insert
- Result: The Fullname text object is saved and assigned to the flowgroup
- Note: If the Insert button is not displayed, click Update.
- Click 'Add New Text Object', and use the information below to set up the text object called Phone Label.
- Note: You may have to select a different font if you don't have the font used in this tutorial.
- Click Insert
- Result: The Phone Label text object is saved and assigned to the centering group.
- Click 'Add New Text Object', and use the information below to set up the text object called Phone Number.
- Click Insert
- Result: The Phone Number text object is saved and assigned to the centering group.
- Click 'Add New Text Object', and use the information below to set up the text object called Mobile Label.
- Click Insert
- Result: The Mobile Label text object is saved and assigned to the centering group.
- Click 'Add New Text Object', and use the information below to set up the text object called Mobile Number.
- Click Insert
- Result: The Mobile Number text object is saved and assigned to the centering group.
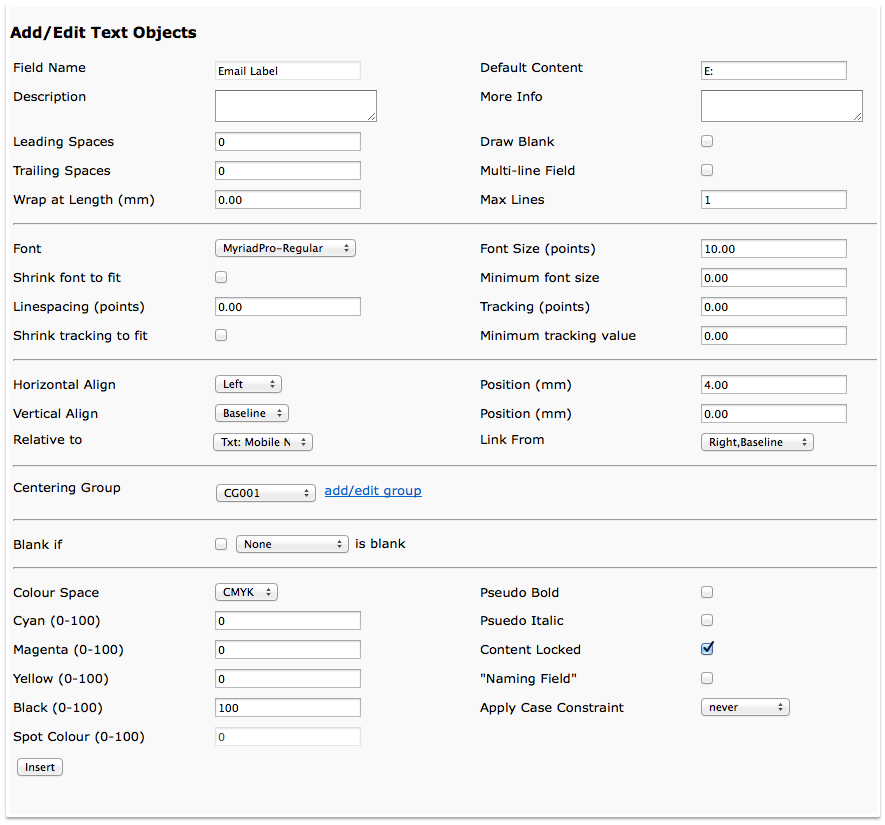
- Click 'Add New Text Object', and use the information below to set up the text object called Email Label.
- Click Insert
- Result: The Email Label text object is saved and assigned to the centering group.
- Click 'Add New Text Object', and use the information below to set up the text object called Email Address.
- Click Insert
- Result: The Email Address text object is saved and assigned to the centering group. Your rendered page should look like the following picture.
- Note: If your rendered page is too small, at the bottom of the page, click 'Edit Dimensions' and set a larger value under JPG Resolution. I set mine to 72. Once you have set this value, click 'Back to Page'.
- Note: Although it looks like we have finished, there are a few more things to do.
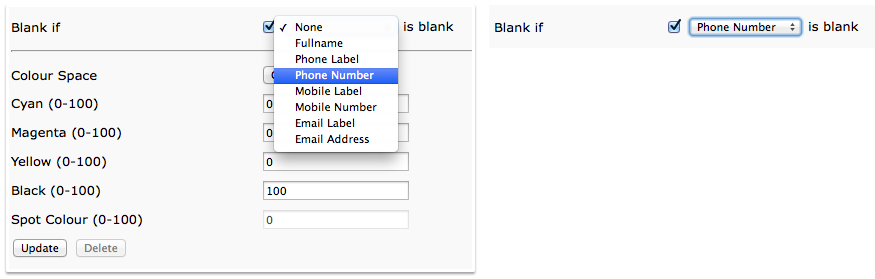
- Click Phone Label, select (tick) the checkbox, then from the 'Blank if' droplist, select Phone Number.
- Note: This ensures the label is not displayed/printed when the customer leaves the Phone Number field empty.
- Click Update.
- Click Mobile Label, select (tick) the checkbox, then from the 'Blank if' droplist, select Mobile Number.
- Note:This ensures the label is not displayed/printed when the customer leaves the Mobile Number field empty.
- Click Update.
- Click Email Label, select (tick) the checkbox, then from the 'Blank if' droplist, select Email Address.
- Note: This ensures the label is not displayed/printed when the customer leaves the Email Address field empty.
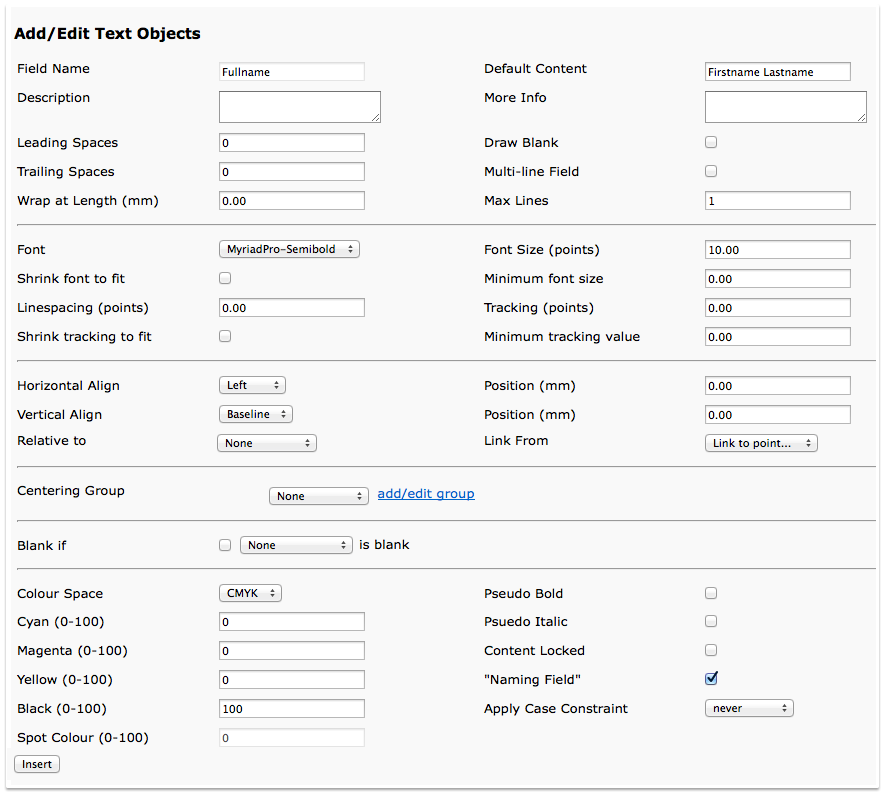 Fullname Text Object Settings
 Two Positioned Text Objects
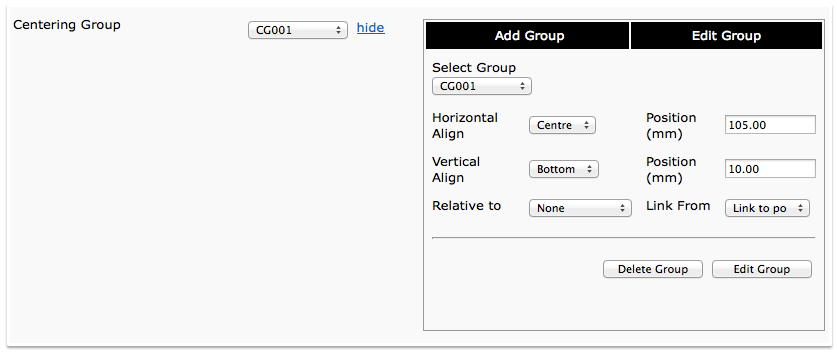 Centering Group Settings
 Phone Label Text Object Settings
 Phone Number Text Object Settings
 Mobile Label Text Object Settings
 Mobile Number Text Object Settings
 Email Label Text Object Settings
 Email Address Text Object Settings
 Text Objects and Rendered Page
 Text Objects and Rendered Page
What's Next?
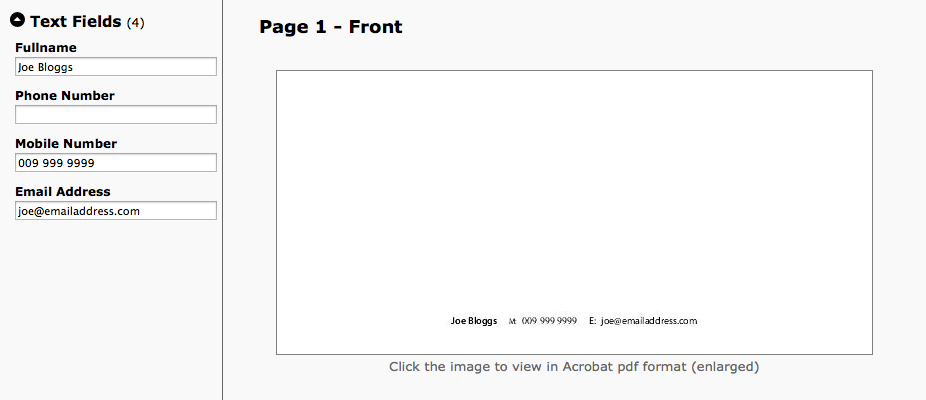
To see what the customer sees, create a new child document.
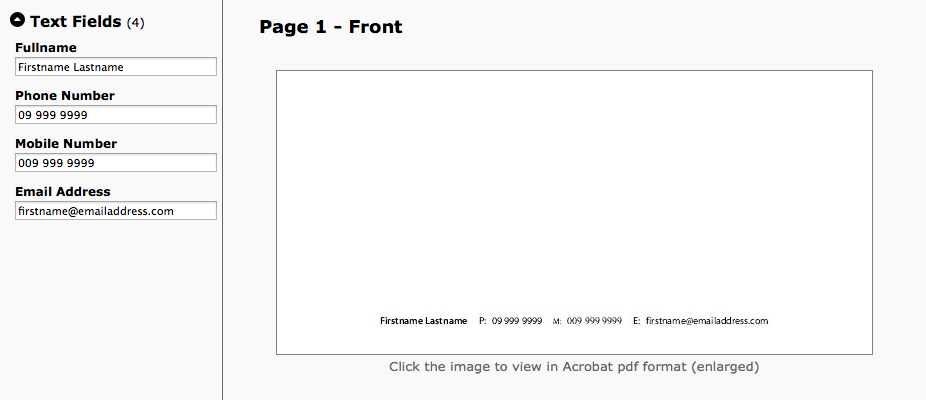 Child Document
The customer can edit the email address. On clicking 'Update & Save Preview', the changes will be reflected onscreen with the updated email address and the url, as a group being re-centred.
 Edited Child Document