
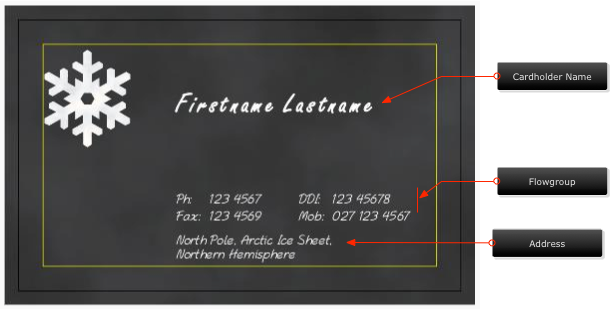
Flowgroups
Note: Only use Flowgroups if you're moving template objects both horizontally and vertically, otherwise using Relative To fields will suffice. While the Flowgroup would still do the job, it would be unnecessarily overcomplicating the template.
On the Relative Positioning page, you were shown how gaps between text objects can close automatically when the customer deletes a field's contents. In this case, the text objects were positioned relative to each other. This is fine for some scenarios, however, sometimes a finer degree of control is required. When using a flowgroup of placeholders, it is the placeholders that are positioned; not the text objects. When the text objects are assigned to the flowgroup they automatically populate the placeholders.
With ePrintcost's Flowgroup feature you can set up a number of placeholders so text objects automatically relocate themselves (flow) from one placeholder to another. The placeholders can be positioned anywhere on the document.
Only use a flow group when you need to control where text objects are to be relocated on the page.
Note: Flowgroups is an advanced ePrintcost feature that is designed for a specific purpose. Please only use flowgroups for the purpose described on this page. If you want to simply close a gap when the customer leaves a field empty, try Relative Positioning. In particular, have a look at "What You Need to Know to Make Relative Positioning Work".
 When the customer leaves some of the contact details in a child document out, the remaining text objects automatically relocate themselves (flow) from one placeholder (fixed location) to another.
On this page:
Table of Contents:
- What is a Flowgroup
- What Your Customer Sees
- What You Need to Know to Make a Flowgroup Work
- Tutorial: Creating a Flowgroup
What is a Flowgroup
Introduction
A flowgroup is a set of placeholders that text objects can be assigned to. The flowgroup determines where these text objects are displayed within the document.
Example
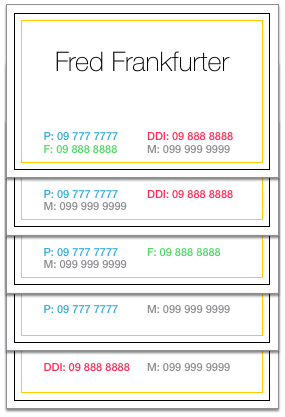
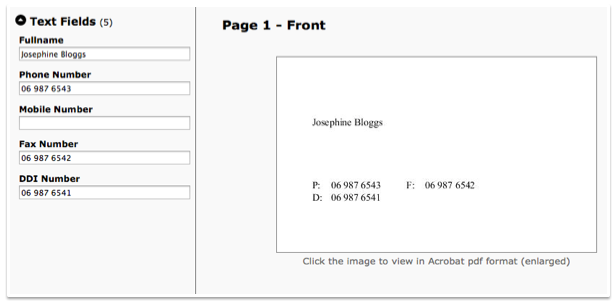
The following picture shows a child document with the contact details (eight text objects) laid out using flowgroup placeholders. The placeholders are never visible. Only the contact details that have been entered in the fields to the left will be displayed on the document. In this example, the location of the Fullname field is not determined by the flowgroup, and is therefore not part of the flowgroup.
 Five Fields Populated by Customer
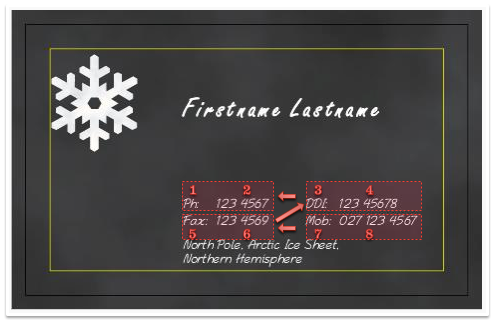
The following picture shows eight coloured regions. The regions are where we expect the:
- labels to be displayed, and
- The regions for the labels correspond to Placeholders 1, 3, 5 and 7.
- customer's copy, e.g., contact details to be displayed
- The regions for the fields correspond to Placeholders 1, 3, 5 and 7.
 Text Regions - Where we expect the contact details to be displayed in a child document.
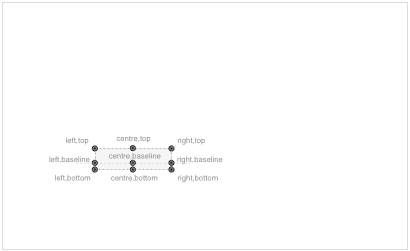
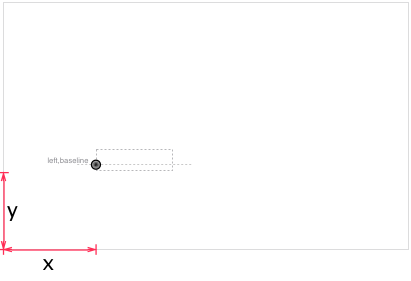
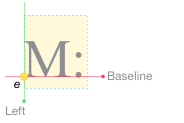
Technically, these regions are not the placeholders because they do not exist. The placeholder is actually a single point in space that you specify when laying out a flowgroup. When specifying this point:
- first choose where this point will be relative to the anticipated text object, e.g., to the left-baseline of the text object, then
- specify the co-ordinates for this point.
Any one of nine points (relative to the anticipated text object) can be chosen.
 A Single Placeholder Region and Available Points
In the example below, I chose the left-baseline point of each region, which means the text will always be to the right of this point and positioned vertically at the baseline.
 Placeholder Points
If, for example below, you choose the left-baseline point of the region (that will be filled by a text object), then when you set the co-ordinates for the placeholder, you will be setting the coordinates of this point.
 Placeholder Point Coordinates
If you change the co-ordinates of this point (see below), the placeholder shifts to a new location.
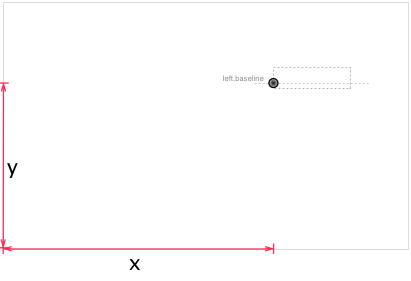 Placeholder Point - Change in Coordinates
The advantage of using flowgroups is that you can position your placeholders anywhere, and the text fields in the child document will fill the placeholders accordingly. That is, the text objects will appear to flow from one placeholder to another depending on how many are used by the customer.
 Placeholder Points Placed on a Curve
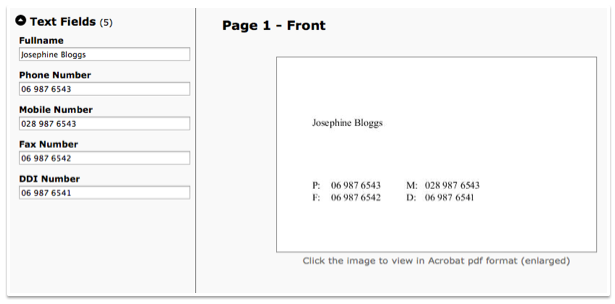
What your Customer Sees
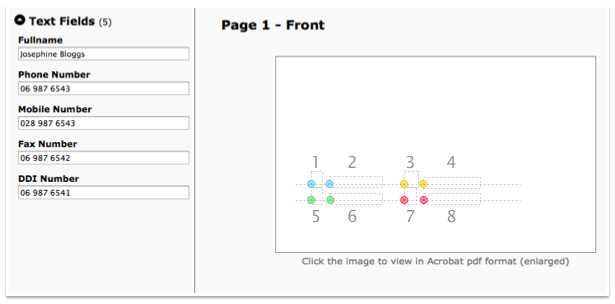
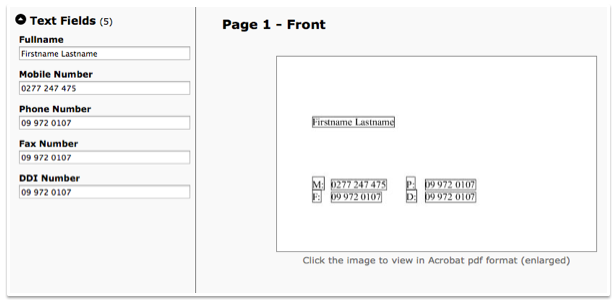
Once you have set up a flowgroup, you can assign a set of text objects to it. For example, in the child document below, there are nine text objects: four of the text objects are labels (P:, M:, F: and D:) and five are customer editable text objects that contain the person's name and contact numbers. To the left, the five editible text objects have been populated. To the right they are all displayed. The contact details are displayed in the order that was set up in the template and displayed at the coordinates set up within the flowgroup.
With the exception of the Fullname field, the remaining text objects (contact labels and fields) are all assigned to the same flowgroup. The first placeholder (filled with the characters 'P:' ), is set relative to a point on the Fullname text object. If the Fullname text object is moved within the template, the contact labels and fields will move relative to the Fullname field.
Five Fields Populated by Customer
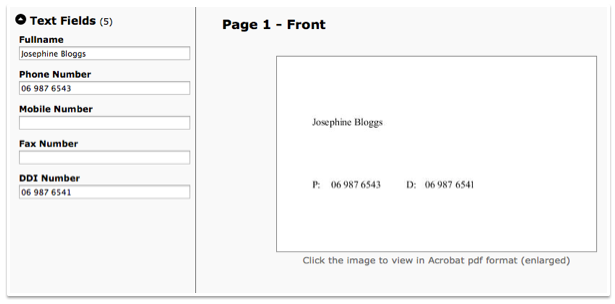
When the customer deletes the mobile number and clicks 'Update & Save Preview', both the label 'M:' and the cell phone number disappear and the fax label and fax number text objects automatically fill the third and fourth placeholders respectively. The direct dial text objects automatically fill the fifth and sixth placeholders.
 One Empty Field
When the customer deletes the fax number and clicks 'Update & Save Preview', both the label 'F:' and the fax number disappear and the direct dial number automatically fills the third and fourth placeholders.
 Two Empty Fields
Reordering Text Objects
The picture below shows the Edit Template Page with nine text objects that have been set up. They are:
- Fullname
- Phone Label
- Phone Number
- Mobile Label
- Mobile Number
- Fax Label
- Fax Number
- DDI Label
- DDI Number
With the exception of the Fullname field, all the other text objects are assigned to the one flowgroup.
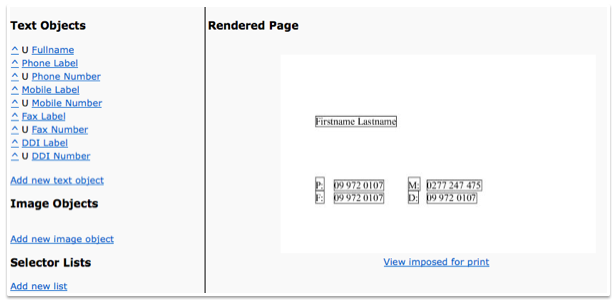 Edit Template Page
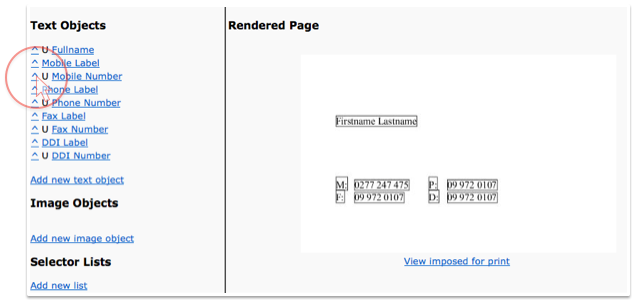
The order in which the objects are listed in the rendered page (above right) is determined by the order in which they are listed under Text Objects (above left). If you rearrange the order of text objects, for example, if you move the mobile label and mobile number up to the top of the list on the left (below left), the mobile label and number moves to the top of the list on the rendered page (below right).
Note: In this example, the mobile label and mobile number have been moved up the list by clicking the objects' up arrow.
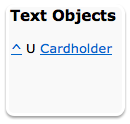
Note: The letter U indicates that the text object is unlocked, that is the textbox can be edited by the customer.
 Edit Template Page
And, this is what the customer sees. The fields are re-ordered, and the mobile label and mobile field are now the first set of contact details to be displayed.
 Fields Rearranged
What You Need to Know to Make a Flowgroup Work
Setting up a flowgroup, involves setting up flowgroup placeholders. A text object that is assigned to the flowgroup will have its location determined by one of the flowgroup placeholders. A placeholder's point can be set relative to:
- a point on the document
- a point on a text object, or
- a point on another placeholder.
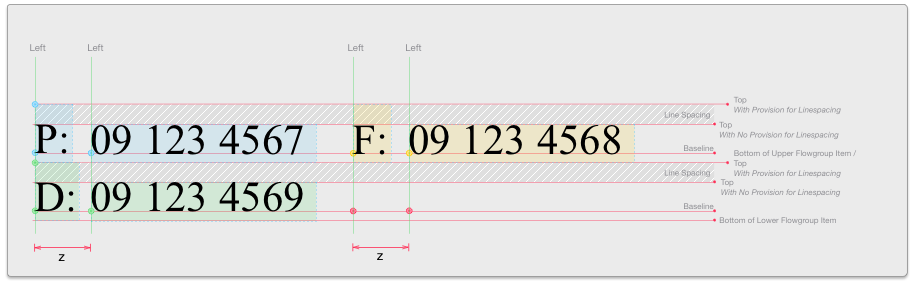
Example 1: Contact Labels and Contact Numbers Are Vertically Aligned
Flowgroup Setup
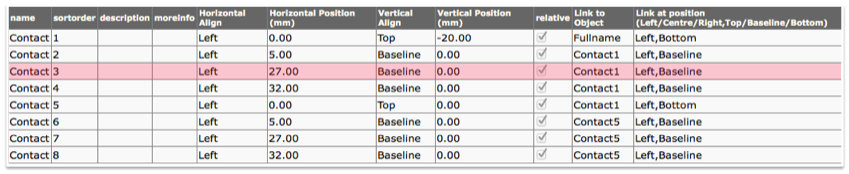
The following table shows the flowgroup setup for eight placeholders. These placeholders will be used for a set of contact details. The aim in this example is to ensure vertical alignment of the contact numbers, irrespective of a contact labels' widths.
 A Flowgroup Set Up for vertical alignment of contact labels and contact numbers.
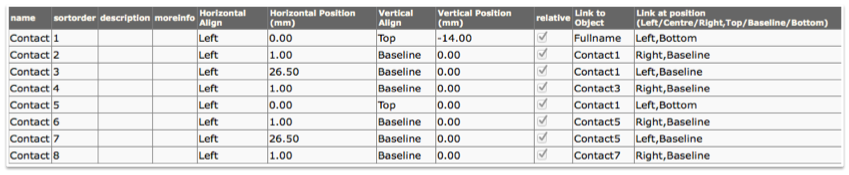
How to Interpret the Flowgroup Table
 The Intersection of Horizontal Align (Left) & Vertical Align (Baseline)
A row in the table above has been highlighted pink to show you what each item means.
- Name
- In this example, 'Contact' is the name given to the flowgroup to which this placeholder belongs. All placeholders that are assigned the same name, belong to the same flowgroup.
- Sort Order
- The sort order determines the sequence of placeholders. The highlighted placeholder 'Contact3' above is the third placeholder in the list. In this example, the placeholder is set up to position a contact label. The contact labels will consist of one letter and a colon. Assuming the customer completes all of the contact details when creating a child document, the Mobile Label will fill this placeholder.
- Horizontal Align & Vertical Align
- By choosing horizontal align and vertical align values, e.g., Left & Baseline you will be deciding which of the placeholder's points (Point e) will have its co-ordinates specified by the horizontal position and vertical position values. In this example, Point 'e' will be the intersection of the placeholder's left edge with the placeholder's baseline.
- Horizontal Position & Vertical Position
- Together, these values specify the coordinates of point 'e' relative to another point. The placeholder will travel with point 'e'. In this example, the horizontal position value sets Point 'e' 27 mm from Point 'b'. Both points are on the baseline.
- Relative
- This checkbox is selected to ensure that Point 'e' will be set relative to the point of another object. In this example, it is set relative to Point 'b' of Contact1.
- Link to Object
- This is the other object from which our placeholder is set. It can be another object, e.g., text object, or another placeholder. In this example, the other object is a placeholder 'Contact1'. 'Contact1' is specified by combining the placeholder's name (contact) with the sort order (1). When combining these values, do not include any spaces
- Link at Position
- Our placeholder (Contact3) needs to be set relative to a point on placeholder 'Contact1'. In this case it is set to Point 'b' which is the intersection of Contact1's left edge with Contact1's baseline.
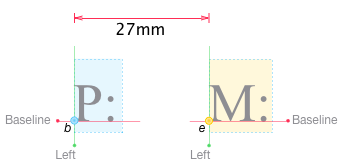 Contact1's Point 'b' and Contact3's Point 'e'.
Placeholder Points
 Placeholder Points
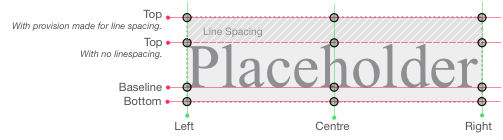
With Printcost, you can choose from the following points of a placeholder or text object.
- Left,Top
- Left,Baseline
- Left,Bottom
- Centre,Top
- Centre,Baseline
- Centre,Bottom
- Right,Top
- Right,Baseline
- Right,Bottom
Ensure there are no spaces (e.g., between the comma and the word that follows) when entering the placeholder name.
Note: The top of the placeholder will be determined by the amount of linespacing specified in the text object that fills the placeholder. If there is no linespacing, the top will be the top of the typeface's ascenders. The bottom will always be the bottom of the typeface's descenders.
Bringing It All Together
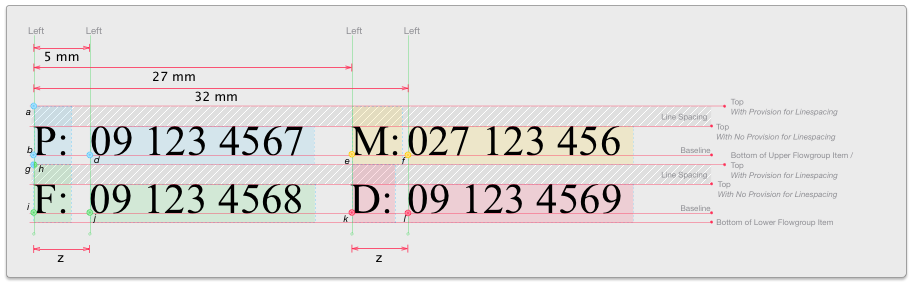
In the example (above and below):
- the first placeholder's point a is left-aligned to a text object called 'Fullname' by a horizontal Position of 0. It sits 20 mm below the Fullname field thanks to the Vertical Position of -20.
- Note: The Fullname text object is not shown in the illustration below. To see an example of the Fullname field, scroll up to the previous topic.
- the second, third and fourth placeholder points (d, e & f respectively) are set relative to the left baseline of the first placeholder (point b) by 5 mm, 27 mm and 32 mm respectively.
- the fifth placeholder point h is set relative to the left-bottom of the first placeholder (point g).
- Note: With no offsets, these points g and h share the same location.
- the sixth, seventh and eight placeholder points (j, k & l) are set relative to the left-baseline of the 5th placeholder by 5 mm, 27 mm and 32 mm respectively.
Note: With the above setup, a fixed distance (z) separates each contact label from its adjacent contact number. This ensures that the contact numbers have vertically aligned left edges.
Note: The width of the placeholder is not specified. Only the position of each placeholder is specified
Note: The placeholders are the points. The coloured regions indicate what will happen when text objects are assigned to the placeholders.
The following diagram is indicative of the above flowgroup setup.
 Flowgroup with Four Contact Details
Note: The line spacing is added to the text objects; not the flowgroup's placeholders. In this example, the line spacing is only added to the labels and not the fields, because each field is always accopmpanied by a text label. You can add the line spacing to every text object if you want to.
When the customer leaves one of the contact details empty, the following diagram illustrates how the fixed distances are maintained.
 Flowgroup with Three Contact Details
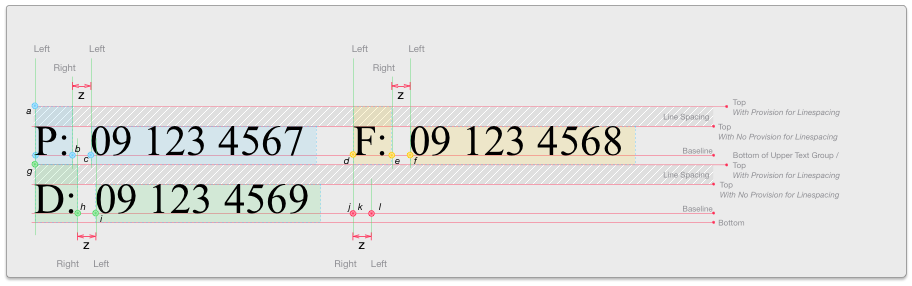
Example 2: Only Contact Labels Are Vertically Aligned
Fixed Width Between Contact Labels and Contact Numbers
The following table shows a 1 mm distance between the right of each contact label and the left of the corresponding contact numbers.
 Fixed Width Between Contact Labels and Contact Numbers
The following picture shows the left edges of the contact label placeholders vertically aligned. There is a 1 mm gap (distance z) specified between the right side of the contact label placeholders and the left side of the corresponding contact number placeholders. This means that the contact numbers may not be vertically aligned, but will always be offset distance (z) from the right of the contact labels.
 Contact Labels Left Edges Always Vertically Aligned
When the customer leaves one of the contact details empty, the following diagram illustrates how the fixed distance (z) is maintained.
 Distance 'z' is Maintained
Note: Point K collapses onto Point J because there is no text object to give it any width.
Tutorial: Creating a Flowgroup
In this tutorial, we will start with a variation of the business card that was created on the Basic Templates page. Firstly, we will set up two text objects; one for the cardholder name and one for the address. The assumption is that for this business, there is only one address and it does not need to be edited by the customer. Also, because it's position is not going to change, it does not have to be part of the flowgroup.
 Rendered Page
To this business card, we will add a flowgroup made up of six placeholders. These placeholders will be used to position the following text objects:
- Phone Label
- Phone Number
- DDI Label
- DDI Number
- Fax Label
- Fax Number
- Mobile Label
- Mobile Number
The contact detail text objects won't be linked to the flowgroup until after the flowgroup placeholders have been set up.
Before you begin
Before creating a flowgroup, ensure that:
- you are logged into ePrintcost
- the relevant Edit Template page is displayed
- you have decided on the position of the flow group and the direction you want the text objects to flow.
Direction of Flow
In the picture below, when the customer leaves the Fax number field empty, the Mobile contact details will relocate themselves to placeholders 5 and 6 respectively. If the DDI number field is also left empty, the Mobile contact details will relocate themselves to placeholders 3 and 4 respectively.
 The Flowgroup Direction for this Tutorial
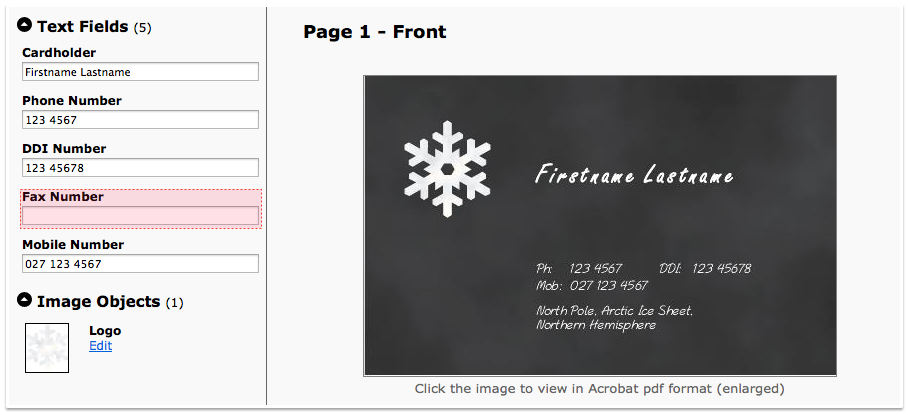
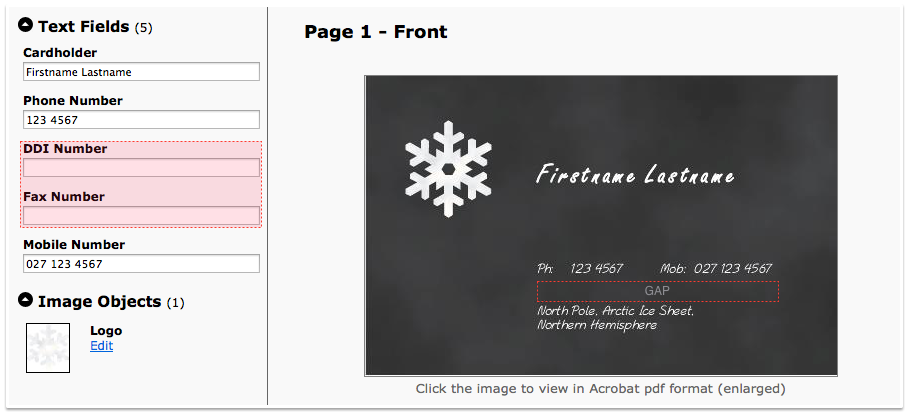
This does highlight a problem that needs to be resolved. That is, if there are only two contact details, they will fill placeholders 1 to 4, and this will create an undesirable gap between the contact details and the address (below-left).
With some relative positioning applied within the flowgroup, we can close the gap automatically (bottom-right).
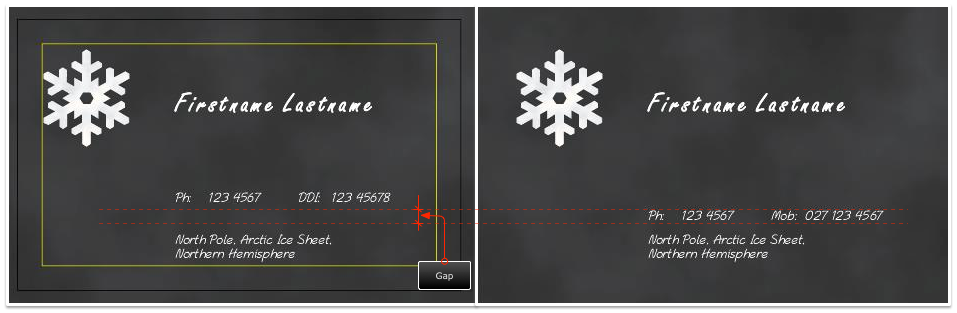 Gap (Left), Gap Closed (Right)
Before creating the flowgroup, we will also set up the following text objects:
- Cardholder
- Address
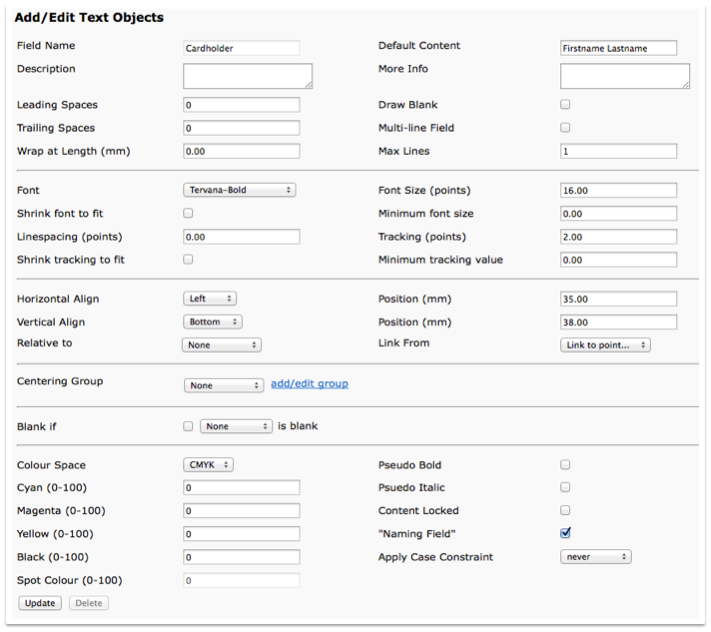
Cardholder Text Object
Set up the Cardholder text object using the information below.
 Cardholder Text Object
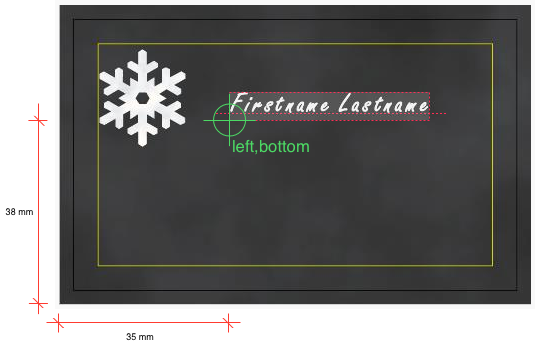 Rendered Page Showing Repositioned Cardholder Text Object
 Cardholder Text Object - Alignment and Positioning Values
Address Text Object
Using the information below, set up the Address text object relative to the Cardholder text object.
Note: In this example I have set the left-bottom point of the Address text object relative to the left-bottom point of the Cardholder text object.
 Rendered Page Address Text Object Set Relative to the Cardholder Address Object
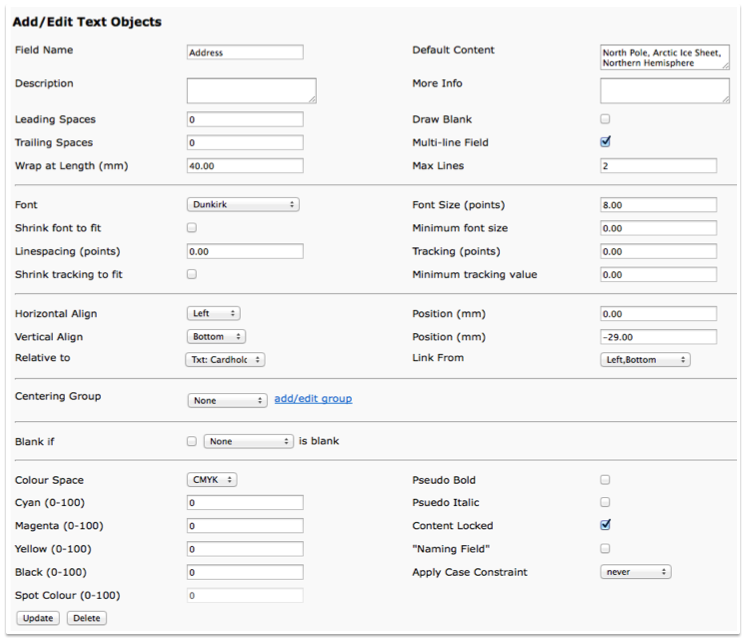 Cardholder Text Object - Alignment and Positioning Values
To add the first flowgroup placeholder:
Follow these steps to add the first flowgroup placeholder.
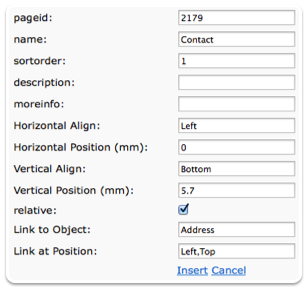 Edit Template Page
- At the bottom of the Edit Template page, click 'Edit Flowgroups'.
- Result: Two links are displayed. They are called 'New' and 'Return to edit template...'
- Click New.
- Result: A list of fields is displayed.
- Note: These fields determine the position of the first flowgroup item.
- Complete the following fields using the information to the right.
- PageID: The actual Page ID is displayed at the bottom of the list. In this example, it's 2179, but on your screen it will be a different number. Enter the Page ID number from your screen into the PageID field.
- Name: In the Name field, type the flowgroup name. The name can be whatever you want; but only use alpha characters; do not use numerals. For this tutorial, type 'Contact'.
- Sort Order: Ensure that this number is unique. For the first flowgroup placeholder, type '1'. You can change the sort order at any time.
- Horizontal Align: In this example, the left edge of the text that will fill this placeholder will be aligned with the left edge of the Address text object. Type 'Left'
- Horizontal Position (mm): We do not want the text object that fills this placeholder to be offset from the left edge, so the horizontal position from the left edge is zero. Type '0'
- Vertical Align: The bottom of the text object that fills this placeholder will be offset from the top of the Address text object. Type 'Bottom'.
- Vertical Position: In this example, the left-bottom of this placeholder will be offset 5.7 mm from the top of the Address text object. Type '5.7'.
- Relative: Select (tick) this option.
- Link to Object: This is the text object that the placeholder's position is being offset from. Type Address.
- Link at Position: Because we are offsetting the left-bottom of the placeholder from the left-top of the Address text object, type 'Left,Top'. Ensure there is no space between the comma and the words.
- Click Insert.
- Result: The flowgroup item is displayed in table format.
 Flowgroup Placeholder Settings
Complete the Flowgroup
Using the information below, set up the remaining placeholders for this flowgroup.
Note: Ensure the PageID you enter matches what is displayed on your screen; not what is displayed below.
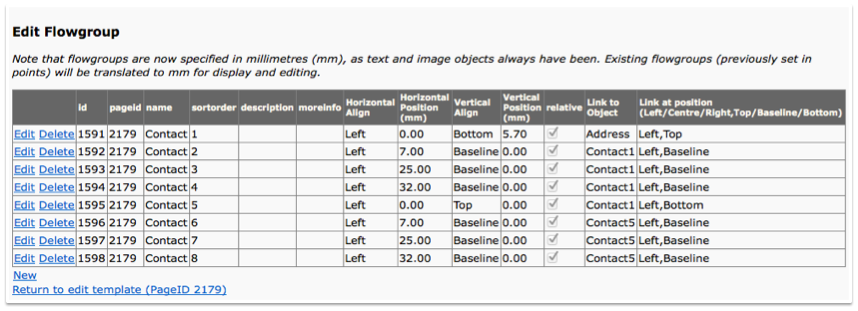 Flowgroup Placeholder Settings
Whats Next?
Now that the flowgroup has been set up, it's time to add the text objects that will fill the flowgroup's placeholders.
Add Text Labels & Text Fields
It's time to add the text fields that will fill the flowgroup placeholders.
With the Phone Label seat up, using the information from the tables below, add the remaining text objects:
- Phone Number
- DDI Label
- DDI Number
- Fax Label
- Fax Number
- Mobile Label
- Mobile Number
Note: With regard to all the other field values and controls, we will leave them as they are for this tutorial.
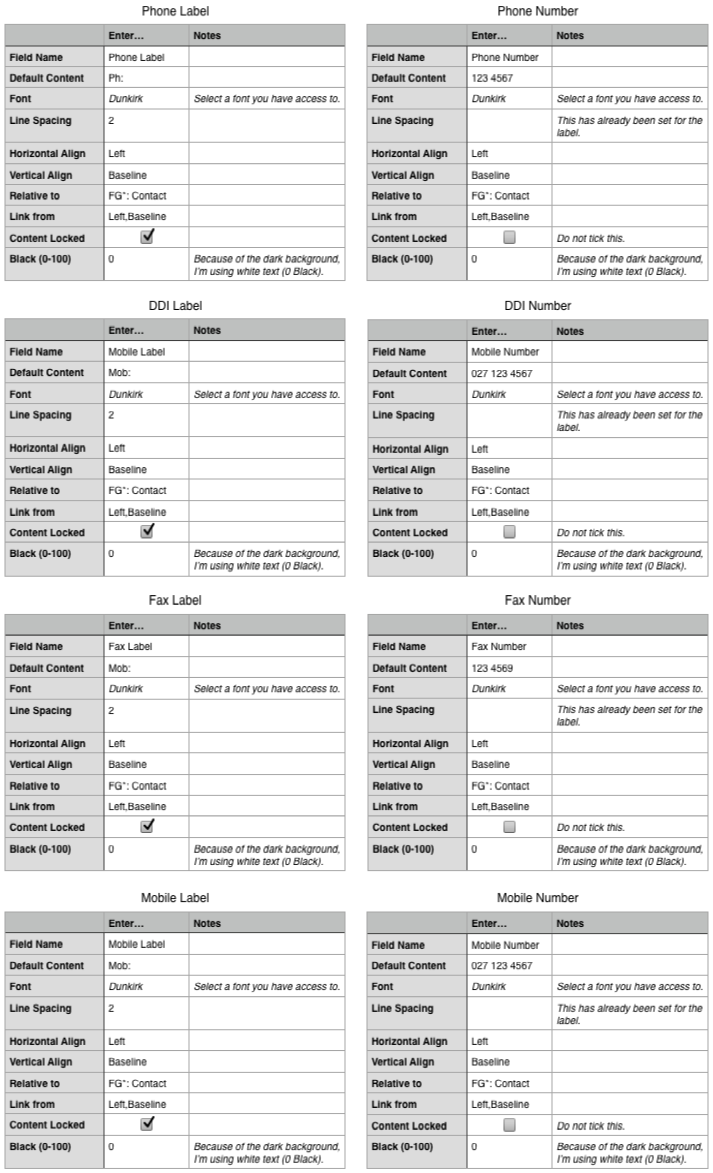 Text Object Data
Your list of text objects and their layout should look like this:
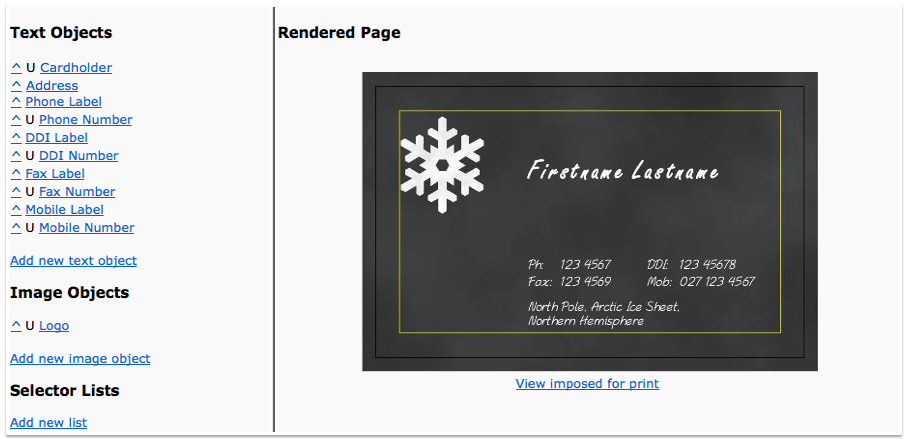 Text Fields Added
What's Next?
Test the template by creating a child document. When the user creates a document from this template and leaves a phone, mobile or fax number field empty, the corresponding label will be hidden, and any gaps will be closed up automatically.
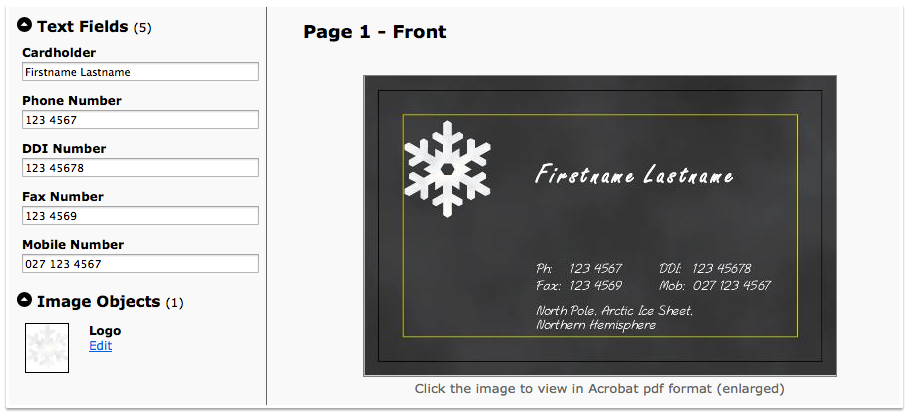 A User-Editable Child Document
 A User-Editable Child Document; No Fax
 A User-Editable Child Document; No Fax, No DDI
What's Next?
The last thing to do is apply a few changes to the flowgroup so that when there are only one or two contact details, these contact details migrate to placeholders 5, 6, 7 & 8, respectively thereby eliminating the undesirable gap between the contact details and the address.
Edit the flowgroup and make the changes that are highlighted pink below.
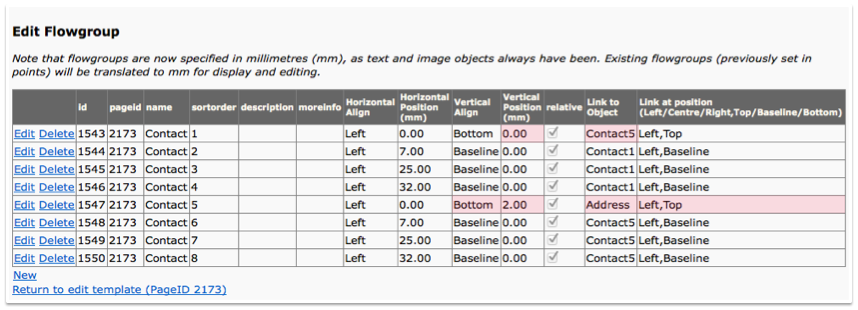 Flowgroup Placeholder Settings
Note: The left-bottom point of placeholder 5 (Contact5) will be offset 2 mm vertically from the left-top of the address. The left-bottom point of placeholder 1 (Contact1) will be positioned relative to the top-left point of placeholder 5. When there are only two fields populated by the customer, these two fields and their labels will automatically migrate:
- from placeholders 1 through 4
- to placeholders 5 through 8.
What's Next?
Test the template by creating a child document. When the user creates a document from this template and leaves a phone, mobile or fax number field empty, the corresponding label will be hidden, and any gaps will be closed up automatically.
 A User-Editable Child Document
 A User-Editable Child Document; No Fax
 A User-Editable Child Document; No Fax, No DDI, and No Gap