
Multiple Backgrounds
Multiple Backgrounds Using One Set of Customer Details
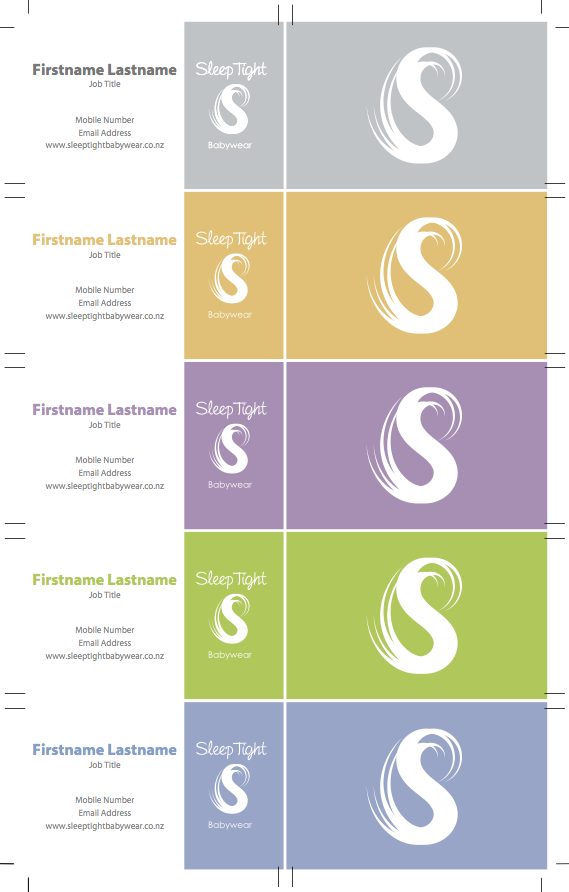
Sometimes you'll want to style a document a number of different ways, but keep the information the same. For example, the PDF on the right is for a set of business cards for one person, with each of the five cards styled differently.
Finished Width, Bleeds, Margins and Crop Marks
When setting up a template for multiple backgrounds you won't be using ePrintcost to set the bleed, margins and crop marks. Instead, these need to be built into the background image (PDF file) that you prepare.
Consequently, when specifying the finished dimensions within ePrintcost, you will need to enter the overall dimensions of the pdf file or paper that you are going to print on.
On this page:
Table of Contents:
Setting Up a Multiple Background Template for Business Cards
 Cards Printed on Different Backgrounds
In this tutorial, we will be setting up a template that allows the customer to enter their contact details once, and for these contact details to automatically populate multiple text box instances. This will be done by:
- setting up a number of primary text objects that will serve as the data source, and
- a number of secondary text objects that will take their content from the data entered into the corresponding primary text objects (data source).
Background Image
To follow this tutorial, you will need a background image file with five variations of the background. You can download the following PDF file used in this tutorial.
Primary Text Objects
Firstly, we will be adding a set of primary text objects. These text objects are the ones customers will use to enter their name and contact details when setting up a child document.
We will be giving these primary text objects the following names:
- Name
- Mobile
- URL
Secondary Text Objects
Second, we will be adding the secondary text objects:
- that will automatically populate themselves with the data entered into the corresponding primary text objects, and
- which can be individually styled using, for example, different colours, fonts and/or position.
We will be giving these secondary text objects the following names:
- Name02, Name03, Name04, Name05
- Mobile02, Moblie03, Mobile04, Mobile05
- Email02, Email03, Email04, Email05
- URL02, URL03, URL04, URL05
Styling each Coloured Card
Each card has a different coloured background, so each of the five 'Name' text objects will use a colour that matches the corresponding card's background colour. That is, the:
- xxxx02 text objects will be positioned 60 mm above their primary counterparts
- xxxx03 text objects will be positioned 60 mm above their xxxx02 counterparts
- xxxx04 text objects will be positioned 60 mm above their xxxx03 counterparts, and
- xxxx05 text objects will be positioned 60 mm above their xxxx05 counterparts.
Note: Alternatively, if the quantity of contact details printed is to vary from cardholder to cardholder, e.g., some people leave out the email address, then relative positioning can be used to automatically close any gaps in the child document that are created when contact details are left out.
Before you begin
Before setting up a multiple background template, ensure that your background image (PDF background file) is ready to upload from your computer into ePrintcost. You can download the following PDF file used in this tutorial.
Note: Your background file should include crop marks and its dimensions should be set to the size of the stock that you will be printing on.
Stage 1: Setting Up the Template
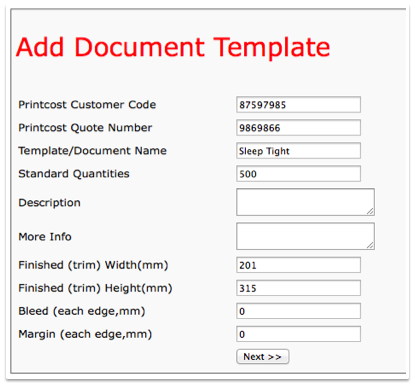
- On the Manage Document Templates Page, click 'Create New Document Template'.
- Result: The Add Document Template page is displayed (pictured below).
- Complete the relevant fields and set the dimensions.
- The dimensions are the dimensions of the PDF image. Your file should include crop marks, so you can leave the bleed and margin fields as they are (0).
- Click Next.
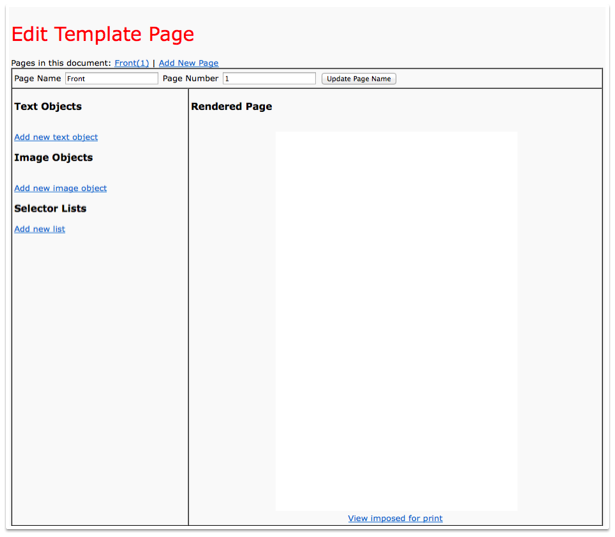
- Result: The Edit Template Page is displayed.
- Note: You can change the dimensions at any time by clicking the Edit Dimensions link (under Guides & Document Settings).
- Note: The entire blank document is displayed.
 Add Document Template
 Edit Template Page for a template with the BleedBox, Crop Box and Margin Box options selected.
What Next?
Import your background image.
Stage 2: Importing the Background Image
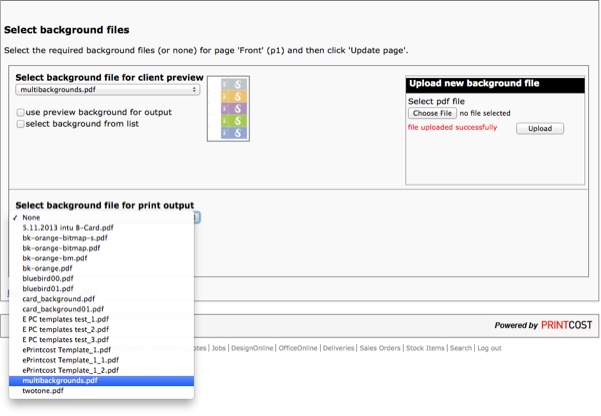
- At the bottom of the page, under Guides and Document Settings, click Edit Background.
- Result: You will be asked to select a background.
- Note: For this tutorial, a background image has been prepared and saved as a PDF. Only PDF files can be uploaded for use as a background image.
- To the right of the window, click Choose File, browse to the location of the file and select it.
- Result: Adjacent to the Choose File button, you will be informed that the file has been selected.
- Click Upload.
- Result: You will be informed that the file was uploaded successfully.
- If not automatically selected, from the two droplists on the left, select the background image file that you uploaded.
- Note: These drop lists are called 'Select Background File for Client Preview' and 'Select Background for Print Output.'
- Click Update Page.
- Result: The Edit Template Page displays the uploaded background image.
 Uploaded Background File Selected
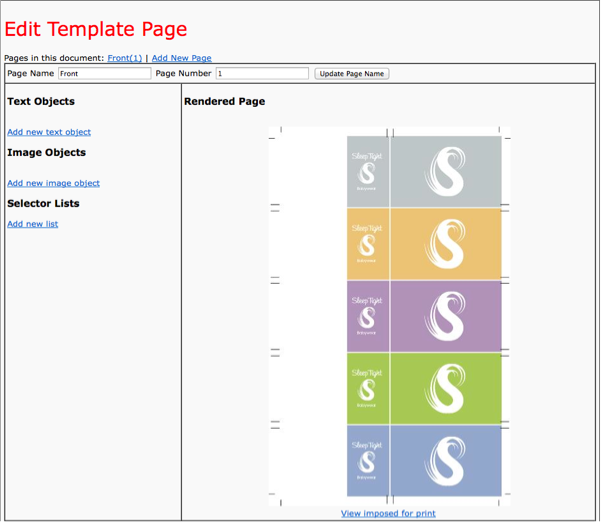 Edit Template Page for a template with the background uploaded.
Note: You can also make adjustments to the size of the preview image. To do this, scroll to the bottom of the page, click Edit Dimensions, and change the value in the JPG Preview Resolution field, e.g. 72 or 100. Click 'Back to Page' to see your enlarged (or smaller) background image.
Stage 3: Adding a Primary Text Object
- Under Text Objects, click 'Add new text object'.
- Result: The Edit Template page is expanded with controls for adding and editing a text object.
- Under 'Add Edit Text Objects', complete the Field Name field.
- Note: This field is mandatory. Ensure the field name is unique so that it cannot be confused with other fields.
- Note: I'm using this field for a person's name, so I have called it the Name field.
- Under 'Add Edit Text Objects', in the Default Content field, type what you want to see displayed in the child document.
- Note: The text I entered here was 'Firstname Lastname'. This is placeholder text that will be replaced by the customer when creating a child document.
- Select the relevant font, make any changes that you require and position the text where you want it to go.
- Note: I positioned all my primary text objects on the card at the bottom of the sheet. You can start at the top if you want to. In my case, I wanted to simplify my data entry so that I could position the first set of secondary text objects +60 mm from the corresponding text objects below them. I also wanted to minimise having to scroll up the window to check the positioning.
- Specify the colour space that you want to use, and complete the relevant colour fields.
- Ensure that the Content Locked checkbox is not selected.
- Note: This ensures that the customer can make any changes to this text.
- For the first text object that you set up in this template, select (tick) the Naming Field option.
- From time to time, the document names of child documents may need updating. Refreshing the document names will marry the template name up with the naming field of the document. When adding a text object, you can nominate the text object as the naming field for the document. This means that content of a child document's naming field will be part of the document name.
- When you have finished setting up the text, click Insert.
- Result: The text is displayed on the rendered page.
- Note: If it's not quite right, you can carry on making changes. Click Update to display the changes you make.
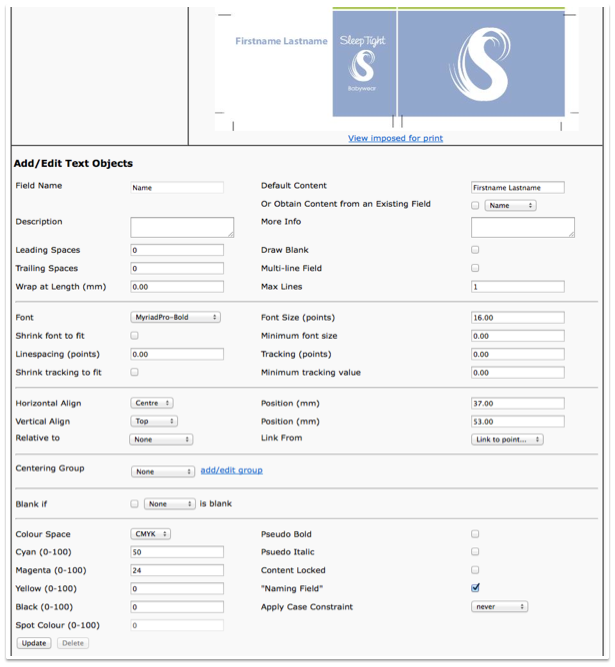 The First Primary Text Object
 Name Field Set Up
Stage 4: Adding the Remaining Primary Text Objects
Set up the remaining primary text objects. For this tutorial I set up three more primary text objects. In total, I now have the following primary text objects:
- Name
- Title
- Mobile
If you need help, refer to Stage 3. above
Note: Do not select the 'Naming Field' for the remaining text objects. Only the first text object, e.g., 'Name' is the naming field. That is, do not repeat Stage 3, Step 7. for the any other text objects.
 All Primary Text Objects Set Up.
Stage 5: Adding a Secondary Text Object
Follow these steps to add the first secondary text object. We will call it Name02.
- Under Text Objects, click 'Add new text object'.
- Result: The Edit Template page is expanded with controls for adding and editing a text object.
- Under 'Add Edit Text Objects', complete the Field Name field.
- Note: This field is mandatory. Ensure the field name is unique so that it cannot be confused with other fields.
- Note: For this tutorial, I'm calling this text object Name02.
- Under 'Add Edit Text Objects', select (tick) the 'Or Obtain Content from...' checkbox
- Note: By ticking the checkbox, this 'Name02' will obtain its content from another field.
- Note: Leave the Default Content field empty.
- From the adjacent droplist, select 'Name'.
- Note: Name was the first field we set up. By selecting 'Name', 'Name02' will obtain its content from the 'Name' field.
- Select the relevant font, make any changes that you require and position the text where you want it to go.
- Note: In this tutorial, I set positioned 'Name02' 60 mm above 'Name'.
- Specify the colour space that you want to use, and complete the relevant colour fields.
- Ensure that the Content Locked checkbox is not selected.
- Note: This ensures that the customer can make any changes to this text.
- When you have finished setting up the text, click Insert.
- Result: The text is displayed on the rendered page.
- Note: If it's not quite right, you can carry on making changes. Click Update to display the changes you make.
 Obtain Content From an Existing Field
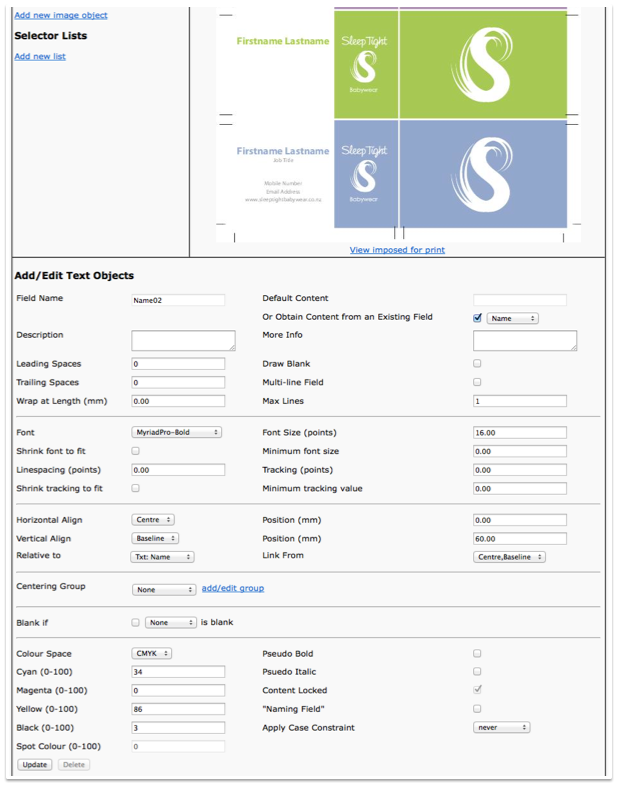 Name02 Text Object & Settings
 All Text Objects – Primary & Secondary.
Stage 6: Adding the Remaining Secondary Text Objects
Set up the remaining secondary text objects.
If you need help, refer to Stage 5. above
In total, I now have the following secondary text objects:
- Name02
- Name03
- Name04
- Name05
- Title02
- Title03
- Title04
- Title05
- Mobile02
- Mobile03
- Mobile04
- Mobile05
- Email02
- Email03
- Email04
- Email05
I set up all the related fields relative to each other. That is, I positioned text object:
- 'Name02' 60 mm above 'Name'
- 'Name03' 60 mm above 'Name02'
- 'Name04' 60 mm above 'Name03'
- 'Name05' 60 mm above 'Name04'
Similarly, I positioned text object:
- 'Title02' 60 mm above 'Title'
- 'Title03' 60 mm above 'Title'
- 'Title04' 60 mm above 'Title'
- 'Title05' 60 mm above 'Title'
Click 'View Imposed for Print' to display a PDF of the sheet.
 View Imposed for Print - The template is ready.
Stage 7: Testing the Child Document
Create a child document, and replace the content of the primary text objects (fields). On clicking 'Update & Save Preview', you should end up with something like the following:
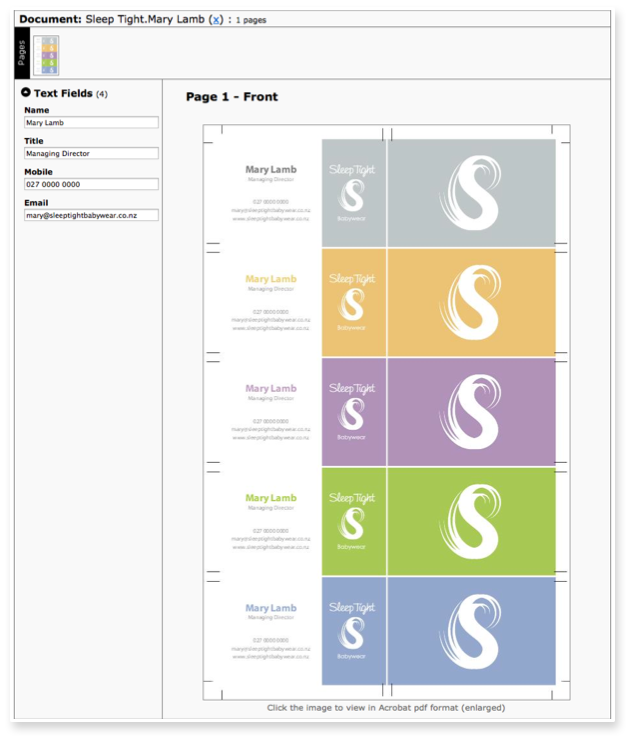 Updated Child Document