Selector Lists
On the Basic Templates page, you were introduced to some of the basic features that can be used to create a simple template. With ePrintcost, you can also use ePrintcost's Flowgroup feature to set up text objects that move relative to each other, depending on whether the text objects are populated with text.
You can also set up a template so your customer can:
- select a background image from a list
- select image from a list
- select text from a list
- add text to one or more centred text objects, with ePrintcost automatically centering the updated text when the user clicks Update, and
- upload their own image file
On this page:
Table of Contents:
- Creating a Selector List of Background Images
- Creating a Selector List of Floating Images
- Creating a New Selector List of Text Items
- Creating an Image Placeholder for Customers to Replace
Creating a Selector List of Background Images
With ePrintcost, you can upload background files for your templates. You can:
- upload a PDF image just for rendering onscreen
- Note: For example, if a customer does not want to see crop marks, or wants the onscreen RGB colours to more closely match the print output, you can upload a PDF that will not be used for print but looks better when rendered as an onscreen preview when compared with rendering the actual print file.
- upload a PDF image just for print output
- Note: For example, if you have uploaded a PDF specifically for onscreen preview, for example it uses RGB colours or is devoid of, e.g., crop marks, you will need to upload a corresponding CMYK file suitable for print output.
- upload a PDF image that can be used for rendering onscreen and for print output
- Note: This file will require CMYK colours which will be rendered onscreen using corresponding RGB colours.
- upload a number of background image options suitable for both onscreen preview and print for the customer to select when creating a child document.
The steps below show you how to upload background images and create a list from which the customer can choose a background image.
Two Stage Process
Creating a selector list first involves creating the initial image object (with a default image). Once the image object is created, the selector list can be set up.
Before you begin
Before creating the initial image object, ensure that:
- the relevant Edit Template page is displayed, and
- your background images are ready to upload from you computer into ePrintcost.
Stage 1: Uploading the Initial (Default) Background Image
Follow these steps to upload an image that will be displayed as a background onscreen when the customer creates a new child document.
- At the bottom of the Edit Template Page, click 'Edit Background'.
- Result: The Select Background Files window is displayed.
- Upload a default image for the image object.
- Note: To do this, under Upload New Background File, click Choose File, locate and select the relevant image file, then click 'Upload'
- From the 'Select Background Field for Client Preview' dropbox, select the uploaded file.
- Result: The image is selected and will be displayed onscreen when the customer creates a child document.
What Next?
Set up the selector list.
Stage 2: Setting up the Selector List of Background Images
- On the template's 'Select Background Files' window, select (tick) the 'Select Background from List' option.
- Next to Image Source, click Select From List.
- Result: The page is expanded and a table of options is displayed.
- Click Create List.
- In the List Name field, type the name that you want to call the list.
- Add your images to the list.
- Note: To load an image file, click Choose File, locate and select the image file from your computer or server, then click Add Image. Only one image can be loaded at a time.
- Result: The images are listed as the are added.
- Click Save.
- Result: The selector list is saved.
- Click Update Page.
- Result: The selector list is applied to the template.
What Next?
If you want to see the selector list that you created, create a child document.
Creating a Selector List of Floating Images
A floating image is an image, e.g. a company logo, that can be placed on your template at a location you chose. If you set up a selector list of floating images, e.g. vartiations of the logo, then customers can select the relevant image when creating a child document.
The image below shows the default image and two other options that the customer can choose from when creating a child document.
In the child document, on clicking the image object's Edit link, the selector list is displayed. The user selects the relevant image option, clicks in the grey area outside the selector list, then clicks 'Update & Save Preview' to replace the current image with the selected image,
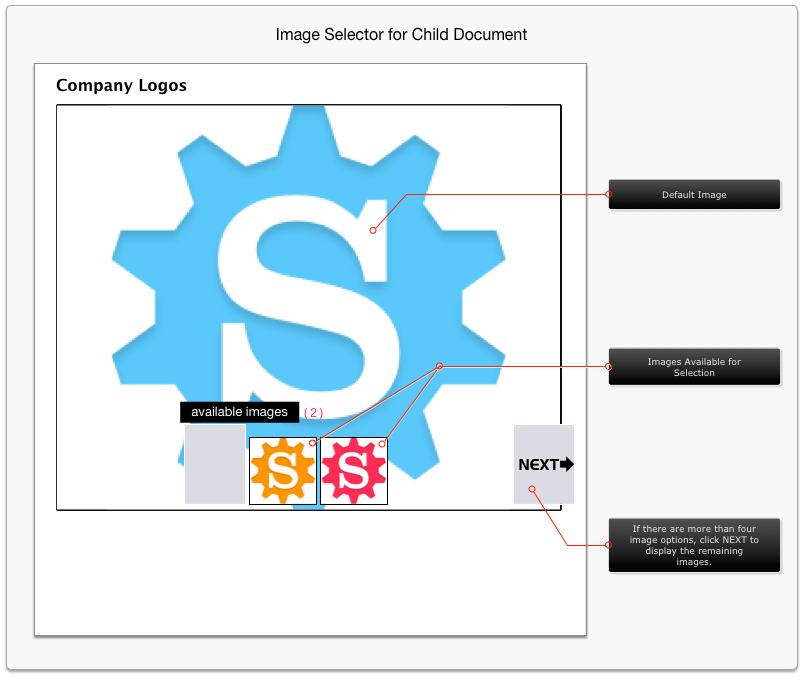 Image Selector List as Displayed in a Child Document
Two Stage Process
Creating a selector list first involves creating the intial image object (with a default image). Once the image object is created, the selector list can be set up.
Before you begin
Before creating the intial image object, ensure that:
- the relevant Edit Template page is displayed, and
- your images are ready to upload from you computer into ePrintcost.
 Uploaded Image File
Stage 1: Creating the Initial Image Object
- On the Edit Template Page, click 'Add new image object'.
- Result: The page is expanded to include fields for creating the image object.
- In the Field Name field, Type the name of the image object.
- Example: Company Logo
- Note: Ensure the 'Content Locked' check remains unselected. If it is selected, the customer will not be able to change the image.
- Upload a default image for the image object.
- Note: To do this, click Choose File, locate and select the relevant image file, then click 'Save File'
- If relevant, set the width and height of the image and constrain the proportions.
- Note: If the image file does not have it's dimensions embedded in the file, you may have to set the dimensions for the image. If you constrain the proportions of the image, then irrespective of the dimensions entered, the image will retain its original proportions and it's longest dimension will be limted to the smallest of the two dimensions that you enter in the width and height fields. For example, if the image is 50 mm x 50 mm, and you constrain the image to, e.g., 20 mm x 40 mm, the image will be displayed at 20 mm x 20 mm.
 Example: 20 mm x 20 mm Image Object
 - Set the position of the image object.
- Click Insert
- Result: The image object is created and displayed on the rendered page.
- Note: You may have to edit the position and alignment of the image object before setting up the selector list. You can do it later, but it's good practice to sort these details out now.
What Next?
Set up the selector list.
Stage 2: Setting up the Selector List of Floating Images
- If not already displayed, on the Edit Template page, click the name of the new image object.
- Result: The page is expanded and the image object's details are displayed.
- Next to Image Source, click Select From List.
- Result: The page is expanded and a table of options is displayed.
- Click Create List.
- In the List Name field, type the name that you want to call the list.
- Add your images to the list.
- Note: To load an image file, click Choose File, locate and select the image file from your computer or server, then click Add Image. Only one image can be loaded at a time.
- Result: The images are listed as the are added.
- Click Save.
- Result: The selector list is saved.
- Click Update.
- Result: The selector list is applied to the template.
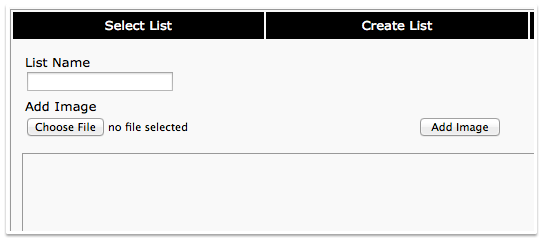 Create List
Note: Sometimes ePrintcost needs to be refreshed in order to for you to see the changes you have made. If under Select List, your list is not available from the dropbox, click Refresh.
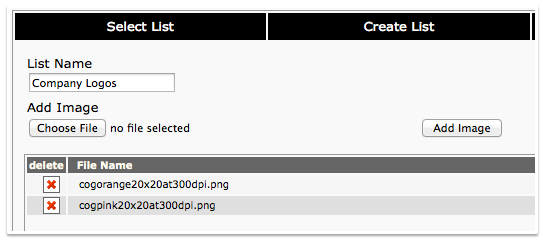 Two Image Files Loaded into the List
What Next?
If you want to see the selector list that you created, create a child document.
Creating a New Selector List of Text Items
Selector lists are commonly used for choosing address details from a list. For example, if a company has more than one branch, all branches' address details can be put into a list for selection by the customer when creating a new child document.
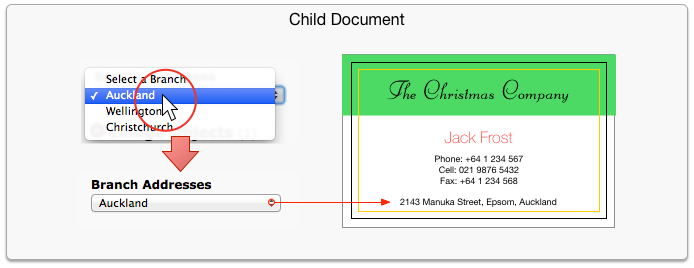 Selecting, e.g., a company branch, e.g. Auckland Branch from a selector list, inserts the relevant address into the child document.
Before you begin
Before creating a selector list, ensure that:
- you have created the text object that is to be turned into a selector list, and
- To do this create a text object field that can be edited by the customer and make a note of this text object's name. In the example used in this topic, a text object called Addresses was created and positioned at the bottom of the child document (business card).
- the Edit Template page is displayed for the relevant template.
To create a selector list:
Follow these steps to creat a new selector list.
- Click Add New List
- Result: The Add Selector List to Current Page page is displayed.
- In the 'Call my new list' field, type the name of the list.
- Note: For example, Branch Addresses. This will become the name of the selector list in the child document.
- Click Next>>.
- Note: Ensure you click the relevant Next>> button. Because we are creating a new list from scratch, click the first Next>> button.
- Result: The Edit Selector List Fields page is displayed. Because this is a new list, there will be no fields in the list.
- In the empty field, type the name of the text object (field), then click Add New Field.
- Note: This is the name of the text object field that you created earlier. Ensure that what you enter matches the text object's name, including capitalisation. In this example, the text object was called Addresses, so that is what was entered here.
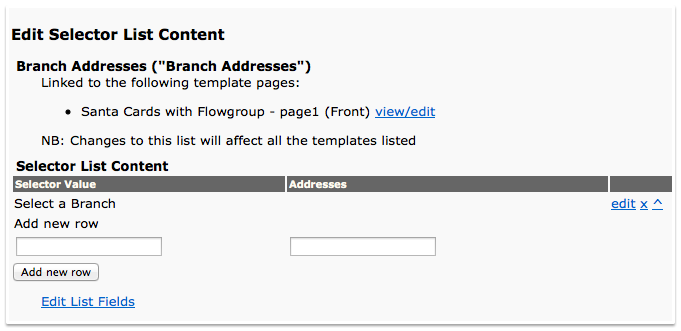
- Click Edit List Content.
- Result: The Edit Selector List Content page is displayed with an empty row and a set of empty fields. At the end of the empty row is a set of links. They are 'edit' 'x' and '^'
- (Optional) At the end of the empty row, click 'edit'. In the Edit Row field, type an instruction, e.g., 'Select a Branch', then Click Update Row Content.
- Note: This will be the first item in the selector list. The Address field was left empty, but you could put something like "Address to be Selected". In this example, we are using the first item to let the customer know that they have to choose a branch from the list. If you leave it empty, the original text object's content will be displayed in the child document until an address is selected.
- In the In the first empty field, type the name of the list item.
- Note: That is, enter the name of the item that your customer will be selecting from the list. For example, if the company has three branches in different cities, then a city's name should do.
- In the adjacent field, type the information that will be printed on the document.
- Note: For example, this may be an actual address.
- Click Add New Row
- Result: The values you entered are displayed above another set of empty fields.
- Do you have another item to add to the list?
- If Yes, go to Step 7
- If No, go to Step 11
- Note: When you have finished adding items to the list, your page should look something like the picture below.
- In the top part of the page, click View/Edit
- Result: The relevant Edit Template Page is displayed and the new selector list is listed under Selector Lists.
 Edit Selector List Fields Page
 Empty Selector List
 Using the First Item to Inform the Customer
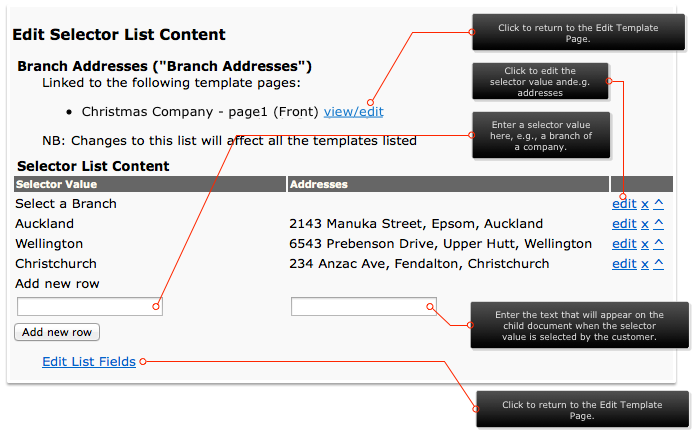 Completed Selector List
 Completed Selector List
What Next?
To see the selector list, create a new child document.
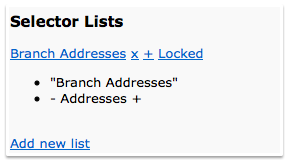
To edit the selector list, click the name of the selector list, e.g., Branch Addresses
To delete the selector list, click the underlined x.
To unlock the selector list, click Locked.
Note: Unlocking the selector list adds another item called 'Edit Fields Manually' to the child document's selector list. With Edit Fields Manually selected, the original text object's value is displayed in the child document and is editable by the customer. That is, the customer can type in any address they like and this will be displayed/printed on the child document.
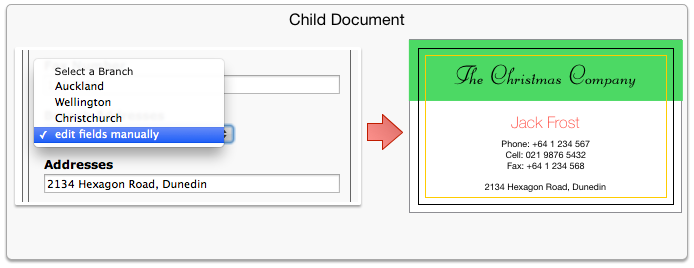 The unlocked selector list with the editable text object option for the customer to use.
Creating an Image Placeholder for Customers to Replace
If the customer is to upload an image into a child document, e.g., a logo or photo, you can set up a placeholder image within the template. The customer can then replace the placeholder image when creating the child document.
 Placeholder Image
Before you begin
Before creating a selector list, ensure that:
- you have created a placeholder image object that your customer can replace, and
- the Edit Template page is displayed for the relevant template.
To create an image placeholder:
- On the Edit Template page, click 'Add New Image Object'.
- Result: A number of fields is displayed.
- In the Field Name field, type the name of the image object.
- Example: Logo_Placeholder
- Click Choose File.
- Locate the relevant placeholder image.
- Click Save File.
- Result: The image is displayed below the Choose File button.
- Example:
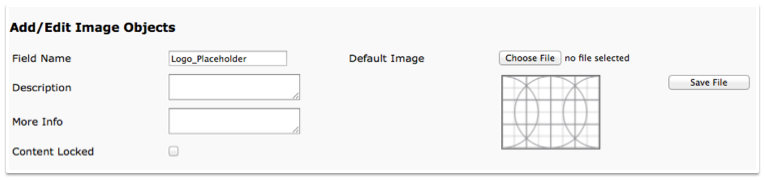
- Ensure the 'Content Locked' checkbox is not selected.
- Complete the Height, Width and relevant Alignment fields.
- Note: This will ensure that any image uplodaed by the customer will be displayed in the correct location and at the correct size.
- Example:
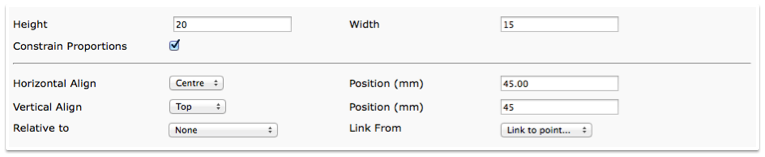
- Set the minimum and maximum resolutions for the uploaded image.
- Example:

- Note: If anyone tries to upload an image that is outside the specified resolution, a warning message is displayed.
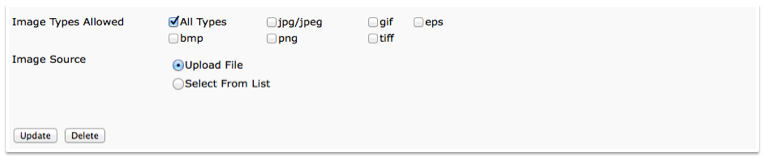
- Select the relevant image types and 'Upload File'.
- Note: By selecting Upload File,
- Click Insert.
- Note: If the Insert button is not displayed, click Update.
- Result: The image is displayed on the rendered page.
What Next?
To test the functionality, try creating a child document and uploading a replacement image. The following sequence of pictures shows you what your customer can do.
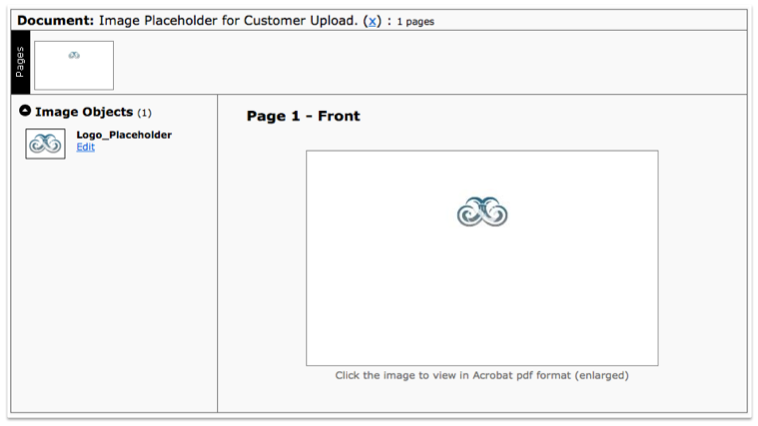
 New Child Document
To upload a replacement image in a child document:
- On the Create New Document Page, adjacent to the placeholder image, click Edit.
- Result: A lightbox displays the placeholder image.
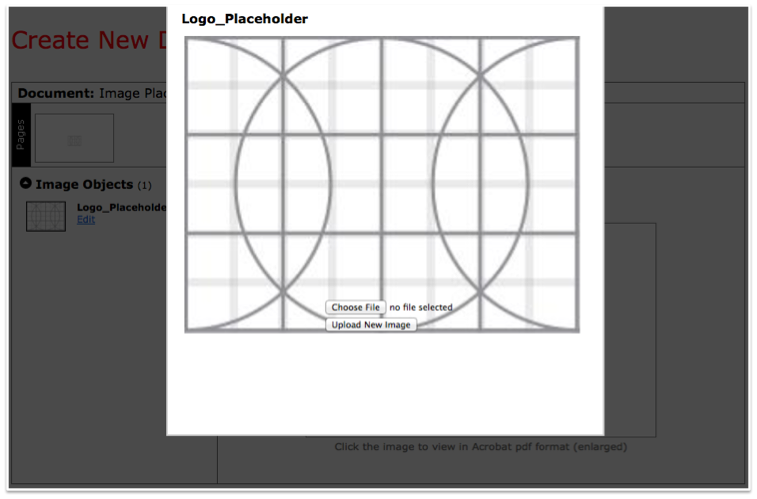
- Click 'Choose File' and locate the replacement image file.
- Click 'Upload New Image'.
- Result: The placeholder image is replaced by the uploaded image.
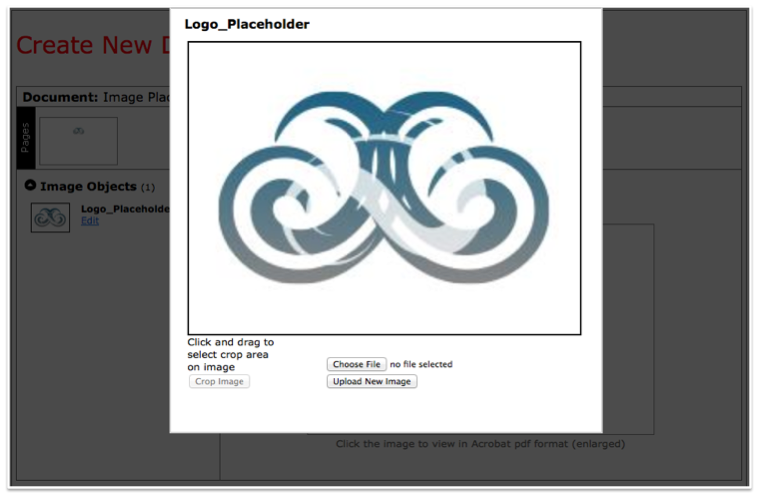
- If relevant, follow the onscreen instructions to crop the image.
- Click anywhere outside the lightbox
- Result: The lightbox is closed and the uploaded image is displayed in the preview of the child document.