
Relative Positioning
On the Basic Templates page, you were introduced to some of the features that can be used to create a simple template. The tutorial covered how to set up two text objects and position them on the document relative to the template origin (bottom-left corner of the template).
Sometimes you may want text objects to move when the customer deletes the contents of a text object from the child document. For example, If you have three text objects stacked vertically, and the customer deletes the contents of the second one, you can take advantage of a feature associated with relative positioning to automatically collapse any gaps caused by empty text object.
 If the customer deletes the contents of Text Object 2 from a child document, Text Object 3 automatically relocates itself relative to Text Object 1.
On this page:
Table of Contents:
- Relative vs Absolute Positioning
- What is Relative Positioning?
- What Your Customer Sees
- What You Need to Know to Make Relative Positioning Work
- Tutorial: Positioning Fields Relative to Each Other
Relative vs Absolute Positioning
On the Basic templates page, you learned how to put a simple business card together. The business card had two details; the cardholder's name and the address. Chances are, when positioning the two text objects, you specified the absolute positions of both text objects. That is, you positioned both text objects relative to the bottom-left corner of the document; the template origin. An object that is positioned relative to the template origin is deemed to be positioned absolutely.
At least one object in every document has to be positioned absolutely. Other objects may be positioned:
- absolutely, that is, relative to the template origin, or
- relatively, that is, relative to another object.
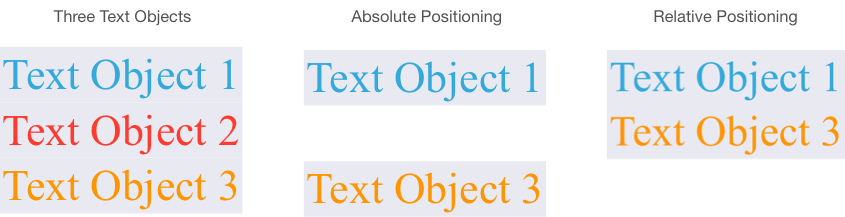 Absolute (centre) vs Relative Positioning (right)
Absolute Positioning
If the three text objects in the picture above (left) are positioned absolutely, then when the customer deletes the contents of one of the text objects, it does not affect any of the other text objects (centre). That is, on deleting the contents of Text Object 2 from the child document, a gap appears.
Relative Positoning
If Text Object 2 is positoned relative to Text Object 1, and Text Object 3 is positioned relative to Text Object 2, then on deleting the contents of Text Object 2 from the child document, Text Object 3 automatically positions itself relative to whatever Text Object 2 was positioned to; in this example, Text Object 1. The gap is automatically closed (Right).
By setting up a series or relatively positioned objects, a relationship between the objects is established. Should one or more of the objects be discarded by the customer, the remaining objects will automatically reposition themselves to close up any gaps created by the missing information.
What is Relative Positioning?
At the top of this page you were introduced to one of the advantages of using Relative Positioning; the ability to automatically close gaps created by the customer when deleting the contents of a field. This is actually a useful consequence of relative positioning; not an explanation.
Relative positioning is simply the positioning of one object, e.g., a text object, relative to another. For example, it's often useful to:
- position a label relative to a field, e.g., positioning the Phone Label relative to the Phone Number, or
- position a field relative to it's label, e.g., positoning the Phone Number relative to the Phone Label.
As to whether the label is positioned relative to the field, or vice versa, can depend on which one (label or field) is to be vertically aligned. Not only can these objects be positioned relative to each other, you can also specify an offset to ensure, for example, that the label's and field's contents never make contact.
Note: Take care to avoid creating a loop of relative relationships. This will cause an error. At least one object must be positioned relative to:
- the template origin, or
- an object that is positioned relative to the template origin.
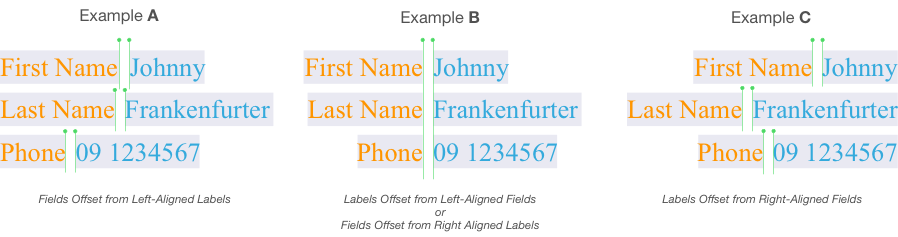
 Example A - Fields Positioned Relative to Corresponding Labels.
In Example A (above and right):
- each field (blue) is positioned relative to its label (orange) and offset by a fixed amount
- the Phone label (orange) is positioned relative to the Last Name label (orange), and
- the Last Name label (orange) is positioned relative to the First Name label (orange).
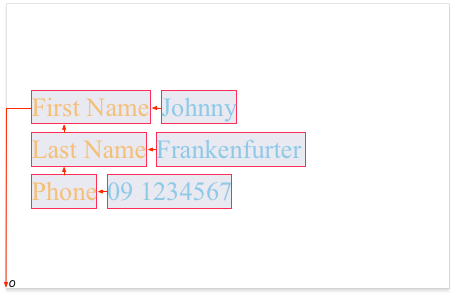
Note: In Example A (right), the First Name field is positioned relative to the template origin (Point o)
In Example B above:
- each field (blue) is positioned relative to its label (orange) and offset by a fixed amount, or
- each label (orange) is positioned relative to its corresponding field (blue) and offset by a fixed amount.
If the fields are positioned relative to the labels, then:
- the Phone label (orange) is positioned relative to the Last Name Label (orange), and
- the Last Name label (orange) is positioned relative to the First Name label (orange).
If the labels are positioned relative to the fields, then:
- the Phone field (blue) is positioned relative to the Last Name field (blue), and
- the Last Name field (blue) is positioned relative to the First Name field (blue).
In Example C above:
- each label (orange) is positioned relative to its corresponding field (blue) and offset by a fixed amount
- the Phone field (blue) is positioned relative to the Last Name field (blue), and
- the Last Name field (blue) is positioned relative to the First Name field (blue).
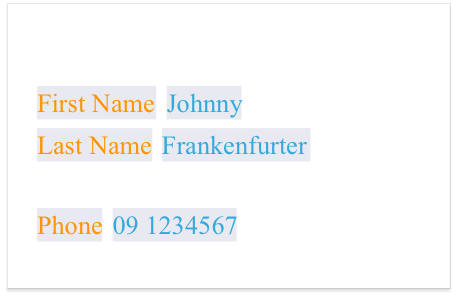
Staying Relative
In the following picture, I have taken Example A and offset the vertical position of the Phone label from the Last Name label by a negative value. Because the Phone field (blue) is positioned relative to the Phone label (orange), the field migrates with the label to its new location.
Labels vs Fields
Labels and fields are text objects. Typically, labels are text objects that cannot be edited by customers. Fields are text objects that can be edited by customers.
Creating a Label
Any text object can be turned into a label. To do this, when creating a text object, select (tick) the Content Locked option.
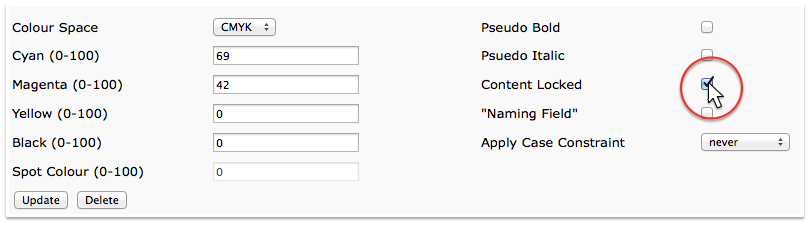 Content Locked
Hiding the Label
If your customers have no use for some of the fields, they will delete the contents of the relevant field. This means that the corresponding label will still be displayed (below-left).
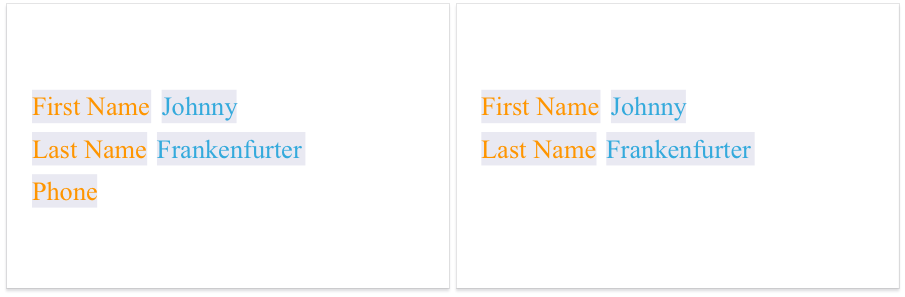 Customer Deletes Field's Contents; Corresponding Label Remains (Left) / Customer Delete's field's Contents; the Corresponding Label is Not Displayed. (Right)
When the contents of a field in a child document is deleted, you can ensure that the label is not displayed (above-right) . To do this, edit the label's details by selecting the corresponding field from the 'Blank if' droplist.
 Blank if
Note: If you are setting up a label before setting up a field, you can't select the field because it does not exist yet. That is, set up the label, set up the field, then edit the label to select the field from the droplist.
What Your Customer Sees
Once you have positioned your objects relative to each other, you're essentially done. For example, in the child document below, there are thirteen text objects. Six of these text objects are editable by the customer. Four of these editable text objects if left empty by the customer, will cause any gaps between the Address text object and the Web text object to close up. In this example:
- the labels (blue text) are positioned relative to their adjacent fields
- Because the text is right justified, it makes sense to hang the labels of their adjacent fields and to position the fields relative to each other vertically.
- the web address is positioned relative to the email address
- the email address is positioned relative to the mobile number
- the mobile number is positioned relative to the fax number
- the fax number is positioned relative to the phone number, and
- the phone number is positioned relative to the address.
Note: The Address text object is positioned relative to the Company Name text object. Alternatively, the Address text object and Company Name text object could each be positioned relative to the Job Title text object. If it can't always be assumed that the cardholder will have a job title, these fields could be positioned relative to the Name or even the template origin.
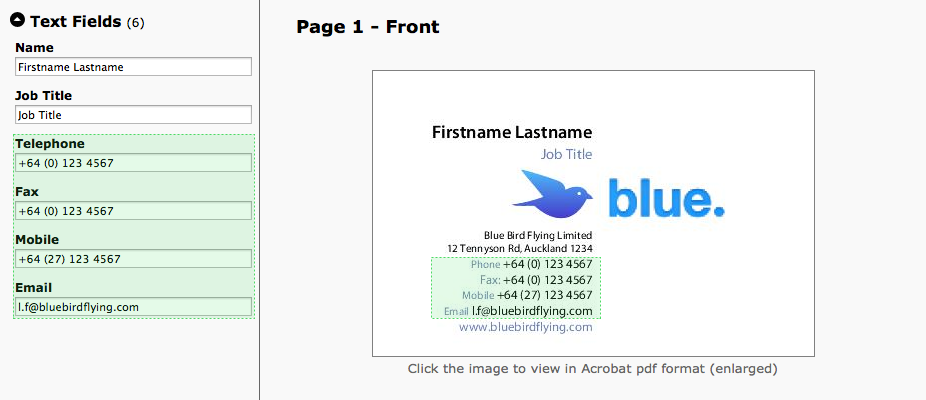
 The Completed Document with All Fields Populated
The following series of pictures show you what the customer sees when editing a child document. In the first picture, all the fields are populated with dummy data from the template. If the contents of any of the four highlighted fields is deleted, the text objects below it will automatically move up to fill the gap that was created.
 Four of the Six Fields that if Deleted will Automatically Alter the Layout of the Card.
When the customer deletes the fax number and clicks 'Update & Save Preview', the fax label is also deleted. The mobile and email contact details, and the web address all move upwards to fill the gap left by the absent fax details.
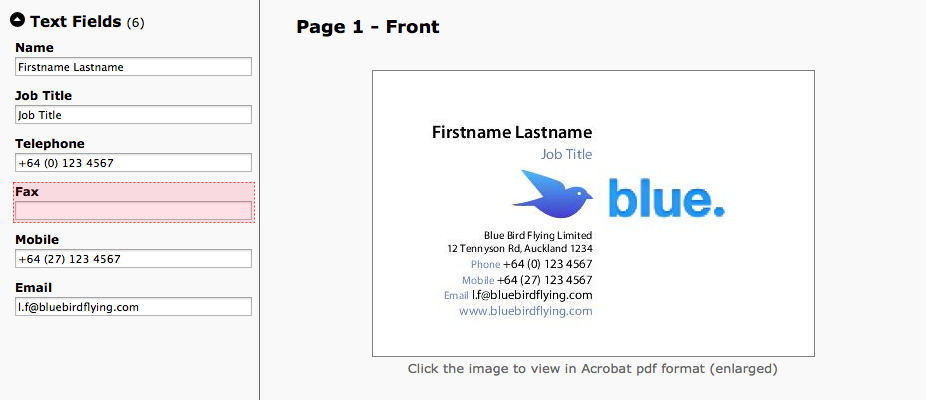 One Empty Field
If the customer then deletes the phone number and clicks 'Update & Save Preview', the phone label is also deleted. The mobile and email contact details, and the web address all move upwards to fill the gap left absent Phone details.
 Two Empty Fields
Text Objects
The picture below shows the Edit Template Page with the 13 text objects that have been set up. They are:
- Name
- Job Title
- Company Name
- Address
- Phone Label
- Telephone
- Fax Label
- Fax
- Mobile Label
- Mobile
- Email Label
- Web
Note: The text objects can be listed in any order. This is because they are each positioned relative to each other when editing the text objects individually. The only reason for listing them in the order they are displayed in the preview, is a personal one. If we were using flowgroups, then the order in which they are listed here is important.
With the exception of the Fullname field, all the other text objects are assigned to the one flowgroup.
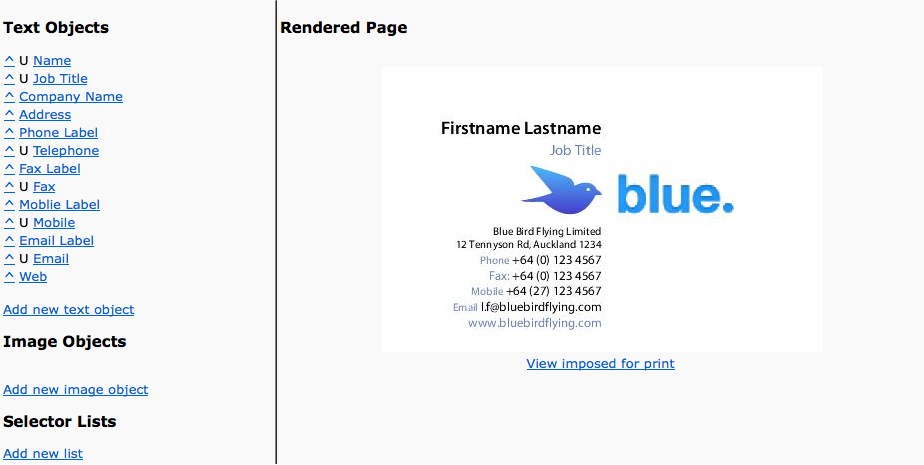 Edit Template Page
What You Need to Know to Make a Relative Positioning Work
To make relative positioning work, on each text object, you must specify a point: This point can be positioned relative to
- a point on the document (absolute position)
- a point on another text object, or
- a point on another object, e.g., image.
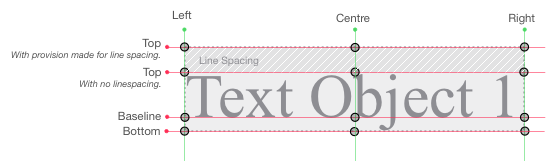 Points
 Relative Values
The following points can be specified:
- Left,Top
- Left,Baseline
- Left,Bottom
- Centre,Top
- Centre,Baseline
- Centre,Bottom
- Right,Top
- Right,Baseline
- Right,Bottom
Note: Any linespacing that you add to the text object will shift the top beyond the text object's aescenders.
Whenever you position one object relative to another, you may need to offset the objects horizontally and/or vertically.
- If you are positioning an object to the left of another object, a negative value is required for the horizontal value.
- If you are positioning an object relative to the template origin or to the right of another object, a positive value is required for the horizontal value.
- If you are positioning an object relative to the template origin or above another object, a positive value is required for the vertical value.
- If you are positioning an object below another object, a negative value is required for the vertical value.
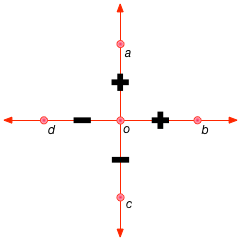
Example
When positioning an object relative to the template origin (Point o below-left), Point a will be set using a positive horizontal value and a positive vertical value. That is, if the template origin is 0.0 (Point o), then the text objects need to be positioned above and to the right of this point for the text object to land on the template.
Below: Point b on Object 2, is positioned relative to Point a on Object 1 . Point b will be offset from Point a:
- horizontally by 0 mm
- vertically by a negative value.
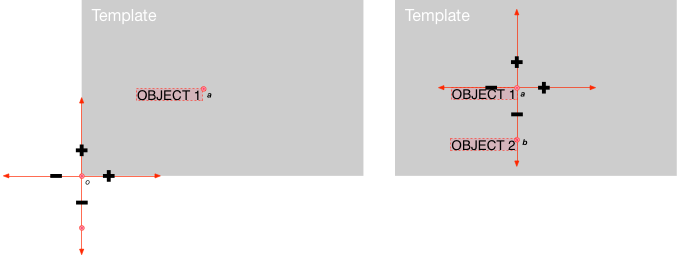 Left:Point a on Object 1 positioned Relative to Template Origin (Point o)Right:Point b on Object 2 positioned Relative to Template Origin (Point o)
Example
Mobile Label
 Mobile Label Text Object(Left) and Mobile Text Object (Right)
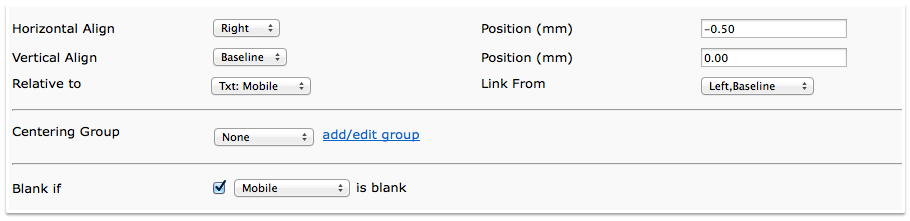 Mobile Label Text Object Positioning
The pictures above show the settings for positioning the Mobile Label text object (field). Point a on the right-baseline of the Mobile Label text object is offset from the left-baseline point b of the Mobile text object (field). It is offset to the left (negative value) by 0.5 mm, hence the negative value of -0.5. Irrespective of the length of the mobile number, the mobile label will always be positioned 0.5 mm to the left of the mobile number.
Note: The text object 'Mobile' is selected from the dropdown list at the bottom of this picture. This ensures that when the customer leaves the the Mobile field empty, the Mobile Label text object is not displayed.
Note: The baseline is used as a common setting across both text objects to ensure the mobile label and the mobile number align vertically.
Mobile Number
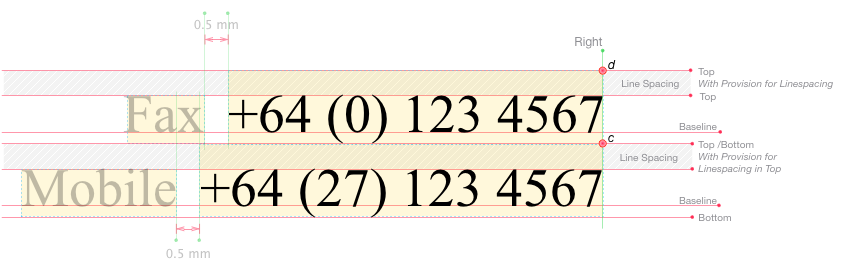
The pictures below show the settings for the Mobile text object (field). The Mobile text object is positioned relative to the Fax text object (field). Point c on the right-top of the Mobile text object is positioned to point c on the right-bottom of the Fax text object. There is no vertical offset. You may however notice there is some linespacing that extends the top of these text objects beyond their ascenders. Although the value is not shown here, the linespacing is 1.6 pts.
 Mobile (Number) Text Object Below & Fax (Number) Text Object Above
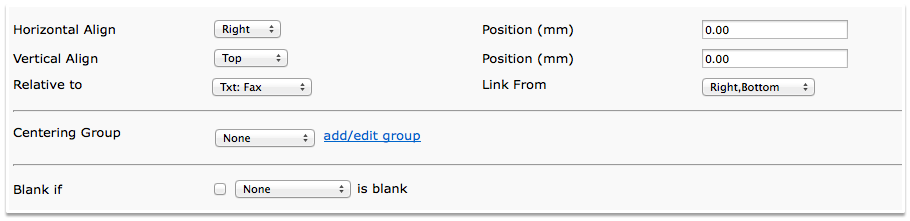 Mobile (Number) Text Object Positioning
If the fax number is deleted from a child document, the mobile number and it's label will move upwards. That is, Point C of the mobile number will move to Point d. Assuming the phone number has not been deleted, Point D will be the right-bottom point of the Phone text object.
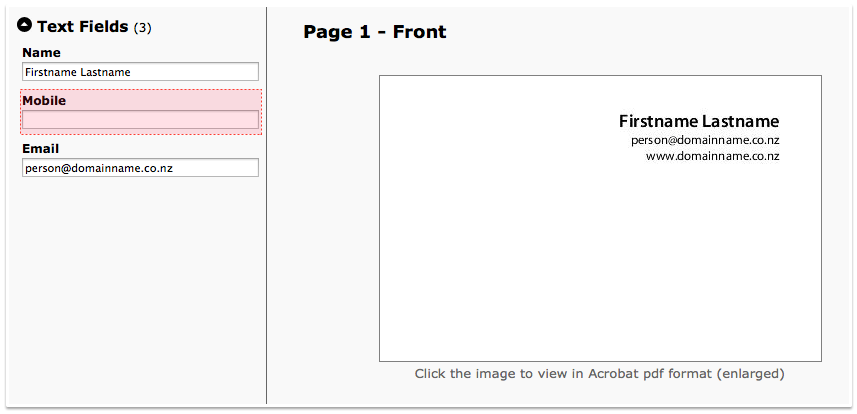
Tutorial: Positioning Fields Relative to Each Other
In this tutorial, I'll show you how to create a simple set of relatively positioned text objects that will be editable by the customer when setting up a child document. All of these text objects will be vertically aligned down the right side. To keep this tutorial simple, there are no labels.
Note: As per the example above, you can set up labels afterwards. If you do add labels, ensure they are positioned to the left of the fields and ensure they are not displayed when the fields are empty.
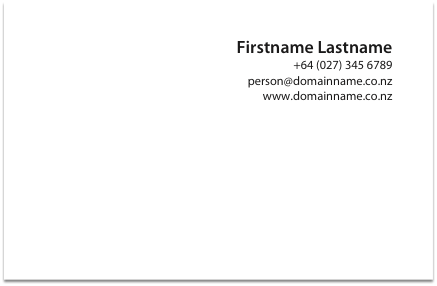 The Completed Document with All Fields Populated
Before you begin
Before positioning text objects relative to each other, set up a new template.
Note: This was covered on the Basic Templates page. As a summary, on the Manage Document Templates Page, click 'Create New Document Template' and complete the fields, then click Next.
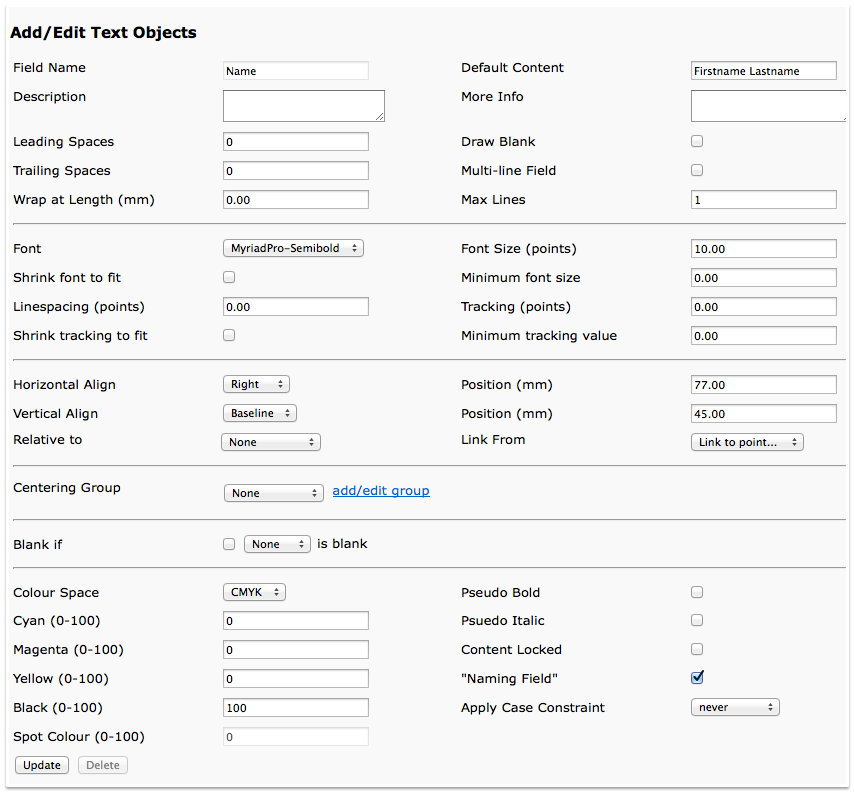
To position text objects relative to each other:
- Set up the first text object using the information below.
- Note: The first object needs an absolute position specified. In this tutorial, the Name field is the first object.
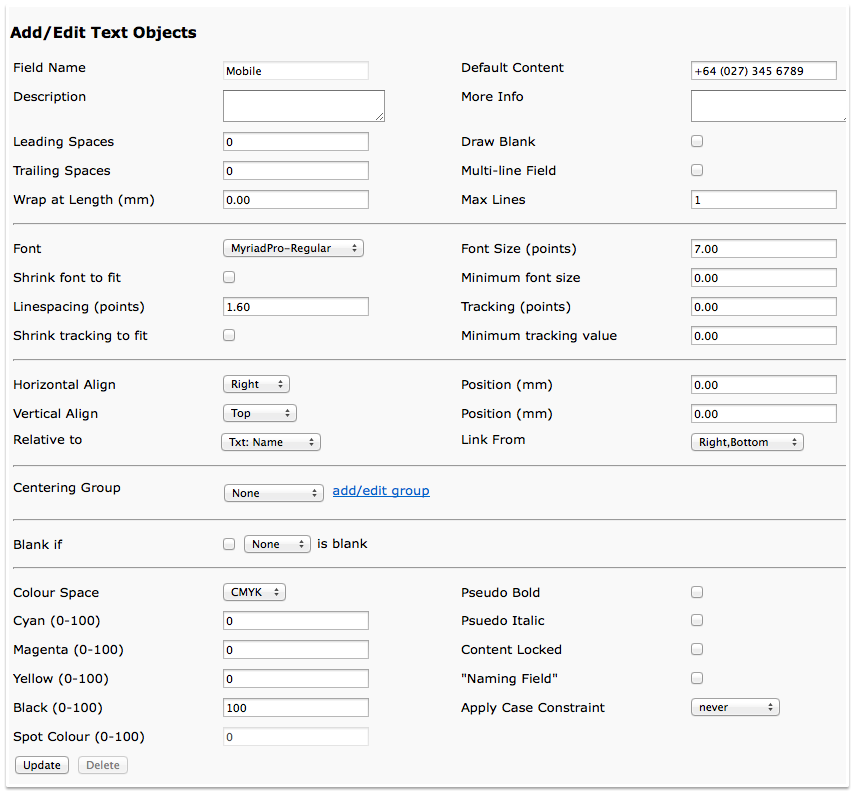
- Set up the second text object using the information below.
- Note: The second text object is for the mobile number. It will be positioned relative to the Name text object
- Set up the third text object using the information below.
- Note: The third text object is for the email address. It will be positioned relative to the second text object.

- Set up the fourth text object using the information below.
- Note: The fourth text object is for the website. It will be positioned relative to the third text object.
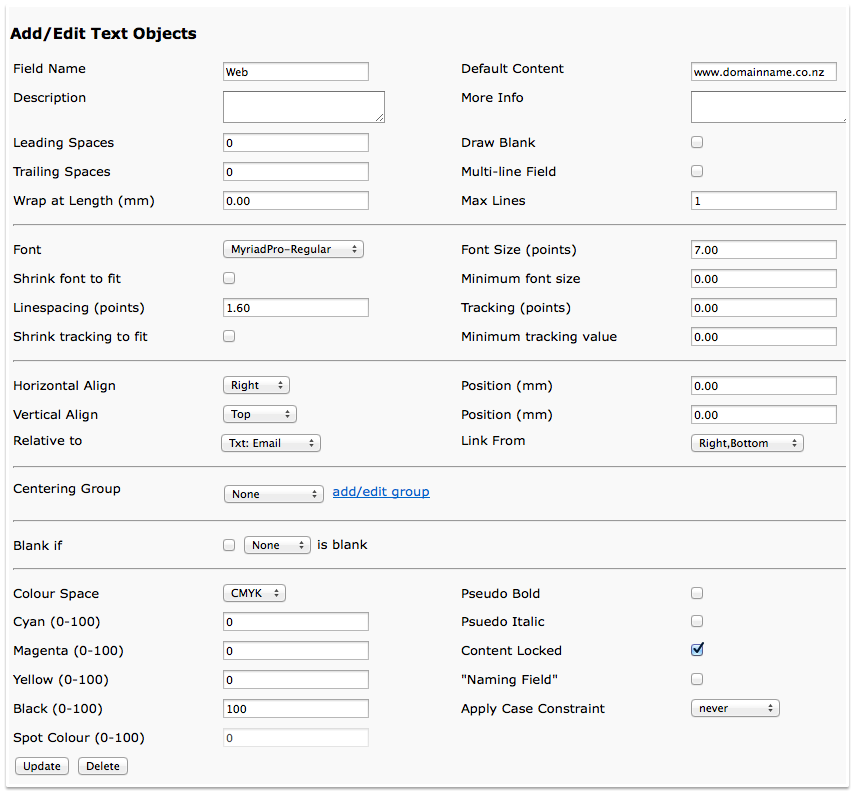
Note: The content of this field is locked to ensure it cannot be edited by the customer.
What Next?
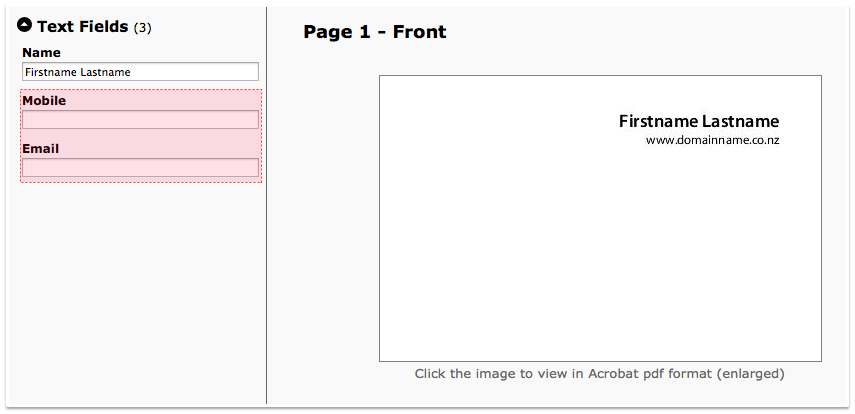
Test the template by creating a child document. When the user creates a document from this template and leaves, e.g. the mobile number field empty, the email addess and the website will move up to close the gap.
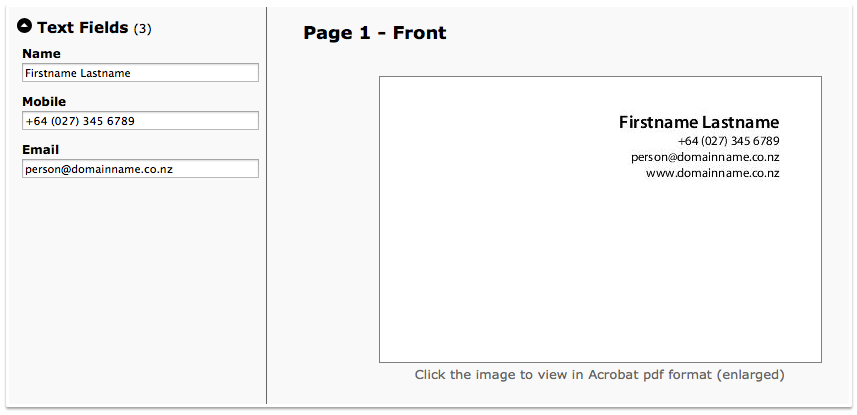 A User-Editable Child Document
 A User-Editable Child Document; No Mobile Number
 A User-Editable Child Document; No Mobile, No Email
Additional Exercise
See What is Relative Positioning? and What You Need to Know to Make Relative Positioning Work, and have a go at adding labels. Position each label 0.5 mm to the left of the relevant field and ensure the labels are not dispayed when the user leaves the field empty in a child document. Even though it's not a label, ensure the website text object is locked to prevent editing by the customer.