
Setup
About ePrintcost
With ePrintcost your customers can easily manage a range of everyday print-ondemand tasks. This is done using a login and password, and saves you valuable time.
ePrintcost integrates directly with your Printcost system, eliminating the re-keying of orders received over the internet.
The topics below show you how to perform a basic ePrintcost setup for a customer. This is all done within Printcost.
On this page:
Table of Contents:
- Turning ePrintcost on for a Customer
- Granting ePrintcost Access to a Customer Contact (User)
- Customising the Welcome Message
- Customising the Email Template
- Setting the Upload of Quote Information
- Setting the Upload of Job Information
- Setting the Expiration Period for Automatically Uploading Quotes and Jobs to ePrintcost
- Adding an Inventory Group
Turning on ePrintcost for a Customer
Before You Begin
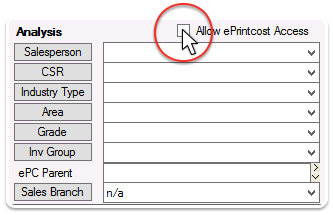 Allow ePrintcost Access Checkbox
Before turning on ePrintcost for a customer, ensure that:
- the Customer File window is displayed, and
- the relevant customer's details are displayed.
To display the relevant customer's details, on the left menu, under Work, click Customers, then double-click the relevant customer record.
To turn on ePrintcost for a customer:
- On the Customer File window, with the relevant customer record displayed, tick the 'Allow ePrintcost Access' checkbox.
- Note: The 'Allow ePrintcost Access' checkbox is located at the centre-top of the Customer File window.
- Result: The 'Allow ePrintcost Access' checkbox is located at the centre-top of the Customer File window.
- From the Inv Group dropbox, select the relevant inventory group.
- Note: The inventory group determines what products are available to the customer through ePrintcost.
- Note: If there are no relevant inventory groups to select, you can do this later. If this is the case, go to Step 3 for now.
- (Optional) From the ePC Parent dropbox, select the relevant customer code.
- Note: When creating a template, a customer code is entered, and this links the template to the ePC parent code that is selected here. This allows you to share a template across a number of customers.
What's Next?
If you are setting ePrintcost for your customer for the first time, you may need to customise ePrintcost and grant access to your customer's staff so that they can log in and order products from the catalogue.
Note: Should you need to turn ePrintcost off for a customer, deselect the 'Allow ePrintcost Access' checkbox. Turning ePrintcost off will prevent access to the ePrintcost site. Any customised settings and permissions will not be lost. This ensures that the ePrintcost site can be turned on again without the need to set it up again.
To grant a customer's staff access to ePrintcost, see Granting ePrintcost Access for a Customer Contact (User) below.
Customise ePrintcost for Your Customers
You can also:
- customise the welcome message that is displayed when customers log into ePrintcost. For more information, see Customising the Welcome Message below.
- customise the ePrintcost emails that you will receive from your customer. For more information, see Customising the Email Template.
- set quote and job information to automatically upload to the customer's ePrintcost site. For more information, see Setting the Upload of Quote Information and Setting the Upload of Job Information below.
- add items to the inventory group dropbox. For more information, see Adding Inventory Groups to the Inventory Group Dropbox below.
- using ePrintcost, set up templates, e.g., editable templates that users can use to create and order printed collateral, e.g. business cards, forms and letterheads. For more information, see Basic Templates.
Granting ePrintcost Access to a Customer Contact (User)
With ePrintcost access, your customers' staff can log into ePrintcost to order product. You can set up ePrintcost access for each contact in Printcost.
For someone to access ePrintcost, that person must first be set up as a contact for the customer. A Princost contact can only have one ePrintcost password. If the user requires access to more than one ePrintcost site, e.g., where a company has a number of branches and an ePrintcost site for each branch, the same password (in combination with an email address or username) can be used to access more than one ePrintcost site. This means, for example, a person from the customer's head office only requires one password to access all of the company's ePrintcost sites.
Before you begin
Before grranting ePrintcost to a customer contact (user), ensure that:
- ePrintcost has been turned on for the customer
- the Customer File window is displayed and the relevant customer's details are displayed, and
- To do this, on the left-menu, under Work, click Customers. From the list of customers, double-click the relevant customer or select the customer and click Details.Ut sollicitudin egestas est.
Contact Details
Note: Where relevant, complete the following fields:
- Salutation
- Name
- Position
- Phone
- Fax
- Mobile
- Email or ePrintcost Login (ePrintcost username)
ePrintcost requires a contact to have either an email address or an ePrintcost username. The contact does not require both. - ePrintcost password The password is mandatory.
- Outward Call Number
To grant ePrintcost access:
- On the Customer File window, with the relevant customer's details displayed, review the list of contacts.
- Note: A list of contacts is displayed under Contact Details.
- Is the relevant contact listed?
- Note: This is the contact for whom you are going to set up ePrintcost access.
- If Yes, select the contact, then go to Step 4.
- If No, go to Step 3.
- Under Contact Details, click New Contact.
- Result: A new line containing the words 'New Contact' is added to the list of contacts
- To the right of the list of contacts, complete the relevant fields.
- Note: Many of these fields are not required for ePrintcost, however, it is good practice to complete as many of the fields as possible. For the contact to access ePrintcost, either the Email field or the ePrintcost Login field must be completed, and the ePrintcost password must be completed. For more information, see Contact Details (inset right)
- Note: Please allow some time before the user can log in to their ePrintcost site.
What's Next?
Repeat the steps above to grant other contacts (users) access to printcost as required.
Customising the Welcome Message
ePrintcost comes with a standard welcome message that was set up for you by the Printcost team. You can customise this message for each of your customers.
Before You Begin
Before customising the welcome message, ensure that:
- the Customer File window is displayed, and
- the relevant customer's details are displayed.
To display the relevant customer's details, on the left menu, under Work, click Customers, then double click the relevant customer record.
To customise the splashscreen & welcome message:
- On the Customer File window, click Settings.
- Result: A list of settings and permissions is displayed.
- Caution: Many of these settings and permissions have been set up by Printcost staff for you. Take care not to change anything that you are unsure of.
- Scroll to and click ePrintcost.WelcomeMessage
- Result: The ePrintcost.WelcomeMessage window is displayed.
- In the Site field, type the replacement welcome message.
- Note: Whatever you type here will be displayed when the customer's users log in.
- Click OK.
- Result: The message that you typed is saved and will be displayed when users log in.
- Note: If the Site field remains empty, the default message will be displayed.
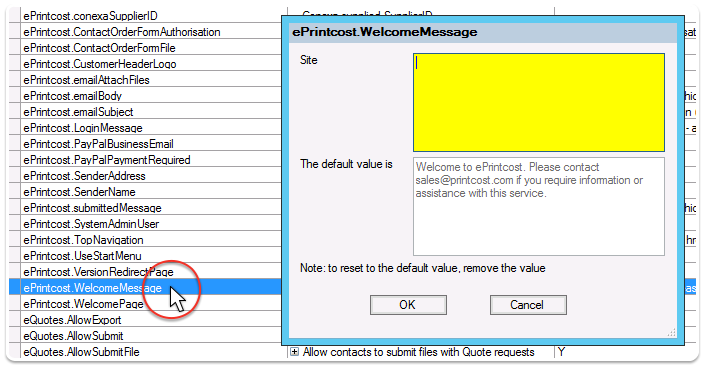 ePrintcost.WelcomeMessage Window
What's Next?
If you have no other settings or permissions to change, then at the top-left of the Customer File window, click Details to display the customer's details.
Customising the Email Template
With Printcost, you can customise the emails that are automatically sent to the user to confirm the order they submitted through ePrintcost. You can:
- cc in one or more email recipients
- customise the email's subject line, and
- customise the email's body.
Before You Begin
Before customising the email template, ensure that:
- the Customer File window is displayed, and
- the relevant customer's details are displayed.
To display the relevant customer's details, on the left menu, under Work, click Customers, then double click the relevant customer record.
To customise the email template:
- On the Customer File window, click Settings.
- Result: A list of settings and permissions is displayed.
- Caution: Many of these settings and permissions have been set up by Printcost staff for you. Take care not to change anything that you are unsure of.
- Scroll to and click the relevant setting.
- Settings: ePrintcost.ccAddress, ePrintcost.emailSubject, ePrintcost.emailBody
- Result: The relevant setting is displayed.
- In the Site field, type in the relevant details.
- Note: To add more than one email address to the ePrintcost.ccAddress Site field, separate each email address by a semicolon.
- Note: If the Site field remains empty, the default value is displayed.
- Click OK.
- Result: The text you typed is saved and will be used by the confirmation email.
- Note: If the Site field remains empty, the default text will be displayed.
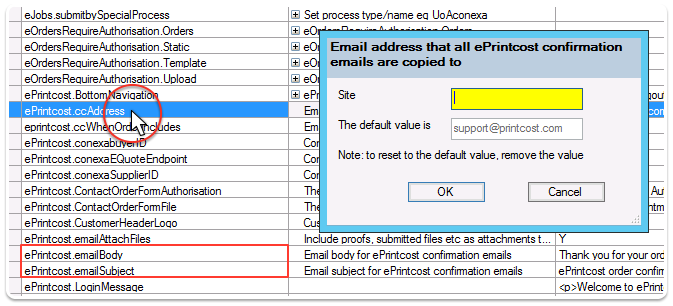 Window for Customising a List of cc'd Email Recipients
What's Next?
If you want to change another email template setting, repeat Steps 2 to 4 above. If you have no other settings or permission to change, then at the top-left of the Customer File window, click Details to display the customer's details.
Setting the Upload of Quote Information
With Printcost, you can decide when you want quote information uploaded to the customer's ePrintcost site.
 ePrintcost Options for Uploading Quote Information
Note: If a particular quote has expired, the quote's information won't be uploaded. For more information see: "Setting the Expiration Period for Automatically Uploading Quotes and Jobs to ePrintcost", below
Before You Begin
Before setting up the upload of quote information for an ePrintcost site, ensure that:
- the Customer File window is displayed, and
- the relevant customer's details are displayed.
To display the relevant customer's details, on the left menu, under Work, click Customers, then double click the relevant customer record.
To set up the upload of quote information for an ePrintcost site:
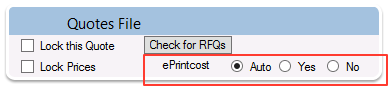
- On the button bar at the top of the Customer File window, click Quotes.
- Result: The Quotes File window displays a list of quotes for the customer.
- Note: At the top of the window there are three ePrintcost related options.
- Select the relevant option.
- Note: Click Auto if you want quote information to be uploaded to ePrintcost when the quote is Pending.
- Note: Click Yes if you want quote information uploaded regardless of the quote's status. Quotes are only uploaded if printed out or emailed to the customer.
- Note: Click No if you do not want quote information uploaded. If quote information has been uploaded already for this customer, it will not be displayed while this option is selected.
What's Next?
If you have no other settings or permissions to change, then close the Quotes File window.
Setting the Upload of Job Information
With Printcost, you can decide when you want job information uploaded to the customer's ePrintcost site.
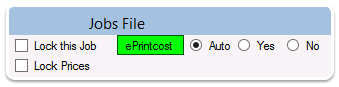 ePrintcost Options for Uploading Jobs Information
Note: If a particular job has expired, the job's information won't be uploaded. For more information see: "Setting the Expiration Period for Automatically Uploading Quotes and Jobs to ePrintcost", below.
Before You Begin
Before setting up the upload of job information for an ePrintcost site, ensure that:
- the Customer File window is displayed, and
- the relevant customer's details are displayed.
To display the relevant customer's details, on the left menu, under Work, click Customers, then double click the relevant customer record.
To set up the upload of quote information for an ePrintcost site:
- On the button bar at the top of the Customer File window, click Jobs.
- Result: The Jobs File window displays a list of jobs for the customer.
- Note: At the top of the window are three ePrintcost related options.
- Select the relevant option.
- Note: Click Auto if you want quote information to be uploaded to ePrintcost when the job is Completed.
- Note: Click Yes if you want quote information uploaded regardless of the job's status.
- Note: Click No if you do not want job information uploaded. If job information has been uploaded already for this customer, it will not be displayed while this option is selected.
What's Next?
If you have no other settings or permissions to change, then close the Jobs File window.
Setting the Expiration Period for Automatically Uploading Quote and Job Information to ePrintcost
If a particular quote or job has expired, the job's information won't be uploaded. You can either set when you want quote and job information to expire globally across all of your customers that have ePrintcost sites, or you can set an expiration period on a customer by customer basis. If you set an expiration period for a customer, this setting overrides the global setting.
To set the expiration period for all customers:
Follow these steps to change the expiration of quote and job information across all customers' ePrintcost sites.
Note: This will not affect a customer's site where the expiration period has been set at a customer level.
- On the left menu, under Miscellaneous, click Misc Data Menu.
- Result: The Misc Data Menu window is displayed.
- Click Defaults
- Note: Defaults is located in the fourth column from the left.
- Result: A list of settings is listed on the left of the window.
- Under Code, click QJEXPIRE
- Note: This code may be truncated, e.g. QJEXÉ
- Result: The 'Days Until Expired' field is displayed.
- In the 'Days Until Expired' field, enter the relevant number of days.
- Note: This is the period or number of days that must elapse before a quote or job is tagged as expired. Once expired, the quote or job will not be uploaded to ePrintcost.
- Result: You may be informed that the setting is marked as ORIGINAL and that the status will be changed to CUSTOM.
- Note: If you want your custom value to be retained next time Printcost is upgraded, ensure the Custom radio button is selected. If you want the value reset to the factory default next time Printcost is upgraded, select original.
- Click Yes
- Result: The expiration period for uploading quote and job information to all you customers' ePrintcost sites is set to the number of days you specified.
- Note: This is a global change affecting all your customer's ePrintcost sites, except those sites for which an expiration period has been set on a customer by customer basis.
To set the expiration period to a particular customer's quote, job or sales order information:
Follow these steps to change the expiration of quote information, job information or sales orders information for a particular customer's ePrintcost site: once expired the information will no longer be uploaded/displayed on the customer's ePrintcost site.
- On the Customer File window, display the relevant customer's details.
- Click Settings.
- Result: A list of settings and permissions is displayed.
- Caution: Many of these settings and permissions have been set up by Printcost staff for you. Take care not to change anything that you are unsure of.
- Scroll to and click the relevant setting.
- Note: The relevant settings are: ejobs.daystodisplay, equotes.daystodisplay, esalesorders.daystodisplay
- Result: The relevant setting is displayed.
- In the Site field, type the number of days.
- Note: This is the number of days that have to elapse. Once elapsed, the information will not upload to ePrintcost.
- Note: If the Site field remains empty, the default value will apply.
- Click OK.
- Result: The number you typed is saved and the expiration period will only apply to this customer's ePrintcost site.
- Note: If the Site field is empty, the default value is applied.
Adding an Inventory Group
To create an inventory group:
Follow these steps to create a new inventory group. Once created, the inventory group will be available in the Catalogue window and you will be able to add catalogue items to the inventory group.
- On the left-menu, under Miscellaneous, click Misc Data Menu.
- Result: The Misc Data Menu Window is displayed.
- On the Misc Data Menu window, under Customer, click Group.
- Result: The Misc Data Customer Group window is displayed.
- Do you want to duplicate an existing group?
- If Yes, select the group that you want to duplicate, then go to Step 4.
- If No, go to Step 4.
- Click New
- Result: You will be requested to enter some details in the Code field.
- In the Code field, type a unique code for the inventory group.
- Ensure that you are not duplicating an existing code. It must be unique.
- Do you want to duplicate the group that was selected in Step 3.
- If Yes, select 'Copy Details from Current Record'
- If No, ensure 'Copy Details from Current Record' is not selected.
- Click OK.
- In the Group field, type a name for the inventory group.
- Note: The name may relate to a specific customer, e.g., where the inventory group is going to contain stationery items unique to that customer. The name may relate to a set of generic items if the inventory group is to be used by two or more customers.
When turning on ePrintcost, one of the steps involved selecting an inventory group from the Inv Group dropbox. If there are no inventory groups available you can add one for.
- a company that has only one branch
- For example, you may want to give a customer access to a set of customer specific catalogue items.
- a company that has multiple branches, or
- For example, you may want to give all of a customers branches, access to a set of customer specific catalogue items, e.g. company stationery.
- multiple companies.
- For example, you may want to give a number of your customers access to the same set of generic catalogue items.
An inventory group is automatically added to the Inv Group dropbox by adding one or more catalogue items to an inventory group (see below). If the relevant inventory group does not exist, you can create one (See inset - right).
Note: An inventory group that has no inventory items assigned to it will not be displayed for selection in the Inv Group dropbox.
When setting up inventory groups, or adding inventory items to an inventory group, ensure that you are aware of which customers will be using the inventory group. That is, ensure that an inventory group that contains a customer's specific stationery items are not used by other customers.
To add catalogue items to an inventory group:
- On the left-menu, under Inventory / Orders, click Catalogue.
- Result: The Catalogue window is displayed.
- Double-click the relevant catalogue item.
- Result: The catalogue item's details are displayed. A list of inventory groups should also be displayed.
- Note: If there are no inventory groups displayed, or the relevant inventory group does not exist, you can create a new inventory group. For more information, see 'To create an inventory group' (right).
- Select the relevant inventory group(s) that this catalogue item will be made available to.
- Note: You can select more than one inventory group. You can also deselect inventory groups if this catalogue item is not going to be available to customers who order from the inventory group.
- Note: Your inventory groups should have meaningful names. They are unlikely to be called Group 1 and Group 2 as they are in this example.
- Result: The catalogue items are assigned to the selected inventory group(s).
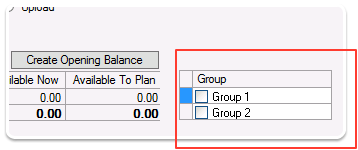 Inventory Groups
What's Next?
Ensure that all the relevant catalogue items have been added to the inventory group.
You can assign your new inventory group to a customer. To do this, on the Customer File window, with the relevant customer record displayed, select the new inventory group from the Inv Group dropbox.
Note: On logging into ePrintcost, your customers will be able to place orders for items from the inventory list.