
Time & Cost
Manually Enter Time and Cost
Time and cost records can be created by PSM terminals or by manual entry. Manual entry can be used where PSM terminals are not in operation. Entries are normally recorded from time sheets or job bags.
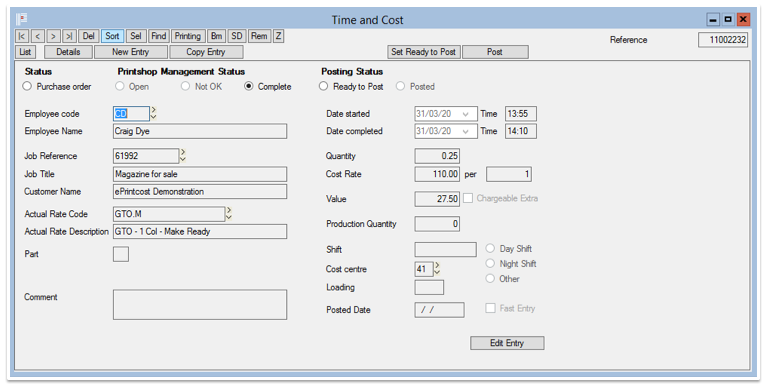 Time & Cost Window
On this page:
Table of Contents:
Adding a New Time & Cost Record
Before You Begin
Before adding a new time & cost record, ensure the Time & Cost window is displayed. To do this, on the left-menu click Work > Printshop > Time & Cost.
To add a new time & cost record:
- On the Time & Cost window, click New Entry.
- Result: The New Time & Cost Record window is displayed.
- In the Employee code field, type the relevant employee code and press Tab.
- Note: If you don't know the employee code, click one of the adjacent arrows to display a list of existing employees. Select the employee then click Accept. If the employee is not listed, click New and add a new employee to the list.
- Result: The employee name is displayed.
- In the Job Reference field type the relevant job number and press Tab.
- Note: If you don't know the job number, click the adjacent right-pointing arrow to display a list of jobs. Select the job then click Accept. By clicking the adjacent down-pointing arrow, you can add a new job if required.
- Result: The job title, customer name and list of activities is displayed.
- To enter the activity, either enter the Actual Rate Code in the field provided or on the right side of the screen, click on the Estimated Activity in the grid.
- Note: If you don't know the rate code, click the adjacent right-pointing arrow to display a list of rate codes. Select the relevant rate code then click Accept. By clicking the adjacent down-pointing arrow, you can add edit or add a rate.
- Result: A range of fields is displayed. The cost rate fields are pre-populated from the selected activity.
- If entering the time taken, in the Quantity field, type the number of hours as a decimal number, or select dates from the date picker and specify start and finish times in hours and minutes.
- Note: If you use the date pickers and time fields, the decimal value in the Quantity field will be calculated for you on clicking Tab. Express time using the 24 hour clock, e.g. 23:00
- If entering the production quantity, in the Production Quantity field, type the actual number of finished items.
- Click OK.
- Result: The time and cost record's details are displayed on the Time & Cost window.
Note: If you want to edit the record, at the bottom-right of the window, click Edit Entry.
Modifying a Copy of a Time & Cost Record
To save time creating a new record from scratch, you can instead make a copy of an existing time & cost record, then modify the copy.
Before You Begin
Before adding a new time & cost record, ensure the Time & Cost window is displayed. To do this, on the left-menu click Work > Printshop > Time & Cost.
To modify copy of a new time & cost record:
- On the Time & Cost window, click List.
- Result: A list of time & cost records is displayed.
- Click or double-click the record that you want to copy.
- Note: If you double-click the record, the record's details are displayed. You can also click the record, then click Copy Entry to display the record's details.
- Note: The record's details are read-only.
- Click Copy Entry.
- Result: The New Time & Cost Record window is displayed and the fields are populated with a copy of the selected record's details.
- (Optional) In the Employee code field, change the employee code and press Tab.
- Note: If you don't know the employee code, click one of the adjacent arrows to display a list of existing employees. Seleect the employee then click Accept. If the employee is not listed, click New and add a new employee to the list.
- Result: The employee name is displayed.
- (Optional) In the Job Reference field change the relevant job number and press Tab.
- Note: If you don't know the job number, click the adjacent right-pointing arrow to display a list of jobs. Select the job then click Accept. By clicking the adjacent down-pointing arrow, you can add a new job if required.
- Result: The job title, customer name and list of activities is displayed.
- (Optional) In the Actual Rate Code field, type the rate code and Press Tab.
- Note: If you don't know the rate code, click the adjacent right-pointing arrow to display a list of rate codes. Select the relevant rate code then click Accept. By clicking the adjacent down-pointing arrow, you can add edit or add a rate.
- Result: A range of fields is displayed. The cost rate fields are pre-populated from the selected activity.
- If modifying the time taken, in the Quantity field, overtype the number of hours as a decimal number, or select dates from the date picker and specify start and finish times in hours and minutes.
- Note: If you use the date pickers and time fields, the decimal value in the Quantity field will be calculated for you on clicking Tab. Express time using the 24 hour clock, e.g. 23:00
- If modifying the production quantity, in the Production Quantity field, overtype the actual number of finished items.
- Click OK.
- Result: The time and cost record's details are displayed on the Time & Cost window.
Note: If you want to edit the record, at the bottom-right of the window, click Edit Entry.