
Setup
Introduction
Printshop terminals, stations or computers can be set up to run Printcost's printshop management software. With Printcost's Printshop Management, you can:
- manage the loading of each machine on the printshop floor, and
- assign employees to one or more machine tasks.
Station / Terminal
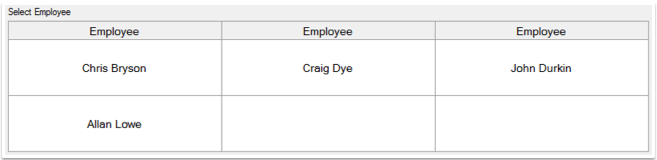 Printshop Management – Select Employee
On this page:
Table of Contents:
- Setting up a New Station
- Managing Employee Access to the Station
- Job Access
- Adding Jobs to a Station Manually
- Assigning Activities to the Station
- Managing a Station's Downtime Activities
Setting up a New Station
A station defines the behaviour of a PMS terminal. It defines which employees can use the terminal, what jobs and activities are displayed on that terminal. Any given station can be used for more than one terminal.
Before you begin
Before Setting up a new station, ensure that
- the employees/processes/loadings that will be accessed by the station, have been set up
- Note: This can be done under the Miscellaneous menu.
- the Station Master File window is displayed.
- To do this, on the left-menu, under Printshop, click Station.
To set up a new station:
Follow these steps to set up a new station from scratch.
Note: To save time and where relevant, you can copy another station's details and then modify them.
- On the Station Master File window, click New.
- Result: You will be requested to type a station code for the new station.
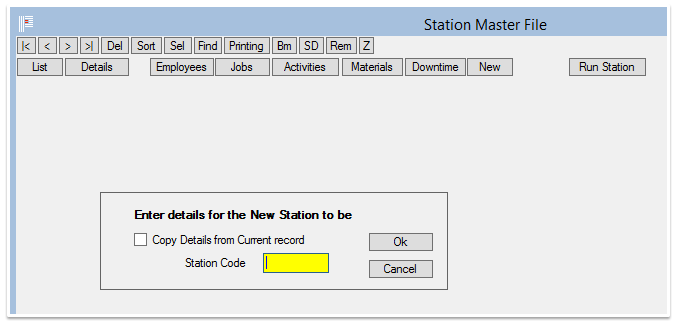 New Station
 - In the Station Code field, type a unique station code or name for the station, then press OK.
- Note: The station code can only be up to four characters long.
- Result: The Station details are displayed
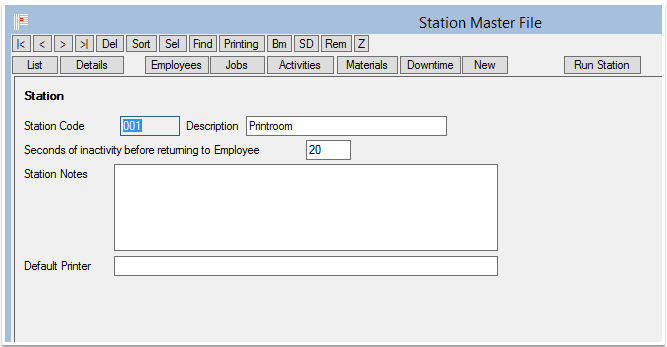 Station Details
 - In the Description field, type a description of the station.
- Note: The description can be up to 20 characters long.
- On the 'Seconds of inactivity...' field, type the number of seconds that you want to elapse after an employee has used the station.
- Note: This is the number of seconds that will elapse after the station has been used. When this time elapses, the list of users is displayed. If there are two or more users using the station, having the station revert to a list of users minimises the possibility of someone unintentionally making changes to someone elses tasks. The next user can select his/her name rather than having to back out of someone else's screens.
- (Optional) In the Notes field, type some notes about the station.
- From the Default Printer droplist, select the printer that the users of this station will have access to.
What Next?
For the station, complete the following tasks:
- Assign employees to the station.
- For more information, see Managing Employee Access to the Station below:
- Set up the type of jobs that are to be displayed at the station
- For more information, see Job Access below:
- Set up the machines/loadings that are accessed by the station
- For more information, see Assigning Activities to the Station below:
- Set up the downtime activities.
- For more information, see Managing a Station's Downtime Activities below:
Managing Employee Access to the station
The station typically displays a set of buttons with users' names. The employee selects his or her name to display the tasks that are relevant to his or her work.
Employees Who can Access the Station
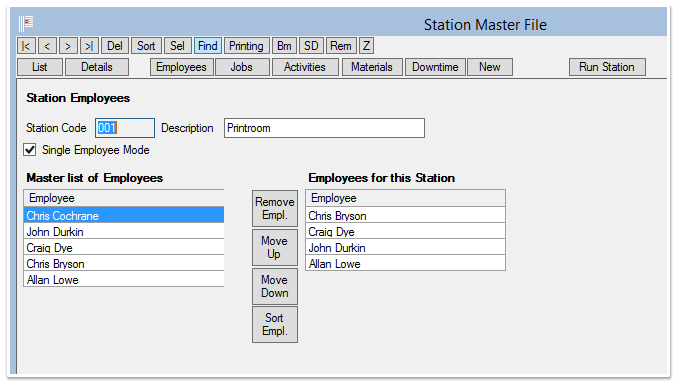 Station Master File - Employees
Single Employee Mode Checkbox
If this checkbox is not ticked:
- there is less chance of an employee mistaking someone else's tasks for their own, because
- the station's screen will regularly revert back to displaying the names of employees, forcing employees to log into the station.
Tick this checkbox if:
- there is only one employee using the station, or
- Note: This means the employee is not required to log in every time he/she needs to use the station.
- there are more employees using the station, but you don't want the station to regularly revert back to displaying the list of users
- For example there may be one employee using the station almost exclusively, even though from time to time other users may need to use it. [?In this case, the screen will reset itself for the user at the top of the 'Employees for this Station' list.?]
Before you begin
Before managing the list of employees for the station, ensure that:
- the station has been set up
- Note: For more information, see Setting up a New Station above.
- the Employees tab of the Station Master File window is displayed.
- To do this, on the left-menu, under Printshop, click Station, then click Employees.
To assign an employee to the station:
- On the 'Master List of Employees' list, click the relevant employee.
- Result: The employee's name is added to the 'Employees for this Station' list.
- Note: Clicking the same name again, adds an additional instance of the employee to the list on the right. Ensure that each employee is listed only once on the 'Employees for This Station' list.
To remove an employee from the station:
- On the 'Employees for this Station' list, click the relevant employee.
- Result: The employee's name highlighted.
- Click 'Remove Empl.'
- Result: The employee's name is removed from the 'Employees for this Station' list.
To move an employee up and down the 'Employees for this Station' list:
- On the 'Employees for this Station' list, click the relevant employee.
- Result: The employee's name highlighted.
- Click the Move up or Move Down button.
- Result: Depending on which button you click, the employee's name moves up and down the 'Employees for this Station' list.
To remove an employee from the station:
- On the 'Employees for this Station' list, click the relevant employee.
- Result: The employee's name highlighted.
- Click 'Remove Empl.'
- Result: The employee's name is removed from the 'Employees for this Station' list.
To sort the employees of this station by alphabetical order:
- Click the 'Sort Empl.' button.
- Result: The list of employees assigned to the station are arranged in ascending or descending alphabetical order.
- Note: Pressing the 'Sort Empl' button will reverse the alphabetical order of the listed names.
Job Access
On the Jobs tab, you can choose what will be displayed on the terminal/station. For example, select:
- 'Work in Progress' to display work in progress for current jobs
- Note: 'Work in Progress' jobs across the entire company wil be displayed on the terminal/station.
- 'Scheduled' to limit the jobs displayed to what is planned through the planning board for this particular station.
- Note: Only use if if your company uses Printcost's planning board. If your company is not using the planning board to schedule jobs, the data will be unavailable.
- 'Manual' to manually assign jobs to a station.
- For more information, see 'Manually Adding Jobs to the Station' below
- 'None' which will require users to enter a job number
- Note: Selecting none means that nothing will be displayed on the station except a field requiring the operator to enter the relevant job number.
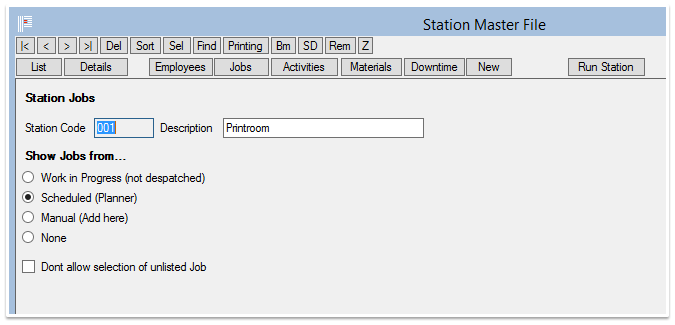 Jobs
Jobs
Scheduled (Planner)
If you use the planning board, then the recommended option is to only show what is planned. To do this, select 'Scheduled (Planner). This ensures that only the relevant tasks are available to the employee when selecting tasks from the terminal.
Allow Selection of Unlisted Job
If this option is ticked for the following options, the employee is prevented from choosing jobs that are not listed:
- Work in Progress (not despatched)
- Scheduled (Planner)
- Manual (add here)
Adding Jobs to a Station Manually
If you select 'Manually Add Jobs to Station', two lists are displayed:
- The first (left) is a list of jobs that are already added to the station.
- The second (right) is a list of jobs that can be added to the station.
Note: The usual method of adding jobs is by using the planner or displaying work in progress. For more information see Job Access (above).
Note: Depending on your version of Printcost, the columns may be the other way around.
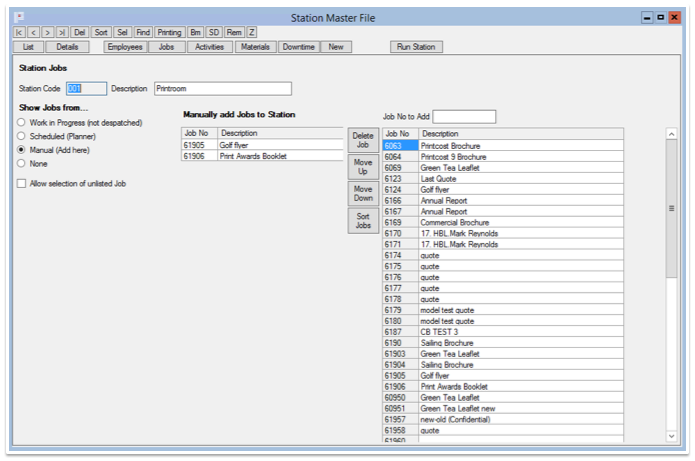 Manually Add Jobs to Station.
Before you begin
Before adding jobs to a station manually, ensure that:
- the Station Master File window is displayed.
- Note: To do this, on the left-menu, under Printshop, click Station.
- the relevant station is selected.
- Note: To do this, click List, then double-click the relevant station.
- the Station Jobs tab is displayed.
- Note: To do this, on the Station Master File window, click Jobs.
- the Manual (Add here) option is selected.
To manually add a job the station:
- From the list on the right, click the job that you want to add to the station.
- Result: The job is added to the station and displayed on the list on the left.
- Note: Ensure the job is only listed once on the station. If the job is listed twice or more, delete the additional instances.
To remove an job from the station:
- From the list on the left, click the relevant job.
- Result: The job is highlighted.
- Click 'Delete Job'
- Result: The job is removed from the station (list on the left).
To move a job up and down the list:
- From the list on the left, click the relevant job.
- Result: The job is highlighted.
- Click the Move up or Move Down button.
- Result: Depending on which button you click, the job moves up and down the list on the left.
To sort the station's jobs by description:
- Click 'Sort Jobs'.
- Result: The list of jobs assigned to the station are arranged in ascending alphabetical order.
- Note: Pressing the 'Sort Empl' button will reverse the alphabetical order of the listed names.
Assigning Activities to the Station
You can assign activities to always be displayed on a station, or only be displayed if estimated in the job.
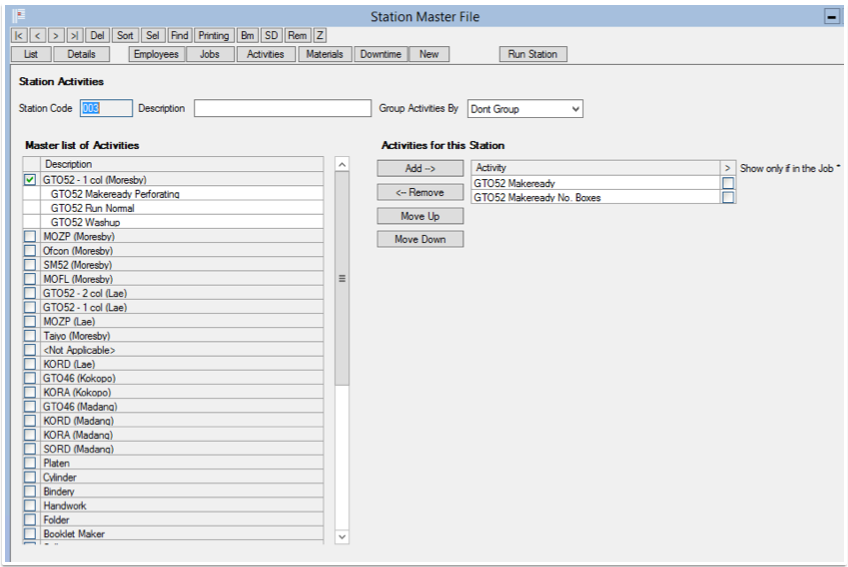 Activities
Before you begin
Before assigning machines and loadings to a station, ensure that:
- the Station Master File window is displayed.
- Note: To do this, on the left-menu, under Printshop, click Station.
- the relevant station is selected.
- Note: To do this, click List, then double-click the relevant station.
- the Station Activities tab is displayed.
- Note: To do this, on the Station Master File window, click Activities.
To manually add an activity to the Station:
- From the Master List of Activities, select the relevant loading.
- Note: To do this, click the relevant checkbox.
- Result: A list of activities is displayed.
- Select the relevant activity.
- Click Add.
- Result: The activity is added to the station and is displayed on the right.
- (Optional) Select the relevant activity by clicking it's checkbox.
- Note: Only select the activity's checkbox if you want it displayed when estimated within the job. If unselected, the activity will always be displayed on the station.
To remove an activity from the station:
- From the list on the right, click the relevant activity.
- Result: The activity is highlighted.
- Click 'Remove'
- Result: The activity is removed from the station and is displayed on the Master List of Activities (left).
To move an activity up and down the list:
- From the list on the right, click the relevant activity.
- Result: The activity is highlighted.
- Click the Move up or Move Down button.
- Result: Depending on which button you click, the activity moves up and down the list on the right.
Managing a Station's Downtime Activities
Downtime activities can be set for the station and applied by any employee when not productive.
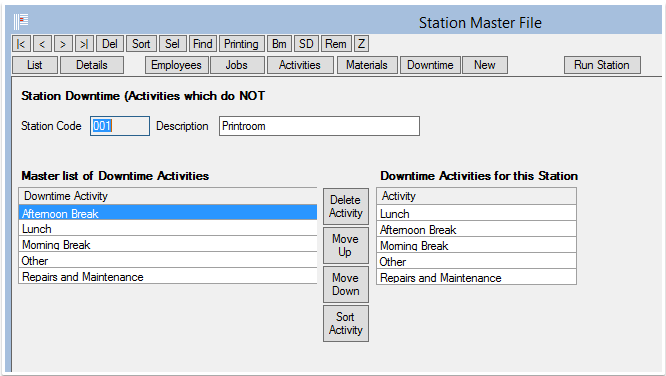 Downtime
Before you begin
Before managing downtime activities, ensure:
- you have created the downtime activities in the Actual Rates file
- the Station Master File window is displayed.
- Note: To do this, on the left-menu, under Printshop, click Station.
- the relevant station is selected.
- Note: To do this, click List, then click the relevant station.
- the Station Downtime tab is displayed.
- Note: To do this, on the Station Master File window, click Downtime.
To assign a downtime activity:
- From the Master List of Activities, double-click the relevant activity.
- Result: The activity is added to the station and is displayed on the right.
To remove an activity from the station:
- From the list on the right, click the relevant activity.
- Result: The activity is highlighted.
- Click 'Remove'
- Result: The activity is removed from the station and is displayed on the Master List of Downtime Activities (left).
To move an activity up and down the list:
- From the list on the right, click the relevant activity.
- Result: The activity is highlighted.
- Click the Move up or Move Down button.
- Result: Depending on which button you click, the activity moves up and down the list on the right.