
Planning Board
With Printcost's planning board, you can easily schedule and reschedule the automated tasks that are performed by your machines. You can also schedule downtime for a machine, e.g., for maintenance.
Note: Depending on your user profile, you may not be able to use the planning board to schedule tasks. If you need to schedule tasks, please contact the Printcost Support Desk.
Note: Printcost requires the job to be estimated (at job or quote stage) before it can automatically create tasks for a job. For the automatic calculation of task durations, the rates for the processes that are required to produce a job must first be assigned to the appropriate loadings. Therefore, the setup of the estimating system is crucial. For this reason, set up is usually performed by Printcost staff. If you require assistance with the setup of your planning board, please contact the Printcost Support Desk
Machines
Before the planning board can be used to schedule a job's tasks to a machine:
- the machine's loading must be set up, and
- Note: If a machine's loading is not set up, please contact Printcost. Printcost staff will set this up for you.
- the machine's availablility must be set up.
- Note: If a machine's availablility is not set up, please contact Printcost. Printcost staff will set this up for you.
On this page:
Table of Contents:
- About the Planning Board
- Displaying the Planning Board
- Updating PSM Shopfloor Stations
- Modifying Plan View
- Task Codes
- Automated Highlighting (Colours)
- Highlighting Related Tasks
- Displaying Only One Day's Tasks
- Displaying Only One Job's Tasks
- Displaying Only One Machine's Tasks
- Printing a Report
 The Planning Board
About the Planning Board
The planning board is a flexible board that you can use for scheduling all your jobs' tasks. Depending what you are used to, you can display the tasks:
- on a horizontal timeline in Plan View, or
- as a list in List View
Plan View
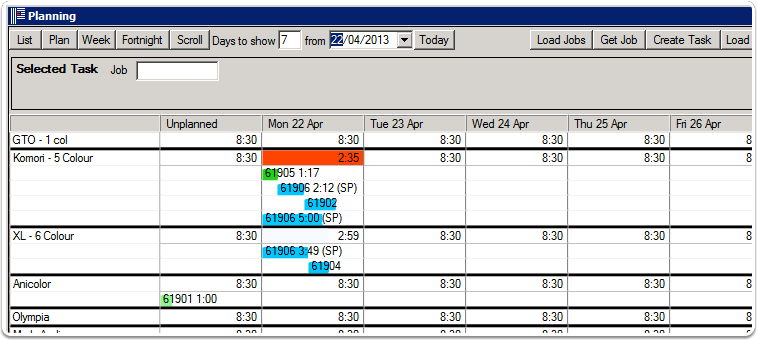
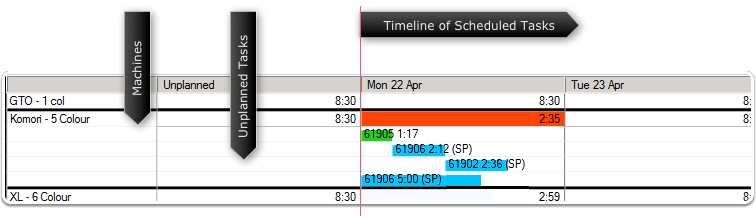
Under Plan View, Printcost's planning board displays a timeline of unscheduled (unplanned) and scheduled tasks. These are the job tasks that are assigned to a range of machines.
 Plan View
Machines Column
Tasks are assigned to the machines that are listed in the column on the far-left of the planning board.
Unplanned Tasks Column
Tasks that are yet to be scheduled are listed in the Unplanned column.
Note: The planner should sign completed tasks off at the end of each day. When signing on the following day, Printcost will ask you about any tasks that are recorded as incomplete and whether they have in fact been completed. If you confim that a task was not completed, the task will automatically be moved to the Unplanned column.
Timeline / Scheduled Tasks
The timeline displays one column for each day. The days for which tasks are scheduled run horizontally across the planning board.
Cells
Within each cell of the planning board, one or more tasks (for one or more different jobs) may be listed in the sequence they will be performed.
Each task is expressed as a code and is assigned a colour. The length of the coloured highlight provides a relative indication of how long the task will take. The colour provides an indication of the task's status.
For an explanation of the codes and colours, see "Task Codes & Colours" below.
List View
Under List View, Printcost displays the list of tasks in a table. List View can be used for planning and reporting.
 List View
Sorting
To sort the table, click the relevant column's header. This will display the table in ascending order based on the column you selected. To display the table in descending order, click the same column's header again. Clicking the header will toggle the table between ascending and descending order.
As an alternative, at the top of the window, click Sort, select the column that you want the table sorted by, and the order in which data is listed:
- ascending (alpha sort), or
- descending (alpha sort descending).
Modifying a Task
In List View, you can also select a task, and above the planning board, modify the following details for the selected task:
- Plan Date
- Machine
- Duration
- Planner Notes
Scroll View
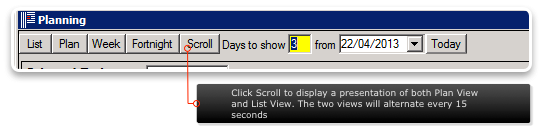
Clicking the Scroll button will put the planning board into a presentation mode. In this mode, the planning board automatically toggles between Plan View and List View every 15 seconds.
Scroll View is best suited to a dedicated large LCD screen.
 Scroll View
Displaying the Planning Board
 Left-Menu
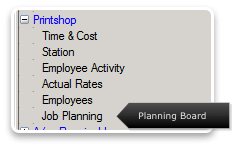
As with all modules within Printcost, the planning board can be accessed through Printcost's left-menu.
To display the planning board:
- On the left-menu, under Printshop, click Job Planning
- Result: The Planning window displays the Planning Board. The planning board is displayed as a timeline in Plan View.
What's Next?
If you want to see the planning board in List View, then, at the top-left of the Planning window, click List. To redisplay the planning board in Plan View, click Planning.
Updating PSM Shopfloor Stations
If you have PSM Shopfloor stations in the factory, you can send the scheduled tasks on the planning board to the relevant stations. Employees in the factory will recieve the tasks that have been scheduled for their stations, and in the sequence they are to be produced.
Before you begin
Before updating PSM shopfloor stations, ensure the planning board is displayed in Plan View.
To update the PSM shopfloor stations:
- At the top of the planning board (Plan View), click Load Stations.
- Result: The relevant PSM shopfloor stations are updated.
Modifying Plan View
You can modify the Plan View of the planning board to suit how you work. You can:
- choose to cascade or stack your tasks, and
- choose the date range covered by the planning board.
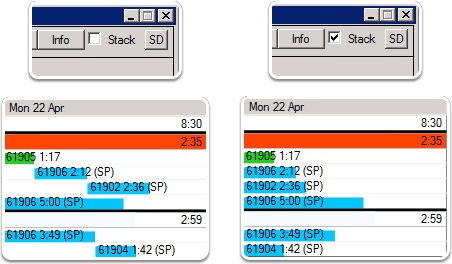 Left-Top: Stack Checkbox Not Selected. Left-Bottom: Cascaded Tasks.
Right-Top: Stack Checkbox Selected. Right-Bottom: Stacked Tasks.
Cascade or Stack Your Tasks
Cascade Your Tasks
When you use the planning board for the first time, the tasks are cascaded.
A machine is limited in how many tasks it can perform at any one time, so the cascade provides a visual reference of the sequence in which tasks are performed by the machine over its period of availability.
The cascade allows you to easily distinguish the tasks performed in sequence (one after the other) from the tasks that are performed in parallel (at the same time).
To cascade your tasks, at the top-right of the Planning window, ensure that Stack checkbox is not selected.
Stack Your Tasks
If you prefer, you can stack all the tasks vertically, that is, left-align them. This can make it easier for you to scan through the tasks as a list. However, it does not graphically show you which tasks are performed in sequence and which ones are performed in parallel. Stacked view is particularly useful when you are using codes and colours to identify or group a customer's job(s).
To stack your tasks, at the top-right of the Planning window, ensure that the Stack checkbox is selected.
Choose the Date Range Covered by the Planning Board
To choose the number of days displayed on the board, you can:
- click Week, to display seven days of planning
- click Fortnight, to display 14 days of planning, or
- overtype the 'Days to Show' field with the number of days you want to see, then press Tab.
- Note: Because of the size of the planning board, displaying more days of data results in less data displayed per task. If displaying a long period of time, you can mouse over the task to display more information.
Today's date is automatically the first date displayed in Plan View. To select another date, click the date field's drop-down arrow and select another date.
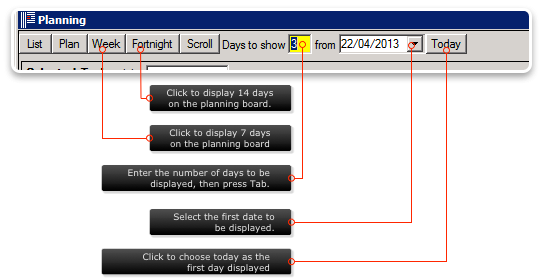
Date Range Selection Options
The Required Number of Planning Days is Not Displayed
If, for example, you have set three as the number of days to be displayed (Days to Show = 3) and only two days are displayed, chances are yesterday's date will be set in the 'from' calendar. To ensure all the required planning days are displayed (from today), set the 'from' date to today's date.
 Three Days from Today
Task Codes
Under Plan View, you can control the amount of task information that is displayed inline.
Codes
Basic Information
The minimum items of information displayed for each task are the job number and start time. The length of a coloured bar provides a relative indication of how long a task will take. Tasks that are scheduled to take longer will have a longer coloured bar.
Note: The time in the top-right corner of a cell is the period of time that the machine is available for that day. That is, it is the remaining time the machine has available for scheduling tasks.
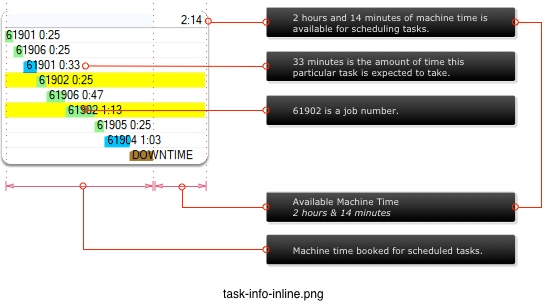 Inline Codes - Basic Information
Machine's Availability Exceeded
If the machine's available time is highlighted red, then the amount of tasks scheduled for the machine (on that day) exceeds its planned availability. This is not an error. Even though a machine may have a planned usage of, for example, eight hours per day, more than eight hours of tasks may be scheduled for the machine, e.g., to accomodate overtime.
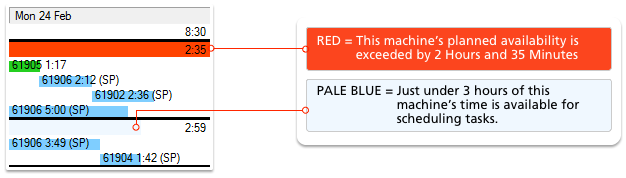 Machine's Planned Availability is Exceeded
Note: For more information on what the colours mean, see 'Automated Highlighting (Colours)' later in this document.:
Extra Information
 Inline Codes & Time
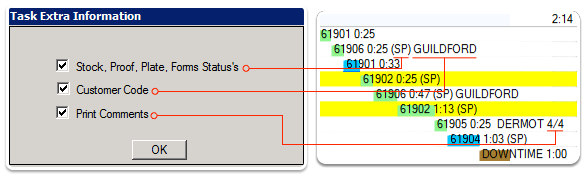
Depending on how Printcost was set up for you, more information, for example, the stock, proof, plate or form's status, where applicable, may also be displayed inline.
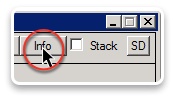
If you want to display more information inline, then at the top-right of the Planning Board window, click Info. On clicking Info, the 'Task Extra Information' window is displayed. With this window, you can select the information that you want to see on the planning board. When you have made your selection, click OK.
Note: The amount of information displayed inline depends on the width of the column, and this is affected by a number of factors, for example:
- the number of days displayed in the timeline, and
- whether you have limited what is displayed by job or machine.
 Inline Codes - Extra Information Displayed
Flags
Letters are used to flag items that require your attention. That is:
- S = Stock
- A = Proof (Approval)
- P = Plates
- D = Dies
- F = Forms
If a flag is displayed, the relevant item is outstanding. The status of the item may, for example, be 'un-checked', 'required' or 'ordered'. However, a flag will not indicate that the status of the item is 'on-hand'.
Customer Code
To streamline delivery to customers, you can display customer codes. This allows you to quickly identify the tasks that belong to a particular customer's job(s).
Print Comments
If selected, the first line of the printing comments in a job is displayed. This is usually used to display ink colours, so that the job can be grouped accordingly. Because only the first line of the printing comments is displayed, ensure that the desired information (e.g. colours) are entered on the first line of the job.
Information is Not Displayed?
If you have selected extra information to be displayed inline, and it is not displayed, you can mouseover the relevant task to display the extra information in a pop-up box.
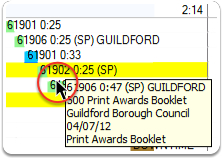 Placing the Mouse Over an Inline Code Displays the Extra Information
Note: Even though you may have selected one or more additional items to be displayed inline, the information is only displayed if there is sufficient room on the planning board. For example, displaying a shorter timeline on the planning board, or only displaying one machine's information, will reveal more information inline. By displaying a longer timeline, less inline information is displayed.
Automated Highlighting (Colours)
On the planning board, colours are used to provide you with information about the task or machine or customer. Many colours are applied automatically, depending on the status of the task or machine.
Note: You can also use colour to highlight related tasks, e.g., tasks that belong to the same job, late tasks, and tasks that were automatically rescheduled. For information on how to do this, see 'Highlighting Related Tasks' later in this document.:
Colours
Depending on the task or machine's status, Printcost will automatically highlight it using one the following colours:
- Bright Green
- Pale Green
- Blue
- Pink
- Grey
- Brown
The length of each coloured bar provides a relative indication of how long the task will take.
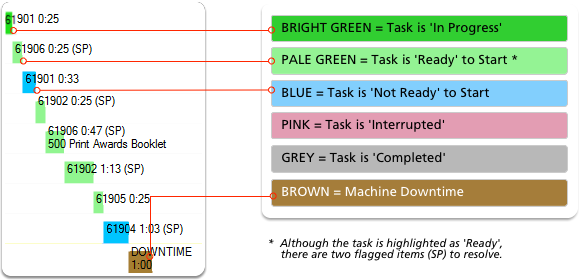 Planning Board Colours Applied by Princost Depending on Task or Machine Status
Bright Green
If the task is highlighted bright green, then the task has been started and is 'In Progress'.
Note: 'In Progress' is the status assigned by Printcost to the task.
Pale Green
If the task is highlighted pale green, then the task is 'Ready' to start.
Note: 'Ready' is the status assigned by Printcost to the task.
Blue
If the task is highlighted blue, then the task is 'Not Ready' to start and the job requires your attention.
Note: 'Not Ready' is the status assigned by Printcost to the task.
Pink
If the task is highlighted pink, then the task has been 'Interrupted'.
If a task that is underway is stopped prior to completion, shopfloor terminals automatcially set the status to 'Interupted' (pink). A task may be stopped, for example, when breaking for lunch, or to do an urgent job.
Note: 'Interrupted' is the status assigned by Printcost to the task.
Grey
If the task is highlighted grey, then the task is 'Completed'.
Once a task has been completed, shopfloor will set the task to 'completed' (grey). The completed task will remain displayed on the planner for the remainder of the day. Completed tasks are automatically removed by the opening of the planning board on the following day.
'Completed' is the status assigned by Printcost to the task.
Brown
If the machine has been scheduled for downtime, then the downtime period will be highlighted brown.
For example, downtime can be scheduled for a machine that requires maintenance.
'Downtime' is the status assigned by Printcost to the machine.
Manually Change a Task's Status
To manually change a task's status or to schedule downtime, see:
Highlighting Related Tasks
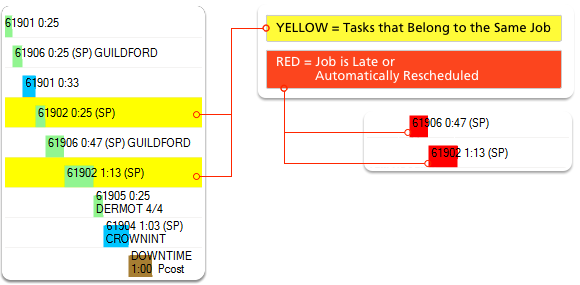
Tasks that Belong to the Same Job
Highlighting tasks that belong to the same job makes it easy to see all of the job's tasks across the planning board - at a glance. These tasks are highlighted yellow.
Tasks that are Late or Automatically Rescheduled
You can temporarily highlight all the jobs that:
- are late, or
- If the Job's required date is prior to today's date, the job can be highlighted. If there are multiple deliveries in a job, only the first delivery is highlighted.
- have automatically been rescheduled.
- Jobs that were planned for the previous day but were not marked as completed by the shopfloor, are automatically re-scheduled for the start of the current day.
These tasks are highlighted red.
 Highlighting Tasks that Belong to the Same Job (Yellow), Jobs that are Late (Red) or Automatically Rescheduled Jobs (Red)
Before You Begin
Before highlighting your tasks, ensure the planning board is displayed in Plan View.
To highlight (Yellow) tasks that belong to the same Job:
- On the Planning Board, click a task that belongs to the relevant job.
- Result: All of the tasks that belong to the job are highlighted yellow.
To highlight (Red) late or rescheduled jobs:
 Highlight Button
- Near the top-right, above the planning board, click Highlight.
- Result: The Task Highlighting window is displayed.
- Note: There are three options to choose from. They are None, Late (first delivery) and Re-scheduled.
- Select the relevant option.
- Note: To highlight the late jobs, select Late (first delivery)
- Note: To highlight rescheduled jobs, select Re-scheduled.
- Click OK
- Result: Depending on your selection, either late or rescheduled tasks are highlighted red.
- Note: Depending on your selection, the Highlight button is labelled 'Late' or 'Resched.'
To remove the red highlighting, click the red 'Late' or 'Resched.' button, then repeat Steps 1 to 3; selecting 'None' at Step 2.
Displaying Only One Day's Tasks
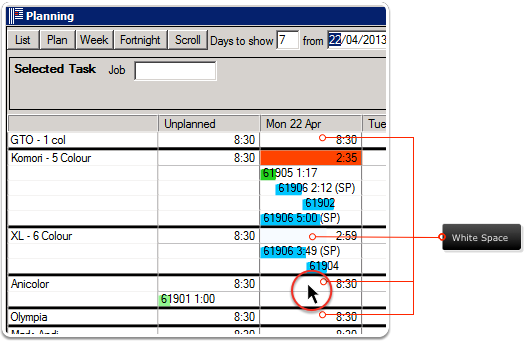
You can easily display all the tasks that will be scheduled on a particular day. In addition, the Unplanned column is displayed.
Before you begin
Before displaying only one day's tasks, ensure the planning board is displayed in List View or Plan View.
To display one day's tasks in Plan View:
- In the relevant day's column, place the mouse pointer over some white space and double-click.
- Result: For all machine's, the Unplanned column (unscheduled tasks) and the list of scheduled tasks for the selected day are displayed.
 For the relevant day, double-click any machine's availability (shown above).
This will display the unplanned column and the selected day's schedule.
To display One Day's Tasks in List View
- Click the relevant task (row).
- Near the top-right above the planning board, click Single Day View.
- Result: The Single Day View window asks you to confirm the date.
- Note: If you want to see a different day's task, or the date field is empty, from the calendar, select the relevant date.
- Click OK.
- Result: The planning board is updated.
- Note: Only the tasks relating to the selected job are displayed on the planning board.
What Next?
- In Plan View, click Plan, or
- In List View, click Show All Tasks.
Displaying Only One Job's Tasks
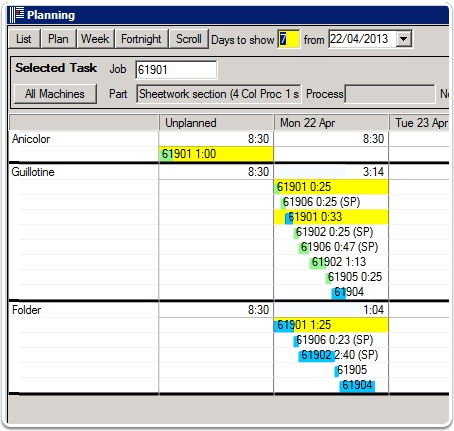 Machines Used for Only One Job
The selected job's tasks are highlighted yellow.
If you want to focus on one job, you can limit the tasks that are displayed, to the machines involved in that particular job.
Note: Although the machines listed on the planning board are all assigned to one job, the machines' other tasks (for other jobs) are still listed.
Before You Begin
Before displaying only one job's tasks, ensure the planning board is displayed in List View or Plan View.
To display One Job's Tasks in Plan View
- On the planning board, click any task that belongs to a particular job.
- Note: Alternatively, near the top-left of the window, you can enter the job number in the Job field, then press tab.
- Result: All the tasks of the related job are highlighted yellow and some of the jobs details are displayed above the planning board.
- Near the top-left above the planning board, click Examine Job.
- Result: The planning board is updated. Only the machines relating to the selected job are displayed on the planning board.
To display One Job's Tasks in List View
- Click the relevant task (row).
- Near the top-right above the planning board, click Single Job View.
- Result: The Single Job View window asks you to confirm the task's job number.
- Note: If you want to see a different job, overtype the displayed number with the job number of the job you want to see.
- Note: If the job number field is empty, type in the job number of the job you want to see.
- Click OK.
- Result: The planning board is updated.
- Note: Only the tasks relating to the selected job are displayed on the planning board.
What's Next?
Plan View
To redisplay all tasks for all machines, at the top-left, above the planning board, click All Machines.
List View
To redisplay all tasks for all machines, at the top-right, above the planning board, click Show All Tasks.
Displaying Only One Machine's Tasks
 One Machine's Tasks
If you want to focus on one machine, you can limit the tasks that are displayed, to that particular machine.
Before You Begin
Before displaying only one machine's tasks, ensure the planning board is displayed in List View or Plan View.
To display machine's Tasks in Plan View
- On the Planning Board, double-click the relevant machine's name.
- Result: The planning board is updated. Only the selected machine's tasks are displayed on the planning board.
To display machine's Tasks in List View
- Click the relevant task (row).
- Near the top-right above the planning board, click Single Machine View.
- Result: The Single Machine View window asks you to confirm the selected machine.
- Note: If you want to see a different machines tasks, select the machine from the dropbox.
- Click OK.
- Result: The planning board is updated.
- Note: Only the tasks relating to the selected machine are displayed on the planning board.
What's Next?
To redisplay all tasks for all machines, either:
- double-click the machine's name, or
- click All Machines.
Printing a Report
From List View, you can print a report that includes, where relevant, the following information for each task:
- Job Number
- Note: This is the job that the task belongs to.
- Location
- Status
- Customer
- Production Quantity
- Job Title
- Notes
- Date Required
- Note: This is the date that the job needs to be completed by.
- Stock
- Plates
- Task Duration
- Plan Date
- Note: This is the date that the task is scheduled to be completed.
- Part
- Description
Note: In the report, tasks are grouped by machine.
Before You Begin
Before printing a report, ensure that:
- the planning board is displayed in List View
- that the list of tasks displays the tasks that you want to print or report on.
- Note: You can use the filter to display the relevant list of tasks.
To print a report:
- In List View, on the button bar at the top of the window, click Printing.
- Result: The Printer Control Screen window is displayed.
- From the list of reports, click the relevant report.
- Review the report.
- Note: Use the Page selector that is located at the top-right of the Printer Control Screen window.
- Note: If any tasks are missing, or the wrong tasks are in the report, click Close, use the filter to list the relevant tasks, then return to Step 1.
- If not altready selected, from the Printer dropbox, select the printer that you want to print to.
- Click Print.
- Result: The report is printed and the Printer Control Screen window is closed.