
Reschedule Tasks
The rescheduling of tasks is straight forward. In plan view, this can be done by dragging and dropping tasks from one day to another. In list view, it's a matter of selecting the task, then changing the date.
On this page:
Table of Contents:
- Rescheduling a Task
- Scheduling Two or More Tasks
- Assigning a Task to Another Machine
- Reordering a Day's Tasks
- Merging Two Tasks
- Modifying a Task's Duration or Splitting a Task in Two
- Changing a Task's Status to 'Not Ready', 'Ready', or 'In Progress'
- Interrupting a Task
- Changing a Task's Status to 'Completed'
- Deleting a Task
- Removing All of a Job's Tasks
Rescheduling a Task
Plan View
Just as with unplanned tasks, in Plan View, you reschedule tasks (and downtime) by dragging and dropping them across the Plan View's timeline.
List View
In List View, you can reschedule a task by changing its plan date.
Before You Begin
Before rescheduling a task, ensure that:
- the planning board is displayed
- depending on your preference, display either Plan View or List View, and
- Note: If using plan view, ensure that both dates for scheduling the tasks are displayed, that is,the date that you are moving the task from, and the date you are moving the task to.
- Both the date the task is currently scheduled for, and the date that you want to schedule it for must be displayed.
To reschedule a task in Plan View:
- Drag the task across the timeline to the required day, then release the mouse.
- Result: The task is rescheduled.
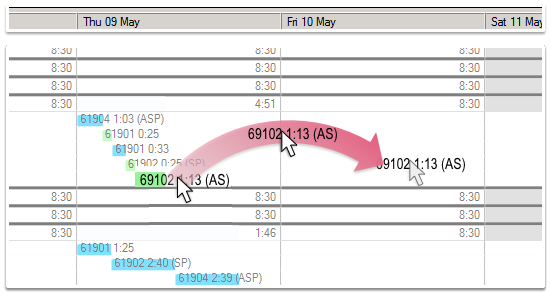 Drag & Drop a Task to Reschedule
To reschedule task in List View:
- Click the relevant task.
- Result: Some of the task's details are displayed above the planning board.
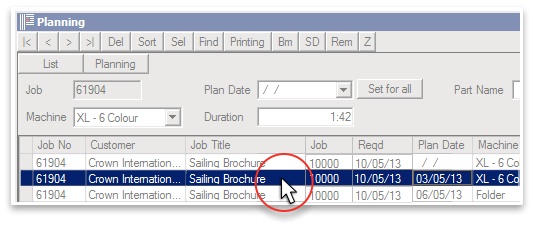
- Using the calendar, reschedule the task.
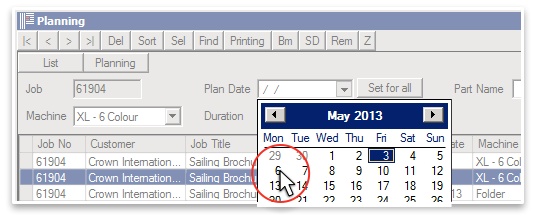
- Press Tab.
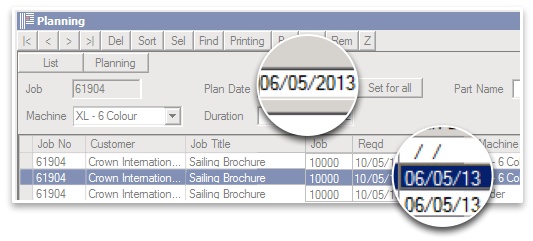
- Result: Both Plan Date fields are updated with the selected date.
- Note: The date field in the Plan Date Column may not update automatically. Printcost uses the date displayed in the Plan Date drop-down calendar, and this is the date that will also be used in Plan View. To force the date in the List View's Plan Date column to update, you can repeatedly press the < and > arrows at the top left of the window. This refreshes the records in the list.
Scheduling Two or More Tasks
With the planning board in List View, you can set two or more tasks to the same date in one go. For example, rather than individually scheduling tasks, you can select all the relevant tasks and schedule them in one go.
IMPORTANT: Ensure that you select the tasks that you want to reschedule. If you do not select any tasks, all of the tasks on the planning board will be set to the same date. If you inadvertently set all planned and unplanned tasks to the same date, there is no undo button to reverse this and as a consequence, you may have to individually reschedule every task on the planning board.
Before You Begin
Before scheduling two or more tasks to the same date in one go, ensure that the planning board (List View) is displayed.
To schedule two or more tasks for the same date:
- In List View, at the top-left of the window, click Sel.
- Result: The Filter-Planning window displays a range of options for selecting and filtering tasks.
- Using the filter, select the relevant parameters, then click Proceed
- Note: The number of tasks listed in List View changes to reflect your search parameters.
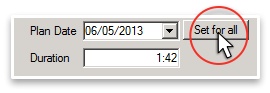
- Using the calendar, select a date.
- Result: This is the date that all selected tasks will be scheduled for.
- Press Tab.
- Press Set for All.
- Result: You will be asked to confirm that you want to set selected tasks on production to the selected date. That is, the tasks currently listed in List View.
- Click Yes.
- Result: The selected date is applied to all of the tasks selected in Step 2, that is, all tasks currently listed under List View.
What's Next?
Redisplay the Filter-Planning window, and set it to display all tasks.
Assigning a Task to Another Machine
There are three ways to assign a task to another machine:- In Plan View, you can drag and drop a task from one machine to another.
- In Plan View, you can display the task's details and change the machine using a dropbox.
- In List View, you can select the task, and at the top of the window, use a dropbox to select another machine.
Before You Begin
Before assigning a task to another machine, ensure that:
- the planning board is displayed in either Plan View or List View, and
- the relevant task is displayed.
- Note: If the task is not displayed, you may need to change the date range that is displayed on the planning board.
To assign a task to another machine (Drag and Drop):
- In Plan View, drag the task from its current row in the table to the required machine's row in the table, then release the mouse.
- Result: You will be requested to confirm the change to a different machine.
- Click Yes.
- Result: The task is assigned to another machine.
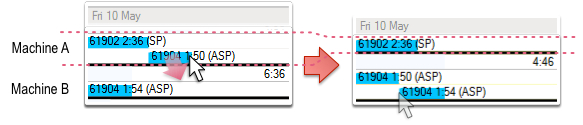 Drag and Drop a Task to Another Machine
To assign a task to another machine (Plan View):
- On the planning board (Plan View), select the relevant task.
- Note: The relevant task is highlighted yellow, along with other task that belong to the same job.
- At the top-right of the window, click View Task.
- Note: Alternatively, you can double-click the task to display its details.
- Result: The Task Details window is displayed.
- From the Machine dropbox, select the relevant machine.
- Click OK.
- Result: The planning board is updated and the task is assigned to the machine that you selected in Step 3.
To assign a task to another machine (List View):
- On the planning board (List View), select the relevant task.
- Result: Some of the selected task's details are displayed above the planning board. This includes the machine to which the task has been assigned.
- From the Machine dropbox, select the relevant machine.
- Result: The task on the planning board is updated with the selected machine.
Reordering a Day's Tasks
In Plan View, it is easy to reorder your tasks for the day.Before reordering any tasks, ensure that:
- the planning board is displayed in either Plan View or List View, and
- the relevant day's tasks are displayed.
- Note: If the day is not displayed, you may need to change the date range.
To reorder a task:
- Drag the task to a new location, then release the mouse.
- Result: The task is rescheduled.
- Note: If a window displays a message asking you to change machines or merge two items, click No, and repeat Step 1. It may also take more than one go to drop the task where you want it.
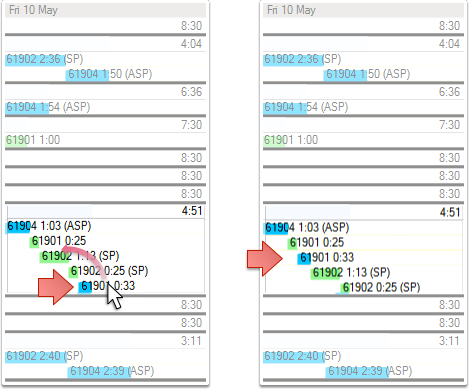 Reorder Tasks
Merging Two Tasks
In Plan View, you can merge two tasks by dragging and dropping one task on top of another.
Note: You can only merge tasks that belong to the same job.
Before You Begin
Before merging two tasks, ensure that:
- the planning board is displayed in Plan View, and
- the relevant tasks are visible.
- Note: If the tasks are not displayed, you may need to change the date range.
To merge two tasks:
- Drag one of the tasks over the top of the other task, then release the mouse.
- Result: You will be asked if you want to merge the two tasks.
- Note: The question actually asks you if you want to 'merge these two times'.
- Note: If the question asks you to change machines, click No. This question will only be asked if you inadvertently drag a task that is performed by a particular machine onto the table row of another machine.
- Click Yes
- Result: The two tasks are merged into one task. The duration of the resulting task equals the sum of the two original tasks.
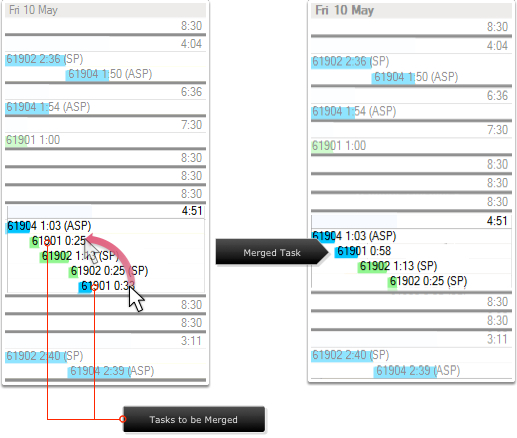 Reorder Tasks (Before - Left, After - Right)
Modifying a Task's Duration or Splitting a Task in Two
With Printcost, you can extend the task's duration, or if reducing the task choose between one shorter task, or two shorter tasks.
Follow-On Task - Splitting a Task in Two
In Plan View, if you choose to reduce the task's duration, you will be asked if you want to create a follow on task. That is, by reducing the duration, you are given a choice of:
- reducing the duration of the task, or
- creating two tasks of shorter duration.
- Note: The second task is the follow-on task and it's duration is automatically calculated as difference between the original task's duration and the duration that you specify.
If you inadvertently split the task in two, you can delete the follow-on task.
Note: When reducing the duration in List View, the task cannot be split in two.
Before You Begin
Before modifying a task's duration or splitting it in two, ensure that:
- the planning board is displayed in either Plan View or List View, and
- the relevant task is visible.
- Note: If the task is not displayed in Plan View, you may need to change the date range that is displayed on the planning board.
To modify a task's duration, or split it in two (Plan View):
- On the planning board (Plan View), select the relevant task.
- The relevant task is highlighted yellow, along with other tasks that belong to the same job.
- At the top-right of the window, click View Task.
- Note: Alternatively, you can double-click the task to display its details.
- Result: The Task Details window is displayed.
- In the Duration field, overtype the current value with the new duration.
- Note: Separate the hours and minutes with a colon or period, e.g., For one hour and 30 minutes, type 1:30 or 1.30
- Click OK.
- Result: If you reduced the duration of the task, the Time Reduced window asks you if you would like to create a follow on task. If you extended the task's duration, the planning board is updated with the new duration.
- If you want to reduce the duration because the task will be completed in the reduced timeframe, click No. The task will be displayed on the planning board with a shorter duration.
- If you want to split the task in two, click Yes. The planning board will split the task in two, with the follow on task automatically assigned to the following day.
To modify a task's duration (List View):
- On the planning board (List View), select the relevant task.
- Result: Some of the selected task's details are displayed above the planning board. This includes the selected task's duration.
- In the Duration field, overtype the current value with the new duration.
- Note: Separate the hours and minutes with a colon or period, e.g., For one hour and 30 minutes, type 1:30 or 1.30
- Press Tab.
- Result: The task on the planning board is updated with the new duration.
Changing a Task's Status to 'Not Ready', 'Ready', or 'In Progress'
In Plan View, you can manually change the task's status to 'Not Ready', 'Ready', or 'In Progress' depending on where the task is in production.
Note: On the planning board (Plan View), a completed task is highlighted:
- orange when not ready
- pale green when ready, or
- bright green when in progress.
Before you begin
Before changing the task's status, ensure that:
- the planning board is displayed in Plan View, and
- the relevant task is visible.
- Note: If the task is not displayed in Plan View, you may need to change the date range that is displayed on the planning board.
To change the task's status (Plan View):
- On the planning board (Plan View), select the relevant task.
- The relevant task is highlighted yellow, along with other tasks that belong to the same job.
- At the top-right of the window, click View Task.
- Note: Alternatively, you can double-click the task to display its details.
- Result: The Task Details window is displayed.
- From the Task Status dropbox, select the relevant option.
- Click OK
- Result: The planning board displays the task with a coloured highlight.
- Note: Depending on your selection, the task will be highlighted orange (Not Ready), pale green (Ready) or bright green (In Progress).
Interrupting a Task
Sometimes the task will need to be interrupted. This interuption can be reflected on the planning board by highlighting the task using a pink colour. For example, when staff break for lunch, or are called away for a meeting.
Note: On the planning board (Plan View), an interrupted task is highlighted pink.
Before you begin
Before highlighting the task pink (Plan View), ensure that:
- the planning board is displayed in Plan View, and
- the relevant task is visible.
- Note: If the task is not displayed in Plan View, you may need to change the date range that is displayed on the planning board.
To highlight the task pink (Interrupted):
- On the planning board (Plan View), select the relevant task.
- Result: The relevant task is highlighted yellow, along with other task that belong to the same job.
- At the top-right of the window, click View Task.
- Note: Alternatively, you can double-click the task to display its details.
- Result: The Task Details window is displayed.
- From the Task Status dropbox, select Interrupted.
- Click OK
- Result: The planning board displays the task with a pink highlight.
What Next?
When it is time to resume the task, repeat the steps (above) to display the Task Details window, select the relevant option, e.g., 'Ready' from the Task Status dropbox, and click OK.
Changing a Task's Status to 'Completed'
Once the task is completed, shopfloor terminals set the task to a status of 'Completed'. You can, however, manually change the task's status to 'Completed'.
Note: On the planning board (Plan View), a completed task is highlighted grey.
Note: Jobs that were scheduled for the previous day that were not completed are automatically rescheduled for the start of the current day. You can highlight these, e.g., first thing in the morning, so that:
- they can be chased up in production
- the customer can be notified, or
- the tasks can be removed from the planner if they were in fact completed.
Before you begin
Before changing the task's status to Completed, ensure that:
- the planning board is displayed in Plan View, and
- the relevant task is visible.
- Note: If the task is not displayed in Plan View, you may need to change the date range that is displayed on the planning board.
To change the task's status to Completed:
- In Plan View, double-click the task.
- Result: The Task Details window (Task View) is displayed.
- From the Task Status dropbox, select Completed.
- Click OK
- Result: The planning board displays the task with a grey highlight (completed).
Deleting a Task
Before You Begin
Before deleting the task, ensure that:
- the planning board is displayed in either Plan View or List View, and
- the relevant task is visible.
- Note: If the task is not displayed in Plan View, you may need to change the date range that is displayed on the planning board.
To delete a task (Plan View):
- On the planning board (Plan View), select the relevant task.
- The relevant task is highlighted yellow, along with other tasks that belong to the same job.
- At the top-right of the window, click View Task.
- Note: Alternatively, you can double-click the task to display its details.
- Result: The Task Details window is displayed.
- Click Delete Task.
- Result: The Remove Task window displays a message asking you to confirm the deletion of the task.
- Click Yes.
- Result: The task is deleted from the planning board and is no longer displayed.
To delete at a task (List View):
- On the planning board (List View), select the relevant task.
- At the top-left of the window, click Del.
- Result: The Confirm Delete window is displayed asking you to confirm that the task is to be deleted.
- Note: The task may be referredd to as a file 30 record.
- Click OK.
- Result: The task is deleted from the planning board and is no longer displayed.
Removing All of a Job's Tasks
All of a job's tasks can be removed from the planning board in one go. While it will remove the job's tasks from the planning board, it does not delete the job from Printcost. The job's tasks can again be added using the Get Job button.
Before You Begin
Before remove a job's tasks, ensure that:
- the planning board is displayed in either Plan View or List View, and
- at least one of the job's tasks is visible.
- Note: If a task is not displayed in Plan View, you may need to change the date range that is displayed on the planning board.
To remove a job's tasks (Plan View):
- On the planning board (Plan View), select the relevant task.
- Result: The relevant task is highlighted yellow, along with other tasks that belong to the same job.
- At the top-right of the window, click Remove Job.
- Result: The Remove Job window displays a message asking you to confirm the removal of the job's tasks from the planning board.
- Click Yes.
- Result: All tasks relating to the job are removed from planning board.
To remove a job's tasks (List View):
- On the planning board (List View), select the relevant task.
- From the set of buttons at the top-right of the window, click Remove Job.
- Result: The Remove Job window displays a message asking you to confirm the removal of the job's tasks from the planning board.
- Click OK.
- Result: All tasks relating to the job are removed from the planning board.