
Schedule Tasks
Scheduling a job's tasks is a two-stage process. Firstly, the job needs to be flagged as 'Ready to Plan'. This can be done manually by clicking the Ready to Plan button in a Job, or it can be automated to occur when specific events happen (usually when a job bag is printed).
Note: Although a job may be flagged as 'Ready to Plan', its tasks are not automatically displayed in the unplanned column of the planning board. This ensures that the unplanned column does not become cluttered, and it enables you to control what is displayed.
On this page:
Table of Contents:
- Displaying a Task's Details
- Adding a Job's Tasks to the Planning Board
- Flagging a Job as 'Ready To Plan'
- Adding a Job's Tasks to the Planning Board by Job Number
- Scheduling an Unplanned Task
- Adding a New Task
- Assigning Downtime to a Machine
- Adding or Sending a Job Note
Displaying a Task's Details
You may have noticed already, that by clicking a task, some of the task's details are displayed just above the planning board. Also, placing your mouse cursor over a task can reveal more information about that task. It is also possible to display all of the task's details.
In Task View, the following information is displayed:
- Job Description / Production Quantity / Sales Rep / Order Date
- Last Activity / Last Station / Last Employee
- Job Notes
- Note: You can also add job notes.
- Job Production Notes
- Time & Cost Records
The following task details can also be modified:
- Duration
- Planned Production Date
- Machine
You can also update the task's status.
Before you begin
Before displaying a task's details, ensure that:
- the planning board is displayed in Plan View, and
- the relevant task is displayed.
- Note: If the task is not displayed, you may need to change the date range that is displayed on the planning board.
To display a task's details:
- On the planning board (Plan View), click the relevant task.
- The relevant task is highlighted yellow, along with other task that belong to the same job.
- At the top-right of the window, click View Task.
- Note: Alternatively, you can double-click the task to display its details.
- Result: The Task Details window is displayed.
What's Next?
Ensure any changes that you have made are saved by clicking OK. If you do not want to save your changes, click Cancel.
Adding a Job's Tasks to the Planning Board
A job's tasks can easily be added to the unscheduled column of the planning board. Before it can be added, the task must first be flagged as 'Ready to Plan'.
If Printcost is set up to do so, on printing a job bag, jobs can automatically be flagged as Ready to Plan. If not set up to do so, or a job is not automatically flagged as Ready to Plan, it can be flagged manually.
Before you begin
Before adding a job's tasks to the planning board, ensure that the planning board is displayed in Plan View.
To add a job's tasks to the planning board:
- At the top of the planning board, click Load Jobs.
- Result: A list of ready-to-plan jobs is displayed. These are the jobs that are ready to be moved to the unplanned column of the planning board.
- Select the relevant job.
- Note: You can select one or more jobs by clicking the relevant checkboxes.
- Note: If the job you are looking for is not listed, see 'Job Wasn't Listed?' below.
- Click Proceed.
- The selected job's tasks are listed in the unplanned column of the planning board.
Job Wasn't Listed?
If the job you are looking for is not listed, then you can manually flag the job as 'Ready to Plan'. Once flaggged as ready to plan, the job's tasks can be added to the planning board.
To manually flag a job as 'Ready to Plan', see 'Flagging a Job as 'Ready to Plan'':
What's Next?
With the job's tasks listed in the unplanned column of the plannning board, you can now schedule the tasks. To do this, see 'Scheduling an Unplanned Task'':
Flagging a Job as 'Ready to Plan'
If you tried to load a job and it wasn't available, then the job will not have been flagged as 'Ready to Plan'.
To flag a job as 'Ready to Plan':
- On the left menu, under Work, click Jobs.
- Result: The Job's File window is displayed.
- On the Jobs File window, locate and select the relevant job.
- At the top-right of the Job's File window, click Ready to Plan.
- Result: A window is displayed informing you that the data is ready for scheduling.
- Click OK.
- Result: After a short while, the Ready to Plan button will change to Sent to Planner (with a red background).
- Note: Re-selecting the job will also update the Ready to Plan button to Sent to Planner with a red background)
What's Next?
The job is now flagged as ready to plan, and its tasks can now be added to the planning board. To do this, see 'Adding a Job's Tasks to the Planning Board':
Adding a Job's Tasks to the Planning Board by Job Number
In addition to the method described above, you can add a job's tasks directly into the unplanned column of the planning board.
Important: Adding the job's tasks by job number creates a duplicate of the job's tasks. That is, the job will not be marked in the Job file as 'Sent to Planner'. If you inadvertantly use both methods (as described on this page) to add a job's tasks to the planning board, you will end up with two sets of tasks for the same job. If this occurs, remove the job from the planner before any of its tasks are started. Removing one instance of the job will automatically remove all instances of the job. You can then add one instance of the job's tasks back into the planner by job number.
Before you begin
Before adding a job's tasks to the planning board by job number, ensure that:
- the job is not already 'Ready to Plan'
- To do this, above the planner (in Plan View), click Load Jobs, and check to see if the job is already listed. If it is, do not proceed with this topic. Instead, go to 'Adding a Job's Tasks to the Planning Board': Adding a Job's Tasks to the Planning Board above.
- ensure that the planning board is displayed in Plan View
To add a job's tasks to the planning board by job number:
- Above the planning board, click Get Job .
- Result: The Load Single Job to Planning Board window is displayed.
- In the Job Number field, type the job number, then press Tab.
- Note: If you do not know the job number, then you can select it from the Jobs File window by clicking the > character (to the right of the Job Number field). Once you have selected the relevant job from the Job File window, at the top-left of the Job File window, click Accept. The job number will be displayed in the Job Number field.
- Click Get Job
- Result: The job's tasks are displayed in the unplanned column of the planning board.
What's Next?
With the job's tasks listed in the unplanned column of the plannning board, you can now schedule the tasks. To do this, see 'Scheduling an Unplanned Task':
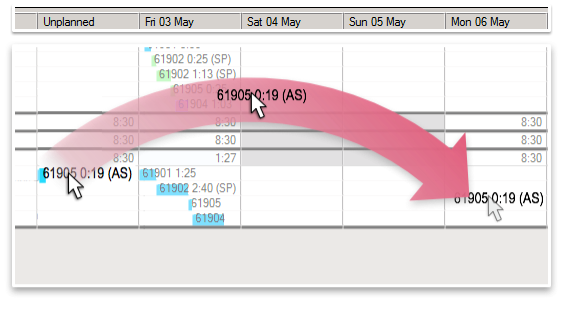
Scheduling an Unplanned Task
Plan View
In Plan View, you can drag and drop tasks that are listed under in the unplanned column, to anywhere on the Plan View's timeline.
List View
In List View, you can schedule a task by changing its plan date.
Before you begin
Before scheduling an unplanned task, ensure that:
- the planning board is displayed
- depending on your preference, display either Plan View or List View, and
- if using plan view, ensure that the relevant dates for scheduling the tasks are displayed.
If the job's tasks are not listed in the unplanned column of the planning board, then add the job's tasks to the unplanned column. To do this, see 'Adding a Job's Tasks to the Planning Board':
To schedule an unplanned task in Plan View:
- Drag the unplanned task across the timeline to the required day.
- Release the mouse.
- Result: The task is scheduled.
 Drag & Drop a Task
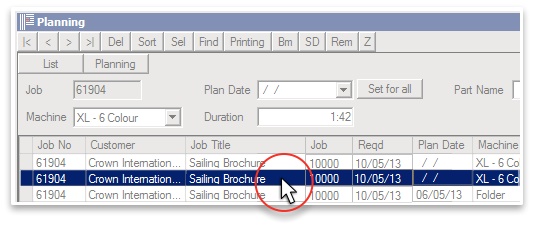
To schedule an unplanned task in List View:
- Click the relevant task.
- Result: Some of the task's details are displayed above the planning board.
- Note: The Plan Date fields of unplanned tasks are empty.
- Using the calendar, schedule a date for the task.
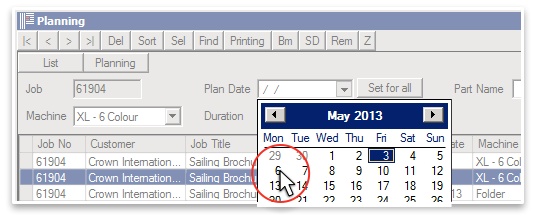
- Press Tab.
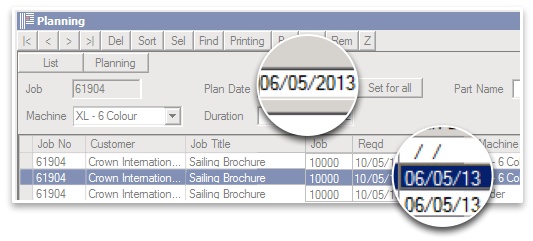
- Result: Both Plan Date fields are updated with the selected date.
- Note: The date field in the Plan Date Column may not update automatically. Printcost uses the date displayed in the Plan Date drop down calendar, and this is the date that will also be used in Plan View. To force the date in the List View's Plan Date column to update, you can repeatedly press the < and > arrows at the top left of the window. This refreshes the records in the list.
Adding a New Task
Tasks are automatically generated from the estimated requirements of a job. Sometimes you may need to add additional tasks to the job. With the planning board, you can easily add a new task for a job and assign it to one of your machines.
Before you begin
Before adding a new task to the planning board, ensure that:
- the planning board (Plan View) is displayed, and
- if you want to add a task to a planned job, in the job planner, select one of the job's existing tasks.
To add a new task:
- At the top of the Planning window, click Create Task.
- Result: The Create Task window is displayed.
- Note: If an existing task (job) was already selected, then the Create Task window will be prepopulated with some of the job's information.
- (If relevant) In the Job Number field, type the job number of the job that you want to add the task to.
- Note: If you do not know the job number, then you can select it from the Jobs File window by clicking the > character (to the right of the Job Number field). Once you have selected the relevant job from the Job File window, at the top-left of the Job File window, click Accept. The job number will be displayed in the Job Number field.
- From the Machine dropbox, select the machine that will be used for the task.
- From the Production Date calendar, select the relevant production date.
- Note: The production date is the plan date, that is, it is the date for which the task will be scheduled.
- In the Duration field, type in the number of hours and minutes.
- Note: Separate the hours and minutes with a colon or period, e.g., For one hour and 30 minutes, type 1:30 or 1.30
- In the Part field, enter information about the part.
- (Optional) In the Planner Notes field, add some notes.
- Click Create Task.
- Result: The task is created and the planning board (Plan View) is displayed.
- Note: The new task will only be displayed on the planning board (Plan View) if the displayed date range includes the date for which the task was scheduled.
Assigning Downtime to a Machine
Sometimes, downtime needs to be assigned to a machine so that maintenance can be performed. It is important to assign downtime to ensure that other tasks are not planned for the machine while it is being serviced or repaired.
Before you begin
Before assigning downtime to a machine, ensure the planning board (Plan View) is displayed:
To assign downtime to a machine:
- At the top of the Planning window, click Create Task.
- Result: The Create Task window is displayed.
- Note: The Create Task window may be be prepopulated with a job's information. You can ignore this information.
- Click 'or Downtime'
- Result: Some of the Create Task window's fields are prepopulated with information that is relevant to the downtime activity.
- From the Machine dropbox, select the machine that is to be stood down.
- From the Production Date calendar, select the date that the machine is to be stood down.
- In the Duration field, type in the length of downtime required.
- Note: Express the time in hours and minutes. Separate the hours and minutes with a colon or period, e.g., For one hour and 30 minutes, type 1:30 or 1.30
- (Optional) In the Planner Notes field, add some notes as to why downtime is required.
- Click Create Task.
- Result: Downtime is set for the selected machine and the planning board (Plan View) is displayed.
- Note: The downtime activity will only be displayed on the planning board (Plan View) if the displayed date range includes the date for which downtime was scheduled.
Adding or Sending a Job Note
From the Task Details window you can add job notes. The same job notes are accessible from the Task Details window of any of the job's tasks. You can also send a copy of the note to any user of Printcost on your system. The note will be displayed in the recipent's Messages module.
Before you begin
Before adding or sending a job note, ensure that:
- the planning board is displayed in Plan View, and
- the relevant task is displayed.
- Note: If the task is not displayed, you may need to change the date range that is displayed on the planning board.
To add or send a job note:
- On the planning board (Plan View), select the relevant task.
- Note: Ensure the task is selected.
- Result: The relevant task is highlighted yellow, along with other tasks that belong to the same job.
- At the top-right of the window, click View Task.
- Result: The Task Details window is displayed.
- Note: Ensure that all the information for the selected task is displayed, e.g., Job Number, Client, and Job Title. If these details are not displayed, click Cancel and go back to Step 1.
- Click Add Job Note
- Result: The Add Note window is displayed.
- From the radio buttons, select the relevant option.
- Note: Selecting Normal adds the note to the job's job notes window and places a copy of the note in the Audit Trail
- Note: Selecting Pop Up opens the note in a different window when you display the details of the job and places a copy of the note in the Audit Trail.
- Note: Selecting Audit Trail places the note in the Audit Trail.
- (Optional) Select the relevant recipients from the list of Printcost Users, and in the Time field, enter the time that you want this note sent.
- Note: Only select recipients if you want to send this note.
- Note: Express the time in hours and minutes, e.g., 2:30, or 2.30. Remember to enter AM or PM, e.g., 2:30 PM
- Complete the Subject and Note fields.
- Select the relevant references that you want to include with the job note.
- Click Proceed.
- Result: The note is recorded and the Add Note window is closed. If you sent the job note, it will appear (at the time you specified in Step 5) in the recipient's Messages window .
Note: The job note can be displayed by clicking Show Job Notes. The Show Job Notes button is located on the Task Details window.