
Stocktake
With Printcost, stocktaking is essentially a three part process. First, using Printcost, you initiate the stocktake by taking a snapshot of what Printcost has recorded as being held in the warehouse. This tells you exactly what Printcost thinks is in the warehouse at the point of taking the snapshot. While undertaking the actual count of what is in the warehouse, you can update Printcost by making adjustments. Finally, when you have finished the actual count and entered all adjustments, you can close the stocktake.
If you have more than one warehouse, you can run multiple stocktakes at any one time; one for each warehouse. You cannot run two or more stocktakes for one warehouse at the same time.
On this page:
Table of Contents:
- Intitiating a Stocktake for a Warehouse
- Adjusting the Warehouse's Stocktake
- Closing the Warehouse's Stocktake
Initiating a Stocktake for a Warehouse
Stocktakes can only be intitated for warehouses that have been set up in Printcost. If a stocktake has already been initiated for a particular warehouse, another stocktake cannot be initiated for that same warehouse until the first stocktake has been closed.
Before you begin
Before initiating a stocktake, ensure that the stocktake window is displayed. To do this, on the left menu, click Inventory / Orders, then click Stocktake.
To initiate a stocktake:
- Click New Stocktake
- Result: A Create New Stocktake box displays two fields for selecting a warehouse and area (optional).
- From the Warehouse field, select the relevant warehouse, then click Create Snapshot.
- Result: You will be asked if you want to creat a new stocktake snapshot.
- Note: If you are informed that a stocktake for the selected warehouse is already open and the stocktake has uncommitted counts, you won't be able to initiate another stocktake for the warehouse until the uncommitted counts have been accepted, and the existing stocktake is (preferably) closed. In this case, click OK. If you are informed that a stocktake for the selected warehouse is already open and there is no mention of uncommitted counts, then you can close the existing stocktake for that warehouse and start a new one. Before doing this, check with the person who initiated the open stocktake session. There may be a reason why it wasn't closed.
- Note: Uncommitted counts are the actual counts that have not yet been accepted (by clicking the Accept Stocktake button).
- Click Yes
- Result: A table displays the list of items that are held in the warehouse, the quantity of each item (System column), a column (Actual Count) to enter the actual number items, and an Adjustment column which displays the difference between the system count and the actual count.
- Note: This could take a minute or two.
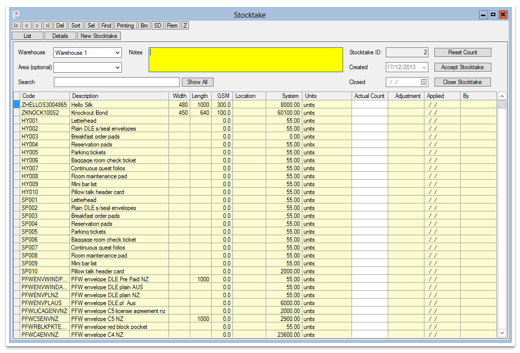 Initial Stocktake Window for a Warehouse
What Next?
Perform an actual count of what is in the warehouse.
Adjusting a Warehouse's Stocktake
Once a stocktake has been initiated within Printcost, it can remain open for the period of the stocktake (actual count). At any time during the stocktake, you can enter the actual count for each item and Printcost will automatically calculate the difference. Once entered, you can accept the actual counts when you are certain they are correct. Click Accept Stocktake does not close the stocktake, it simply accepts that actual count for the itmes where an actual count has been entered.
The steps below assume that you will be entering one or more actual counts and accepting these counts. By accepting the counts, Printcost will record the counts as accepted, the date they were accepted and who accepted them.
Note: A new stocktake for a warehouse cannot be initiated until the actual counts have been accepted.
Buttons
The following image shows three buttons, and an actual count entered into the Actual count field for a particular item. The difference between what the system had recorded (System Count) and the actual count is displayed in the Adjustment field.
Clicking Reset Count will delete any uncommited (yet to be accepted) data entered in the Actual Count column.
Clicking Accept Stocktake will commit all of the data that is entered into the Actual Count column, and apply a date to the adjustment.
Clicking Close Stocktake will close the stocktake.
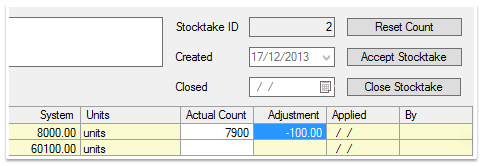 Reset, Accept and Close Buttons
Before you begin
Before initiating a stocktake, ensure that:
- the stocktake window is displayed
- the details of the relevant stocktake are displayed, and
- you have some adjustments to make.
To display the relevant warehouse's stocktake, on the left menu, click Inventory / Orders, click Stocktake, select the relevant stocktake item, then click Details.
To adjust the stocktake:
- For the relevant item, enter the actual count into the Actual Count field
- Note: When you enter the actual count and press tab, the difference between the system count and the actual count is displayed in the Adjustment column.
- If for an item, the actual count equals the system count, leave the actual count field empty.
- If for an item, the system count indicates that there are some items and the actual count reveals that there are no items, type 0 (zero) into the Actual Count column.
- Do you have more actual counts to enter?
- If YES, go to Step 1.
- If NO, go to Step 3
- When you are sure that the actual counts that are entered are correct, click Accept Stocktake.
- Result: You will be asked if you want to create adjustments now.
- Click Yes.
- Result: You will be asked if this completes the stocktake.
- Note: You can close the stocktake at any time.
- If the actual count for all items in the warehouse has been completed and you want to close the stocktake now, click Yes.
- If there is more 'actual count' data to enter, that is, the stocktake is not complete, click No.
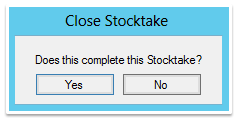 Close Stocktake?
What Next?
If your stocktake is complete and you haven't closed it already, you can close it at any time. For more information, see 'Closing the Stocktake' below.
Closing a Warehouse's Stocktake
When you have actual counts to accept and you click Accept Stocktake, you are asked if you want to close the stocktake. If you click No, the stocktake session remains open until someone closes it. When the actual warehouse count is complete and all counts have been entered into Printcost and accepted, you can close the stocktake session.
Before you begin
Before closing a warehouse's stocktake session, ensure that:
- the stocktake window is displayed
- the details of the relevant stocktake are displayed, and
- Note: To display the relevant warehouse's stocktake, on the left menu, click Inventory / Orders, click Stocktake, select the relevant stocktake item, then click Details.
- all actual counts have been entered and accepted, that is, all adjustments have been accepted.
- Note: For more information see Adjusting a Warehouse's Stocktake above.
To close a warehouse's stocktake:
- On the Stocktake window, with the relevant warehouse's stocktake detail displayed, click Close Stocktake.
- Result: You will be asked if all adjustments have been created for this stocktake.
- Important: Any uncommitted counts (adjustments) will be lost on clicking Yes.
- Click Yes
- Result: The warehouse's stocktake is closed.
What Next?
If you accidentally closed a warehouse's stocktake, you can start another stocktake for that warehouse.