
Issues / Transfers
The Issues Transfers window can be used to record the transfer of goods from one of your warehouses to another one of your warehouses. More often, it is used to issue goods directly to a job.
Note: You cannot use the Issues / Transfers page to record the transfer of goods to or from indent or consignment. To record the transfer of goods to or from indent or consignment, use a sales order or purchase order.
On this page:
Table of Contents:
- Issuing Goods from a Warehouse to a Job
- Returning Unused Stock
- Transferring Goods from One Warehouse to Another
Issuing Goods from a Warehouse to a Job
Goods can be issued from a warehouse to a job using:
- the Stock Issues Warehouse Transfers window, or
- the Jobs File window.
Both approaches are detailed below.
To issue goods from a warehouse to a job from the Stock Issues Warehouse Transfers window:
Follow these steps to issue goods from a warehouse to a job using the Stock Issues Warehouse transfers window.
- On the left-menu, click 'Inventory / Orders', then click 'Issues / Transfers.
- Result: The Stock Issues Warehouse Transfers window is displayed.
- On the Stock Issues Warehouse Transfers window, click New Issue / Transfer.
- Result: The Select Item window is displayed.
- Note: If the Selection window is displayed, you can dismiss it.
- Search for and select the relevant inventory item.
- Result: The Select Fulfilment window is displayed.
- Select warehouse that you want to transfer the goods from.
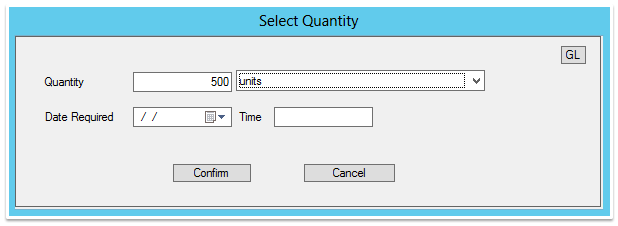
- Result: The 'Select Quantity' window is displayed (pictured right).
- (Optional) Specify the quantity of items, sheets or units that you want to transfer.
- Note: To do this, in the Quantity field, type the number of items, sheets or units that you want to transfer, and select the relevant option (items, sheets or units) from the adjacent dropbox.
- (Optional) Enter the date and time that the transfer took place or is to take place.
- Note: You can leave the date and time fields empty, or if already populated, you can ignore them. You will be asked later whether you want to record the transfer now or at a later date.
- Click Confirm.
- Result: The Select Fulfilment window is displayed.
- Note: This steps below assume that you will be issuing the goods from one warehouse to one job.
- Click Production
- Note: The Create / Select Job window is displayed.
- Click Existing Job.
- Result: The Select Job window is displayed.
- Browse to and select the existing job that you want to transfer the goods to.
- Result: The Select Quantity window is displayed.
- Note: The 'Notional Cost a/c' and Dept fields determine the GL code. The select by profile checkbox provides an additional method of selecting a GL code. This field, dropbox and checkbox only work if you have Printcost General Ledger installed.
- Click Confirm Order.
- Result: You will be asked if you want to move the goods now.
- Do you want to move the goods now?
- If YES, click Yes, then in the Issue Goods window, ensure the goods are allocated correctly, then click Confirm.
- Note: You can use the checkboxes and Allocate fields to change the allocation if they are not allocated correctly.
- If NO, click No.
- Note: If you select No, the goods will be reserved (against the inventory item.
- Result: The Issues / Transfers window displays how many goods were issued to the job.
 Select Quantity Window
What Next?
To see the list of issues/transfers, click List.
To issue goods from a warehouse to a job via the Jobs File Window:
Follow these steps to issue goods from a warehouse to a job using the Job Files window.
This method is only applicable to jobs that have been estimated on items that are listed in the inventory file.
- On the left-menu, click Work, then click Jobs.
- Result: The Jobs File window is displayed.
- Select the relevant job.
- Result: The job is highlighted
- On the top of the Jobs File window, click Alt Menu, then click Requisitions.
- Result: The Show Requirements tab displays what can be requisitioned.
- Select the relevant item, then click Create Requisition.
- Note: Alternatively, you can double-click the item.
- Result: The Select Fulfilment window is displayed.
- Select the warehouse from which the items will be sourced.
- Result: The Select Quantity window is displayed
- Enter the quantity of items, and click Confirm.
- Result: The Quick Receipt window is displayed
- Note: You will be asked whether you want to receipt these now. Clicking Yes will issue the items now. Clicking No reserves the items for later fulfilment.
- Click Yes.
- Result: The Issue Goods Window is displayed
- Click Confirm.
- Result: The Show Orders / Issues tab is displayed
What Next?
To issue additional items for the same job, click Show Requirements, and repeat the steps above from Step 3. To see the list of issues/transfers, click List.
Returning Unused Stock
The procedure below shows you how to return unused items to the warehouse.
Before You Begin
Before returning unused stock, display the Jobs File window. To do this, on the left-menu under Work, click Jobs.
To issue goods from a warehouse to a job via the Jobs File Window:
- On the Jobs File window, select the relevant job.
- Result: The job is highlighted.
- On the top of the Jobs File window, click Alt Menu, then click Requisitions.
- Result: The Show Requirements tab displays what can be requisitioned.
- Click Show Orders/Issues .
- Result: A list of items that can be returned to the warehouse is displayed.
- Select the relevant item, then click Return Goods.
- Note: The items must have a quantity in the fulfilled column.
- Result: You will be requested whether you want to return unused raw materials.
- Click Yes.
- Result: The Select Fulfilment window is displayed
- Select the warehouse to which the items will be returned.
- Result: The Select Quantity window is displayed.
- Enter the quantity of items to be returned, and click Confirm Order.
- Result: The Quick Receipt window is displayed
- Note: You will be asked whether you want to receipt these now. Clicking Yes will issue the items now. Clicking No reserves the items for later fulfilment.
- Click Yes.
- Result: The Issue Goods Window is updated.
- Click Confirm.
- Result: The Show Orders / Issues tab is displayed
What Next?
To return additional items for the same job, repeat the steps above from Step 3. To see the list of issues/transfers, click List.
Transferring Goods from One Warehouse to Another
The procedure below shows you how to record the transfer of goods between two warehouses.
Note: You can also record the transfer goods from the source warehouse to two or more other warehouses:
Before you begin
Before recording the transfer of goods, ensure the Issues / Transfers window is displayed. To do this, on the left-menu, click 'Inventory / Orders', then click 'Issues / Transfers.
To record the transfer of goods from one warehouse to another :
- On the Stock Issues Warehouse Transfers window, click New Issue / Transfer.
- Result: The Select Item window is displayed.
- Note: If the Selection window is displayed, you can dismiss it.
- Search for and select the relevant inventory item.
- Result: The Select Fulfilment window is dipslayed
- Select warehouse that you want to transfer the goods from.
- Result: The 'Select Quantity' window is displayed (pictured right).
- (Optional) Specify the quantity of items, sheets or units that you want to transfer.
- Note: To do this, in the Quantity field, type the number of items, sheets or units that you want to transfer, and select the relevant option (items, sheets or units) from the adjacent dropbox.
- (Optional) Enter the date and time that the transfer took place or is to take place.
- Note: You can leave the date and time fields empty, or if already populated, you can ignore them. You will be asked later whether you want to record the transfer now or at a later date.
- Click Confirm.
- Result: The Select Fulfilment window is displayed.
- Note: This steps below assume that you will be transferring the goods to one warehouse; not multiple warehouses or jobs.
- Select the warehouse that you want to transfer the goods to.
- Result: The Select Quantity window is displayed.
- Note: The Stock on Hand and Dept determine the GL code. The select by profile checkbox provides an additional method of selecting a GL code. This field, dropbox and checkbox only work if you have Printcost General Ledger installed.
- Click Confirm Order.
- Result: You will be asked if you want to transfer the goods now.
- Do you want to transfer the goods now?
- If YES, click Yes, then in the Issue Gods window, ensure the goods are allocated correctly, then click Confirm.
- Note: You can use the checkboxes and Allocate fields to change the allocation if they are not allocated correctly.
- If NO, click No.
- Note: If you select No, the goods will be reserved (against the inventory item. If you select Yes, the issue goods window is displayed.
- Result: The Issues / Transfers window displays how many goods were transferred from the warehouse (source).
Select Quantity Window
What Next?
To see the list of issues/transfers, click List.