
Setup
On purchasing Printcost Accounting, it is set up and customised to your needs. If you do require changes to how the Accounting module is set up, please contact Printcost.
On this page:
Table of Contents:
- General Ledger Setup
- Accounting Periods
- Chart of Accounts
- Adding a Department
- General Ledger Profiles
- Adding a Ledger Account to the Chart of Accounts
- Printing the Chart of Accounts
- Displaying GL Period Codes
- Adding a GL Period
General Ledger Setup
The general ledger in Printcost is set up by Printcost staff. To see how the general ledger has been set up, on the Tools menu, click System Setup, then click G/L.
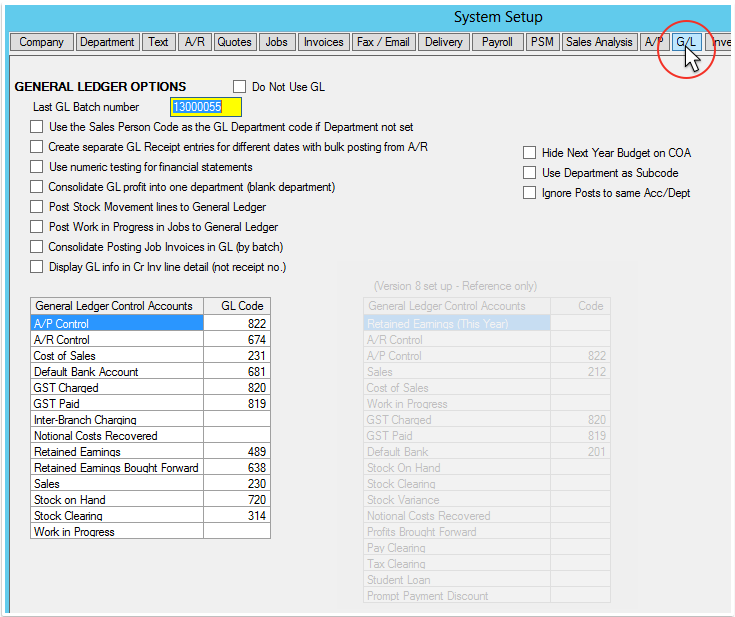 General Ledger Options
Note: The picture above is not an indication of how your copy of Printcost is set up or is to be set up.
To close this window, on the window's button bar (top-right), click Close
Accounting Periods
An accounting period is the period for which books are balanced and financial statements prepared. Including the adjustment periods at the beginning and end of the year, there are 14 periods in total.
Each accounting period is assigned a four-digit number; normally a month but it could be any period. The status must also be set here.
When a new batch is manually created it will take the current accounts payable period by default.
Chart of Accounts
The chart of accounts is a list of accounts used to define each class of items for which money is spent or received. The chart of accounts organises the finances of your business for the purpose of separating expenditures, revenue, assets and liabilities. With a well-planned chart of accounts you can provide interested parties a better understanding of the financial health of your business.
To display the chart of accounts, on the left-menu under General Ledger, click 'Chart of A/cs'.
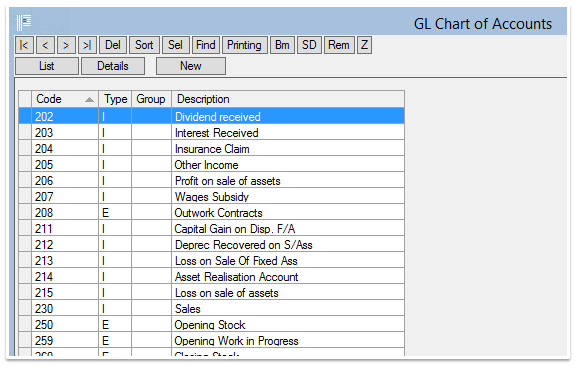 Chart of Accounts - List View
Chart of Accounts Columns
There are four columns of information in the chart of accounts.
- Code
- Type
- Group
- Note: The group column is no longer used in Printcost.
- Description
Code
The Code column lists the General Ledger Code (GL Code) that is assigned to each account.
Type
There are six standard account types:
- I for Income or Revenue
- E for Expenses
- A for Assets
- L for Liabilities
- O for Owner's Equity
Group
The Group column is no longer used in Printcost.
Description
The name of the account is displayed in the Description field.
Account Detail
Double-clicking a ledger account, or selecting it and clicking Details, displays the detail of the selected account. The following picture shows an account's detail. It contains a number of controls that you can use for reporting purposes.
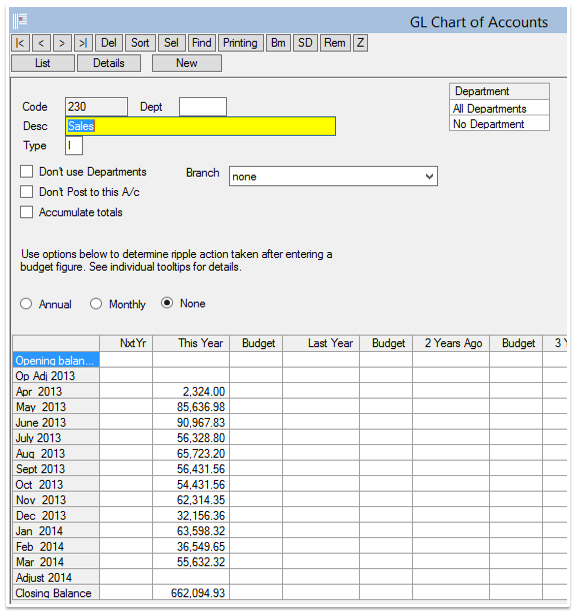 Chart of Accounts - Detail View
Departments
If your company has a number of departments, you can use the following controls to display only the totals of the transactions that originated from Debtors or Creditors that are assigned to departments.
All Departments
To display a ledger account's balance for transactions across all departments, select All Departments.
No Department
To display a ledger account's balance for transactions that are not assigned to a department, select No Department.
Don't Use Departments
If you don't want your data broken down by department, that is, to disable the departmental breakdown and display the ledger account's balance, select 'Don't Use Departments'
Branches
If your company has a number of branches, you can use the branch dropdown list to display only the totals of the transactions that originated from debtors and creditors assigned to the selected branch.
Example: On the Customers Details window you can assign a debtor to a branch. When you post a transaction from the accounts receivable module it will retain its association with the branch along with the values in the data that are automatically generated in the general ledger module. This means that when you view the chart of accounts (Sales for example), you can use the branch drop down list to view only the totals of the transactions that originated from debtors that are assigned to that branch.
Branch
If for example, the company has a number of branches, selecting a branch displays the balances and budgets for just that branch. From the branch dropdown list, select:
- 'None' to deselect individual branches.
- Note: By deselecting individual branches, the balance and budget totals for all branches are displayed, or
- a branch to display the balances and budgets for just that branch.
Because this is not a report and there is only one screen of data, selecting Multi Site has no effect.
Posting
To stop transactions from being posted to this account, select 'Don't Post to this Account'.
Accumulate Totals
For Year-to-Date budget running totals, select Accumulate Totals. For Month-to-Date totals, deselect Accumulate Totals.
Ripple Actions
Select Ripple Action prior to entering budget amounts.
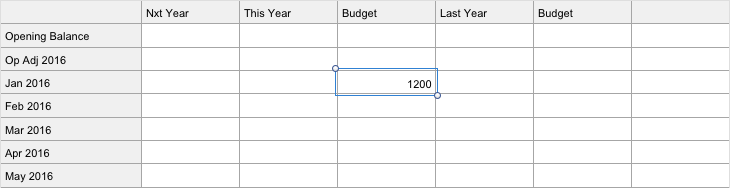
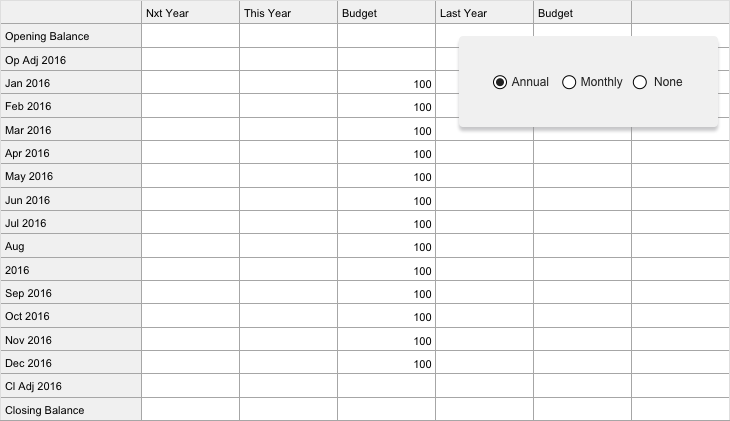
For example, in the following table, the figure of 1200 is entered in the budget cell for January 2016.
Annual
If Annual is selected, then on entering a budget amount, e.g., 1200 and pressing Tab, the amount entered is automatically divided by the number of remaining months in the financial period and this new number is used to populate all the remaining cells in the financial period.
 Entering a Budget Amount
For example, if 1200 is entered in the budget cell for January 2016. On pressing Tab, the figure of 1200 is divided by the 12 remaining months of the financial period. In this case 1200 / 12 = $100. Each cell is automatically populated with 100.
 Entering a Budget Amount when Annual is Selected
Monthly
If Monthly is selected, then on entering a budget amount, e.g., 1200 and pressing Tab, the amount entered is assumed to be a monthly figure and this number is used to populate all the remaining cells in the financial period.
For example, 1200 was entered in the budget cell for January 2016. On pressing Tab, the figure of 1200 is used to populate the remaining cells for the financial period.
 Entering a Budget Amount when Manual is Selected
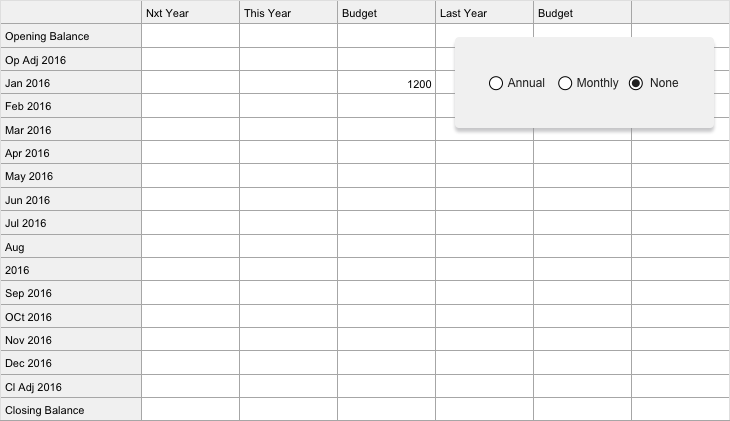
None
If you select None, then on entering a budget amount and pressing Tab, the amount entered is assumed to be only for that month. None of the other cells are populated.
For example, 1200 was entered in the budget cell for January 2016. On pressing Tab, the figure of 1200 remained. This amount is not used as a basis for calculating the values of any other cells.
 Entering a Budget Amount when None is Selected
Adding a Department
If you need to report by department, you can set up departments within Printcost.
Departments can be set up to pass their data through to the general ledger, for example, using the following windows:
- Customers File
- (Optional) Assigning the Area, Grade or Industry Type links the customer to the relevant department.
- Sales Order
- (Optional) Assigning a sales person, links the sale to the relevant department.
- Jobs File
- (Optional) Selecting a job type, links the job to the relevant department.
- GL Profile
- (Optional) Assigning a GL profile to an inventory item, links transactions to a department.
Before you begin
Before setting up a department, ensure that:
- the Department Maintenance window is displayed.
- To do this, on the left-menu, under General Ledger, select Miscellaneous, then click Departments.
To set up department:
- On the Department Maintenance window, click New.
- Result: You will be requested to enter a department code.
- In the Department Code field, type the code for the department, then press OK.
- Note: The department code must be unique.
- Result: The new department is listed on the Department Maintenance window.
- With the department still selected, in the Description, type a description of the Department.
- Note: Type a description that clearly identifies the department.
- Note: The description can be up to 12 characters in length.
- Press Tab
- Result: The description is saved.
- Note: If displayed, ignore the Division field. Divisions are no longer supported in Printcost.
General Ledger Profiles
If you are selling, purchasing, issuing or storing an item, you can have Printcost automatically assign a GL code and department to the transaction. Once set up, general ledger profiles automatically override the standard general ledger control accounts that are set up on the System Setup window.
Profiles are set up for different transaction types using the GL Profile window.
Profiles are assigned to inventory items using the Inventory Catalogue window.
Note: General ledger profiles can also be used to select GL codes for unlisted items, that is, for items not in the inventory master file.
Setup
When setting up a GL Profile you don't need to fill in all fields; only the ones you want to override.
 GL Profile List
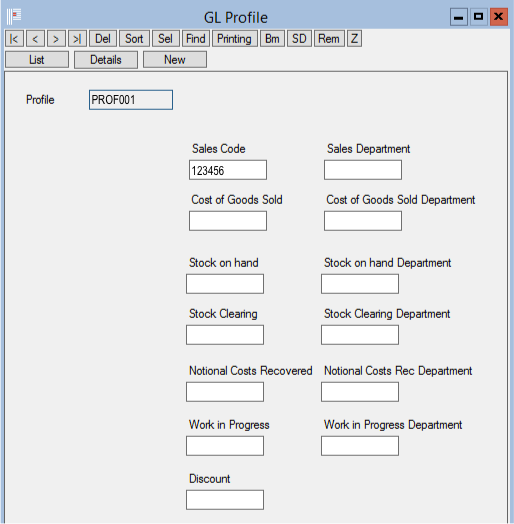 GL Profile Detail
Note: To display the GL Profile window, on the left-menu under General Ledger > Miscellaneous, click Profiles.
Assign Inventory Items to a General Ledger Code
Using the inventory master file, you can assign inventory items to a general ledger profile. To do this, on the Inventory /Catalogue window, type the profile name into the inventory profile's G/L Profile field.
Note: To display the Inventory / Catalogue window, on the left-menu under Inventory / Orders, click Inventory Catalogue. In List view, double-click an item to see its detail.
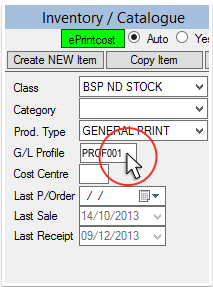 Inventory / Catalogue Window - Detail
Adding a Ledger Account to the Chart of Accounts
Adding of a new ledger account involves:
- assigning a unique number to the account
- giving the account code a name, and
- categorising the account as a sale, asset, liability, expense, or owner's equity.
Before you begin
Before adding an account to the chart of accounts, ensure that:
- the GL Chart of Accounts window is displayed, and
- To do this, on the left-menu, under General Ledger, click 'Chart of A/Cs'
- you have established the unique number that is to be assigned to the new account.
- In conjunction with your accountant, a block of numbers will have been set aside for each category (type) of accounts. Please refer to this block of numbers when deciding on a unique number.
To add an account to the chart of accounts:
- On the Chart of Accounts window, click New.
- Result: You will be requested to enter some details.
- In the Account field, type a unique number for the new account, then click OK.
- Result: A set of fields is displayed for adding the detail of the account.
- Note: You can ignore the Dept field.
- In the Desc field, type the name of the account.
- In the Type field, type the letter that represents the relevant account type.
- Note: There are six broad account types:
- For Income or Revenue, type I
- For Expenses, type E
- For Assets, type A
- For Liabilities, type L
- For Owner's Equity, type O
Printing the Chart of Accounts
Before you begin
Before printing the chart of accounts, ensure the GL Chart of Accounts window is displayed.
To print the chart of accounts:
- On the button bar at the top of GL Chart of Accounts window, click Printing.
- Result: The Printer Control Screen window is displayed.
- Click Classic Reports.
- Result: A list of reports is displayed.
- Click 108 Chart of Accounts.
- Result: The chart of accounts is displayed.
- Note: The chart of accounts may be spread over one or more pages.
- Adjust your print settings as required.
- Note: Under the list of reports, there are a number of settings that you can change depending on your requirements.
- Click Print
- Result: The report is printed.
- Note: Instead of printing the report, you can email it or save it as a PDF.
Displaying the GL Period Codes
From time to time, you may need to refer to the GL period codes for reporting purposes.
To display the GL period codes:
- On the left-menu under General Ledger > Miscellaneous, click Periods.
- Result: The GL Period window is displayed.
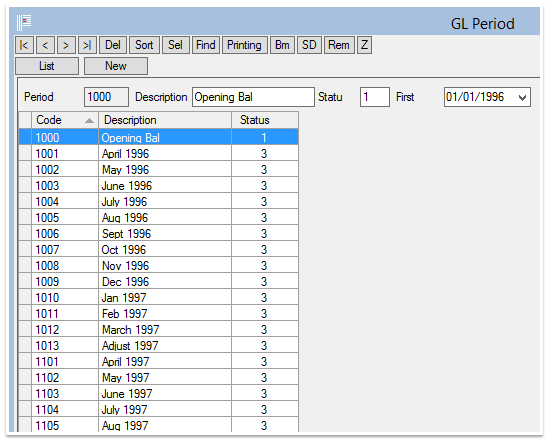 The GL Period Window
Adding a GL Period
You can add a GL period for completing end-of-year adjustments.
Before you begin
Before adding a new GL Period, ensure the GL Period window is displayed. To do this, on the left-menu, under General Ledger > Miscellaneous, click Periods.
To add a new GL Period:
- Determine the period code that you require for the new period.
- Note: To do this, locate the latest period code and add 1. For example, if the latest period code is 1234, your new period code will be 1235.
- Click New
- Result: A field is displayed for you to enter the period code.
- In the Period Code field, type the new period code.
- Note: Enter the period that you determined in Step 1.
- Click OK.
- Result: A new line is added to the list of period codes.
- With the new line selected, in the Description field at the top of the window, type in the name or description for the new period.
- In the Status field, type the relevant status.
- For opening balance, type 1
- For history, type 2
- For closed, type 3
- For open, type 4
- For future, type 5
- From the 'First' calendar field, select the period's start date.