
Ageing & Reporting
Printcost is a period-based; not transaction date based system. Accounts payable and accounts receivable are posted into their respective open periods.
On this page:
Table of Contents:
- Ageing Receivables
- Ageing Payables
- Displaying & Printing a Financial Statement
- GL Statement Modification
Ageing Receivables
Complete this at the end of the month.
Before you begin
Before ageing receivables, ensure that:
- all the invoicing in and reporting has been completed, and
- Printcost has been backed up for the current accounts receivable period.
To age receivables:
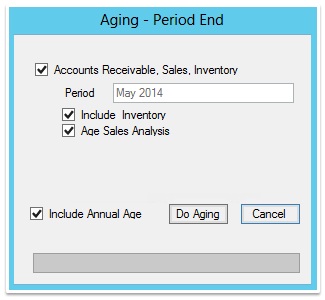 Ageing Receivables
- At the top of the window, from the Functions Menu choose Age, then click Age Receivables (Financial Period End)
- Result: The Ageing - Period End window for the month to be aged is displayed.
- Note: All options are selected automatically. You cannot change the period to be aged.
- Note: You cannot age the last month of the financial year independently of ageing the financial year. If this is the last month of the financial year, ensure the 'Include Annual Age' option is selected.
- Click 'Do Ageing'.
- Result: You will be asked to ensure that nobody else is logged into Printcost and that you have backed up Printcost.
- Click OK.
- Result: Ageing is completed.
- Note: If a message is displayed to say all users will be logged out, Click OK.
- Note: Ageing may take a while. If it is interrupted or there are errors, call Printcost Support immediately. Do not use Printcost until given the all clear by Printcost Support.
What Next?
(Optional) Check to ensure ageing was successful. To do this, perform a debtors balance check.
Performing a Debtors Balance Check
You can perform a balance check at any time. You may find it helpful to perform a debtors balance check, for example:
- before sending statements
- before printing an aged trial balance
- after ageing.
To perform a debtors balance check:
- From the Functions menu, choose Data Checks, then click Debtors Balance Check.
- Result: The Debtors Balance Check window is displayed.
- Click Yes.
- Result: The 'Balance Check...' window is displayed.
- Note: If it doesn't balance, the 'Errors Detected' message will be displayed.
- Important: All A/R totals must balance, that is, be the same value.
If the A/R Totals don't balance, close the window by clicking OK, and call Printcost Support for assistance. - Note: It is okay if the GL Total differs from the A/R Totals. The GL Total differs from the A/R totals when one or more General Ledger batches are not posted.
- Note: After ageing, all other fields in this months transactions will be 0.00
- Click OK
- Result: The Balance Check window is closed.
Ageing Payables
Age payables at the end of the month.
Before you begin
Before ageing payables, ensure that:
- all the creditor invoices and payments are entered and reporting has been completed, and
- Printcost has been backed up for the current accounts payable period.
To age payables:
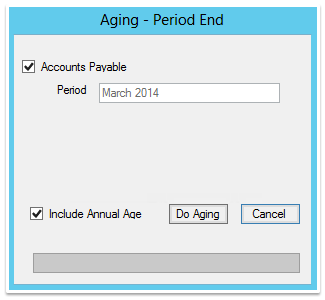 Ageing Payables
- At the top of the window, from the Functions Menu choose Age, then click Age Payables (Financial Period End)
- Result: The Ageing - Period End window for the month to be aged is displayed.
- Note: You cannot age the last month of the financial year independently of ageing the financial year. If this is the last month of the financial year, ensure the 'Include Annual Age' option is selected.
- Click 'Do Ageing'.
- Result: You will be asked to ensure that nobody else is logged into Printcost and that you have backed up Printcost.
- Click OK.
- Result: Ageing is completed.
- Note: If a message is displayed to say all users will be logged out, Click OK.
- Important: Ageing may take a while. If it is interrupted or there are errors, call Printcost Support immediately. Do not use Printcost until given the all clear by Printcost Support.
Displaying & Printing a Financial Statement
With Printcost, you can create a range of financial statements. These include:
- Trial Balance
- Equity Movements
- Financial Performance
- Financial Position
- Trial Balance Special
Creating a financial statement involves choosing what you want to see in your reports. A report can display up to four columns, and your report can be used to compare budget and actual financial information.
Before you begin
Before displaying a financial statement, ensure that the GL Financial Statements window is displayed. To do this, on the left-menu Under General Ledger, click Financial Stmts.
 The Financial Statements Window
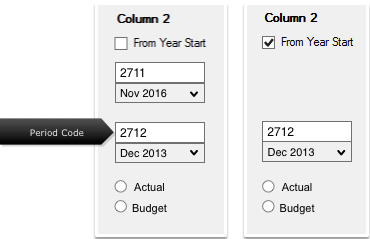
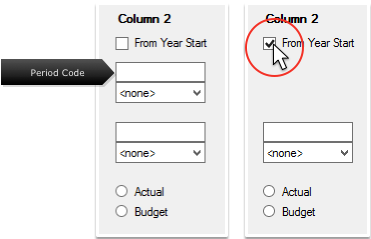 From Year Start
To display or print a financial statement:
- On the GL Financial Statements window, select the relevant statement.
- Note: Only one statement / report can be selected at any one time.
- To specify the start date, go to Step 3.
To report from the start of the financial year, click the relevant 'From Year Start' checkbox, then go to Step 5. - In the relevant column's first field, type the period code.
- Note: If you don't know what the period code is, type one numeral, e.g., 1 and press Tab. The GL Period window will display a list of period codes. From the list, select the relevant period code, then at the top-left of the GL Period window, click Accept.
- From the relevant column's first droplist, select the start period.
- Note: This is the start of the reporting period.
- In the relevant column's End field, type the period code, then press Enter
- Note: This is the period end that you want to report on.
- Note: If you don't know what the period code is, type one numeral, e.g., 1 and press Tab. The GL Period window will display a list of period codes. From the list, select the relevant period code, then at the top-left of the GL Period window, click Accept.
- From the relevant column's second droplist, select the end period.
- Note: This is the end of the reporting period.
- Select the relevant Actual or Budget option for the column you are setting up.
- Note: To display actual statement information, select Actual. To display budget statement information, select Budget.
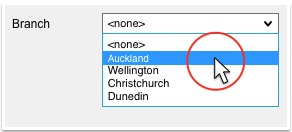
- From the Branch dropbox, select the relevant option.
- Note: To report on your company branch-by-branch, select the relevant branch.
- Note: To report on your company as a whole, select none.
- Note: The Group value is no longer used in Printcost. You can ignore this field if it is displayed.
- (Optional) Select any of the following options:
- Consolidate Department Details
- Select this to see totals per account code instead of reporting by department.
- Hide Codes
- To ensure period codes are excluded from the statement, select 'Hide Codes'.
- Show Zero Balances
- Show Percentages
- To display or print percentages, select this option.
- Click Display / Print.
- Result: The relevant financial statement is displayed.
- Note: One or more [+] buttons may be displayed. Click a [+] button for more information.
- If you need to reconfigure your report, click Selection, make your changes, then click Display / Print.
- Click Print
- Result: The financial statement is printed
- Note: You can also export the report to a *.csv file for importing into a spreadsheet or other application.
 Reporting Codes and Period Selected
 Selecting a Branch
 Modify GL Statements
GL Statement Modification
The setting up of financial statements is handled by Printcost Support. If you require a new financial statement, please contact your Printcost representative.
We recommend that unless you know what you are doing, do not modify the selection of data that is reported on in the financial statements.
If you are confident enough to modify the selection of data that goes into into your financial statements, on the GL Financial Statements window, click Modify GL Statements.