
Processing
General Ledger Batches that have automatically been created by Accounts Payable and Accounts Receivable can be displayed on the GL Batch Maintenance window. This window can also be used to create manual batches.
On this page:
Table of Contents:
- Displaying a Batch's Details
- Creating a Batch of Journal Entries
- Duplicating a Batch
- Reversing a Batch
Displaying a Batch's Details
Before you begin
Before displaying a batch's details, ensure the GL Batch Maintenance window is displayed. To do this, on the left-menu, under General Ledger, click Transactions:
To display a batch's details:
- On the GL Batch Maintenance window, double click the relevant batch.
- Result: The batches details are displayed.
- Note:You can also select the batch, then click the Details button.
Note: For manually entered transactions / journal entries, you can edit existing lines in List view by selecting and overtyping the values.
Creating a Batch of Transactions / Journal Entries
In Printcost, journal entries are grouped into batches. When invoices are generated using Printcost, a batch of journal entries is automatically generated. A financial period can contain any number of batches. A batch can contain any number of journal entries.
The steps below will introduce you to the steps involved in adding receipts, payments, and manual journal entries to a new batch.
Before you begin
Before creating a batch of transactions / journal entries, ensure the GL Batch Maintenance window is displayed.
Note: To do this, on the left menu under General Ledger, click Transactions
To create a batch of journal entries:
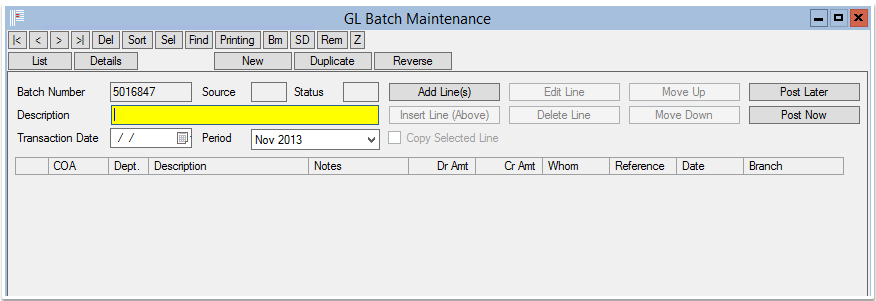
- On the GL Maintenance window, click New.
- Result: The GL Batch Entry window is displayed over the top of the GL Batch Maintenance window.
- Note: A batch number and period are automatically assigned to the batch. The period can be changed.
- In the Description field, type the name of this batch.
- Note: Use this field to enter a name or description that you can use to identify this batch.
- (Optional) From the Transaction Date calendar, select today's date.
- Note: This date is not used by Printcost and is for your reference only. You can use this field to track when a batch was created.
- (Optional) From the Period drop list, select the relevant month.
- Click 'Add Lines'.
- Note: If you are adding a line to an existing batch, e.g., to balance a manually entered credit or debit, you can select the line below where you want to add the new line, then click 'Insert Line Above'.
- Note: If you want to copy an existing line, select the line, select the 'Copy Selected Line' checkbox, then click 'Add Lines'. You can then edit the copied line.
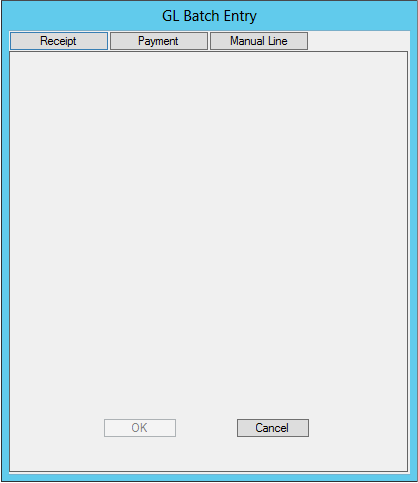
- Result: The GL Batch Detail window is displayed.
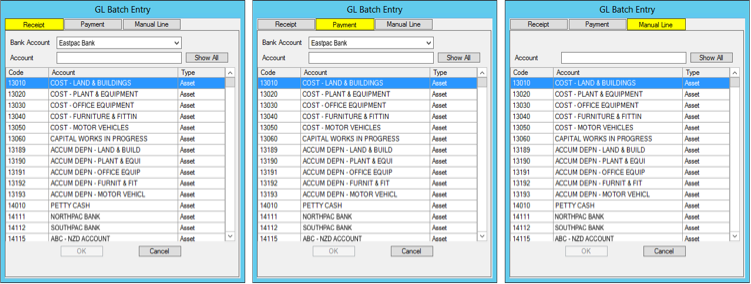
- Select the relevant tab (transaction type).
- Result: The GL Batch Entry window displays options for the transaction.
- Note: Selecting and completing the relevant details from either the Receipt or Payment tabs will automatically balance the transaction (debits and credits).
- Note: For manual journal entries, e.g., wage journals and end-of-year balancing journals, select and complete the Manual Line tab. You will need to build the complete transaction line by line. That is when you add a credit, use the 'Manual line' tab again to add the corresponding debit.
 Custom GL Batch Entry Fields
 - If not already selected,from the Bank Account drop list, select the relevant bank account.
- Note: This is the account that will be credited for purchases and debited for income.
- Select the relevant account.
- Note: To do this, either type the corresponding account's GL code into the Account field and press Enter, or select the relevant account from the list below.
- Result: A range of fields are displayed.
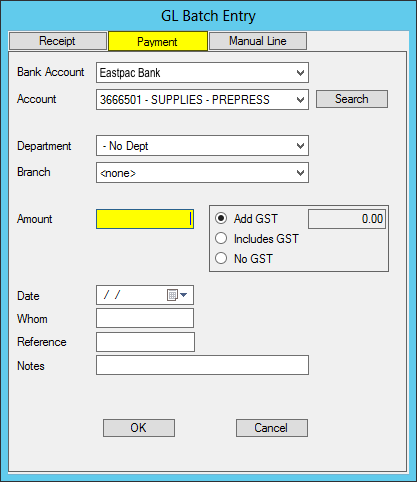 Custom GL Batch Entry Fields
 - If you use departments, select the relevant department from the Department droplist. If not, ensure 'No Dept' is selected.
- Note: A number of departments may have been set up for each ledger account. A department, for example, may have been set up for offset printing in general, or for a particular machine, e.g., a Kamori. This means you can track how much was invoiced for offset printing, or per machine.
- If you use branches, select the relevant branch.
- Note: If your company has offices / branches that have been set up in Printcost, select the relevant branch so that the financial reports can be set to report on a branch-by-branch basis. If not, ensure 'none' is selected.
- In the Amount field, type the amount of the transaction and select the relevant sales tax (GST) option.
- From the Date calendar, select the date of the transaction.
- If required, in the Whom field, type the name of the other party.
- Note: For a purchase, this could be the debtor code or supplier's name. For a sale, this could be the creditor code or the customer's name.
- Note: If this journal entry was automatically generated from an Accounts Receivable or Accounts Payable transaction, the Whom field will already be populated with the relevant debtor or creditor code.
- If required, in the reference field, type a reference.
- Note: If this journal entry was automatically generated from an Accounts Receivable or Accounts Payable transaction, the Reference field will already be populated with a reference.
- (Optional) in the Notes field add some notes.
- Do you want to add another transaction / journal entry?
If Yes, Go to Step 5.
If No, Go to Step 17. - Click OK
- Result: For a Receipt or Payment transaction, a set of balanced debit and credit lines are added to the batch. For a manual journal entry, one line is added to the batch.
- Note: For manually entered transactions /journal entries, you can edit existing lines directly from the list.
 GL Batch Entry
 The GL Batch Entry Window
What Next?
Ensure all the relevant receipt and payment transactions have been added to the batch and for all journal entries:
- each manually entered credit is balanced with one or more manually entered debits, and
- each manually entered debit is balanced with one or more manually entered credits.
Note: To move a line up and down the list, select the line, then click Move Up or Move Down. To delete a line, select the line, then click Delete. To edit a line, either double-click the line, or select it, then click Edit Line.
When you are ready, post the batch to include it in the financial reporting.
Duplicating a Batch
Before you begin
Before reversing a batch, ensure the GL Batch Maintenance window is displayed. To do this, on the left-menu, under General Ledger, click Transactions.
To duplicate a batch:
- On the GL batch Maintenance window, select the relevant batch.
- Click Reverse.
- Result: You will be asked to confirm duplication of the selected batch.
- Click OK.
- Result: The batch is assigned a new batch number.
- Click OK.
- Result: The batch is duplicated and listed.
What's Next?
Give the duplicate a name. If the batch's details are not already displayed, in list view, double-click the batch, then in the Description field, type a name or description.
Note: When duplicating a batch, the duplicate inherits the original batch's name / description. However, this is not displayed in List view until it is edited.
Reversing a Batch
Reversing a batch reverses the credits and debits.
Before you begin
Before reversing a batch, ensure the GL Batch Maintenance window is displayed. To do this, on the left-menu, under General Ledger, click Transactions.
To reverse a batch:
- On the GL batch Maintenance window, select the relevant batch.
- Click Reverse.
- Result: You will be asked to confirm the reversal.
- Click OK.
- Result: The batch's credits and debits are reversed.