
Overview
Initiating Purchase Orders
Within Printcost, you can initiate purchase orders from the following windows:
- Supplier ( Left Menu > Inventory Orders > Supplier )
- Catalogue ( Left Menu > Inventory Orders > Catalogue )
- Purchase Orders ( Left Menu > Inventory Orders > Purchase Orders )
On this page:
Table of Contents:
- Purchase Order Process
- Initiating a Purchase Order
- Completing the Purchase Order into Stock (Inventory)
- Completing the Purchase Order for an Existing Job
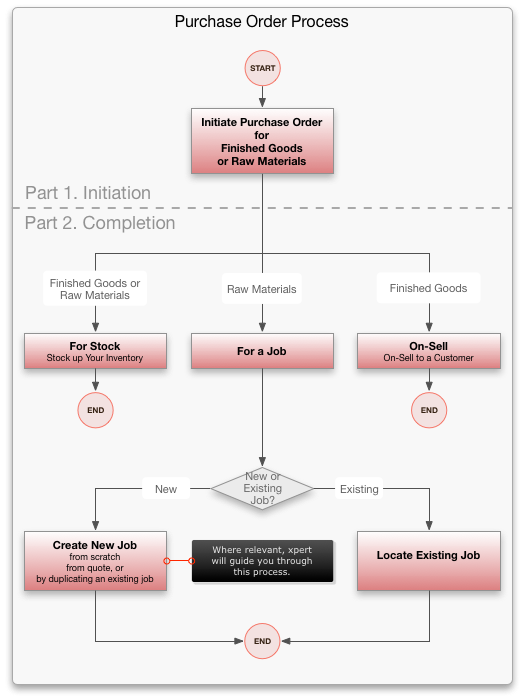
Purchase Order Process
The purchasing order process is made up of two parts:
- Part 1. Initiation of the purchase order
- Part 2. Completion of the purchase order
Note: Completion of the purchase order may require the creation of a job record. For more information about jobs see "Create Job".
Prior to initiating the purchase order, you would have already decided whether it will be :
- for stock
- a job (raw materials only), or
- on-sold immediately to a customer
Once you have initiated the purchase order, you can then assign it to stock, a job, or on-sell what you are purchasing to a customer.
 Purchasing Process
Pricing Options
To make things easier you can choose choose from any of the following pricing options:
- Price Point
- All units will be charged at the same price.
- Gradual
- For example, you can charge the first 1000 units at one price and the remaining units at another price.
- Price List
- For example, you can charge per quantity, e.g., $1.00 per unit for an order of 1000 units, $0.50 per unit for an order of 3000 units.
Initiating a Purchase Order
Finished Items
You can initiate a purchase order for finished goods to be held in stock or to onsell to a customer. Once purchased for stock, finished items held in a warehouse can later be sold to fulfil an order.
Raw Materials
You can initiate a purchase order for stock or to assign to a job. Once purchased for stock, raw materials held in a warehouse can later be issued to a job.
Taking Delivery (Receipt) of the Items
When initiating a purchase order, you can break your order down so that it is not all delivered at once. That is, you can request receipt of the order over two or more deliveries, with each delivery being made on a different day. You can also specify the time for taking receipt of a delivery.
Before you begin
Before initiating a purchase order for purchasing finished items or raw materials for stock, ensure that the Purchase Orders window is displayed.
Note: To do this, on the left menu, under Inventory / Orders, click Purchases.
Note: You can also raise a purchase order from the Supplier window (Left Menu > Inventory Orders > Supplier) or the Catalogue (Left Menu > Inventory Orders > Inventory / Catalogue).
To initiate a purchase order:
- On the Purchase Order window, click New Purchase Order.
- Result: The New Purchase Order window is displayed.
- Click the relevant supplier.
- Result: The Select Item window is displayed.
- From the list of items, click the relevant item.
- Result: The Order Details window is displayed.
- Note: If the item you are after is hard to find by scrolling, you can search on the item. To search for the item, type the name of the item into the field located below the Search by Supplier dropbox, then press Tab.
- Note: You can also narrow down the search by clicking Catalogue or Orders. Clicking Catalogue lists only the catalogue items sourced from the selected supplier and ones where no supplier is specified. Clicking Orders lists previous orders. This is particularly useful if you want to duplicate a previous purchase order.
- In the Quantity Field, type the quantity of items required, then press Tab.
- Result: The pricing details from the catalogue are automatically added to the Order Details window, and the Catalogue Price checkbox is selected.
- Note: These details can be modified. Deselecting the Catalogue Price checkbox removes the catalogue pricing.
- (Optional) Update the pricing.
- Note: You can change the price, units, discount, tax code and gross value. To do this, overtype the existing values. To reinstate catalogue pricing, select Catalogue Price. You can also add some notes.
- Click Required.
- Result: The Add Expected Receipt window is displayed.
- Note: This is where you enter the date that you expect to take delivery of the order.
- From the Required dropbox, select a date, and in the Time field, enter a time.
- Note: If you don't want all of the items delivered on the same day, you can specify how many items you want delivered each time. If this is the case, specify the quantity and date that you want to take delivery (receipt) of part of the order.
- Click OK.
- Result: The quantity and date that you expect to take delivery of the items is listed under Expected Receipts
- Do you want to add another Expected Receipt item?
- If Yes, click Add, then go to Step 7.
- If No, go to Step 10.
- Note: You can break your order down so that it is not all delivered at once. That is, you can request receipt of the order in parts, with each part being delivered on a different day, or time of day.
- Note: Ensure that the sum of the quantities of your expected receipts equals the quantity of the order. It must match.
- Click Complete Order Line
- Result: The Select Fulfilment window is displayed.
What Next?
If you are ordering:
- finished items or raw materials for stock (inventory), see "Completing the Purchase Order for Stock (Inventory)".
- raw materials for a job, see "Completing the Purchase Order for an Existing Job"
Completing the Purchase Order for Stock (Inventory)
Before you begin
Before completing the purchase order, ensure that:
- you have initiated the purchase order. To do this see "Initiating a Purchase Order" above.
- the Select Fulfilment Window is displayed.
To complete the purchase order for stock (inventory):
- On the Select Fulfilment window, select the relevant warehouse.
- Note: Select the warehouse that will take delivery of the order. Warehouses are hightlighted apricot in colour.
- Result: The Select Quantity window is displayed and the fields are prefilled with the purchase order details.
- Click Confirm Order.
- Result: The purchase order is listed on the Purchase Order window.
What Next?
Print or email the purchase order.
Completing the Purchase Order for an Existing Job
Some of the options below require that you are familiar with creating a job record, including using the xpert wizard.
Note: For more information on creating job records see "Create Job".
When completing the purchase order you can:
- create a new job and assign the purchase order to that job
- assign the purchase order to an existing job
- duplicate an existing job and assign the purchase order to the duplicate job (leaving the existing job untouched), or
In most cases, the purchase order is completed for an existing job.
Options
New Job from Standard Quotes
Create a new job record based on a standard quote and assign the purchase order to the new job record.
New Job from Quote
Create a new job record for an actual quote and assign the purchase order to the new job record.
Existing Job
Assign the purchase order to an existing job.
Copy Job (####)
Duplicate an existing job record and assign the purchase order to the duplicate job record.
Copy Job (Select Job)
Search for a job record, duplicate it, and assign the purchase order to the duplicate job record
Create Job (from New)
Create a new job from scratch.
Before you begin
Before completing the purchase order for an existing job, ensure that:
- you have intitiatied the purchase order. To do this see "Initiating a Purchase Order".
- the Select Fulfilment Window is displayed.
To complete a purchase order for an existing job:
Follow these steps to assign the purchase order to an existing job record.
- On the Select Fulfilment window, click Production.
- Result: The Create / Select Job window displays a list of options.
- Click Existing Job.
- Result: The Select Job window is displayed.
- Locate the relevant job, then click Select Job.
- Note: If you know the job number, type it into the Job Number field, or click Browse to display the Jobs File window, select a job and click Accept.
- Result: The Select Quantity window is displayed for you to confirm the details.
- (Optional) Update the details.
- Click Confirm Order
- Result: The purchase order is listed on the Purchase Order window.