
Payments
Once supplier invoices have been entered into the system they can be paid in batches using the Payments module. Both Direct Credit and Cheques Payments can be processed in the same batch. Direct Credit files for submission to a bank can also be produced in the process.
Credits which have been entered can be allocated at the same time and Remittance Advices can be sent to the suppliers.
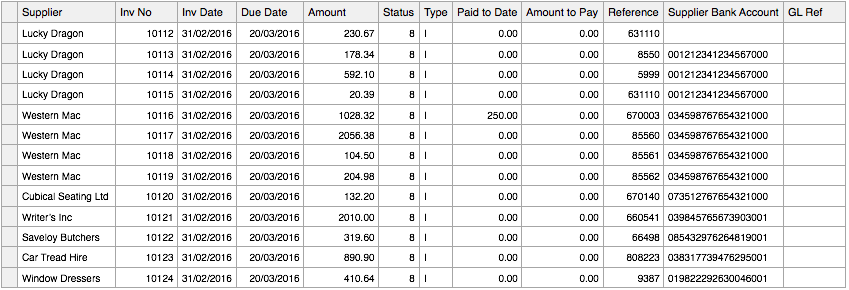 List of Invoices for Payment
On this page:
Table of Contents:
Selecting Invoices to Pay
With Printcost, you can select unpaid invoices for a single supplier or all suppliers. You can also include unallocated credits and unallocated previous payments.
Before You Begin
Before selecting invoices, ensure you entered all supplier invoices or supplier credits into Printcost. Also ensure that all supplier postal and email details are up to date, so that Remittances are sent to the correct addresses. You can update contact details through the Supplier Master window.
To select invoices to pay:
- On the left menu, click A/Cs Payable, then click Payments.
- Result: The Suppliers Payments window is displayed and the overlaid Selections window displays a number of quick picks.
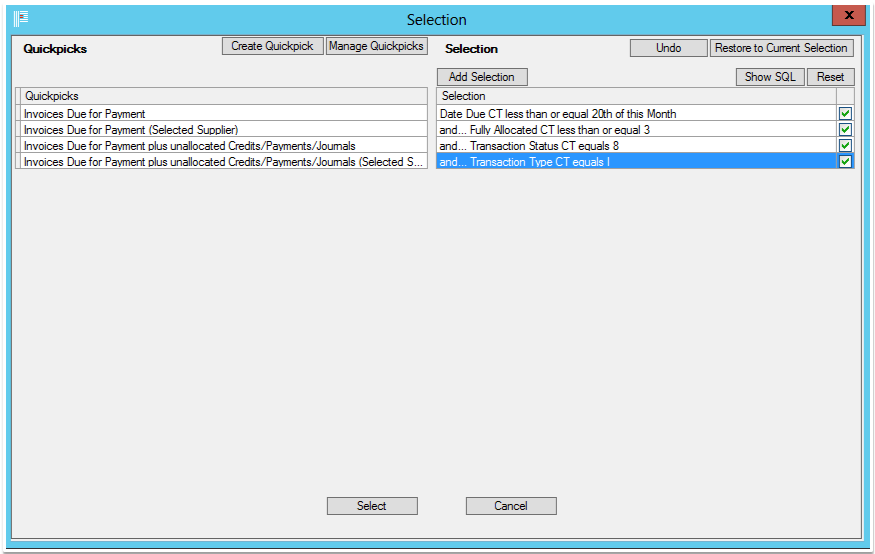
- Note: The Selection window won't be displayed if the Suppliers Payments window was previously displayed since signing onto Printcost. To display the Selections window, at the top of the Suppliers Payments window, click Sel.
- Note: A range of quick picks are provided. You can choose to display all invoices that are to be paid, or a particular creditor's invoices that are to be paid. If payments have actually been made, e.g. by cheque, but not yet matched to the relevant invoices in Printcost's General Ledger, Printcost assumes at this stage that they are yet to be paid. You can also choose to include any credits. These can be used to reduce the actual payment amount.
- On the left of the Selection window, click the relevant option.
- Result: The Enter Parameter window is displayed
- Note: You can refine the parameters if required. For example, to include unallocated credits select one of the quickpicks starting with "Invoices Due for Payment plus Unallocated...".
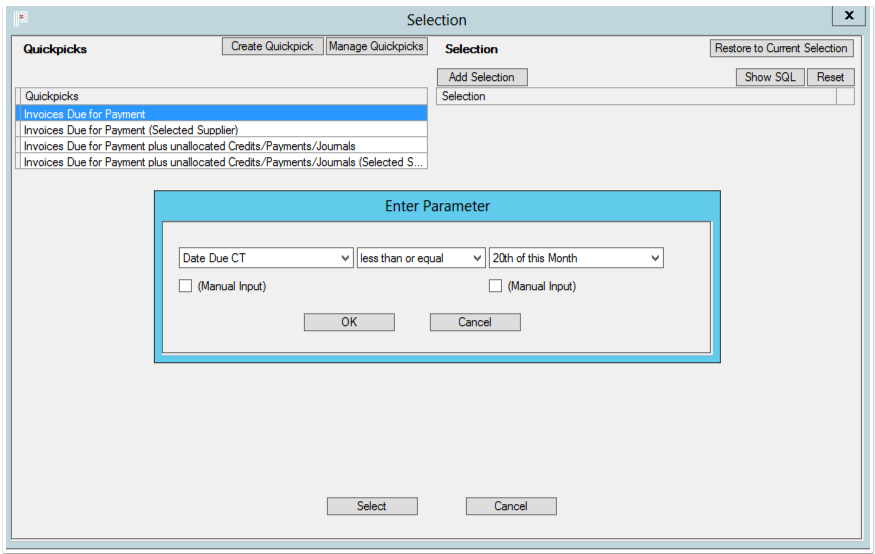
- Click OK.
- Note: You may be asked to select a supplier. If so, select the supplier and click OK.
- Click Select.
- Result: The Suppliers Payments window is updated and lists the relevant selection of invoices to be paid.
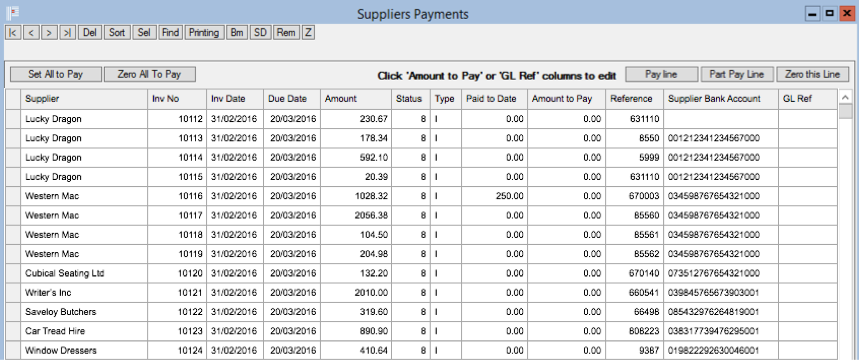
- Reminder: At this stage, there may be invoices listed here that have been paid, e.g., by cheque, cash or as online transactions (but not by a Printcost generated direct credit batch). If there is no bank account listed against the payment, the payment is excluded from the direct credit batch file. It is assumed that these payments have or are to be paid by cheque, or online. Payments made by cheque or online are posted individually to the general ledger so they can be reconciled individually.
What's Next?
- Set the relevant transactions 'To Pay'. To do this, see 'The Suppliers Payments Window' below. For a credit to be allocated, the amount to pay needs to be set.
- Send Remittances. To do this, see 'Sending Remittances' below.
The Suppliers Payments Window
The following pictures demonstrate what you can do with the Suppliers Payment window.
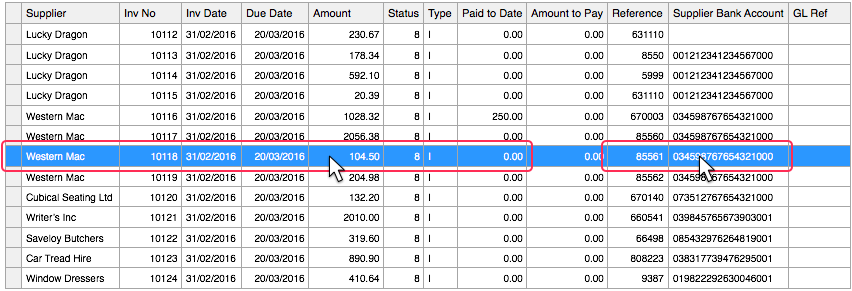
Select a Line
To select a line, click the line. Once selected, there are a number of actions that you can perform. These actions are outlined below.
 Line Selection
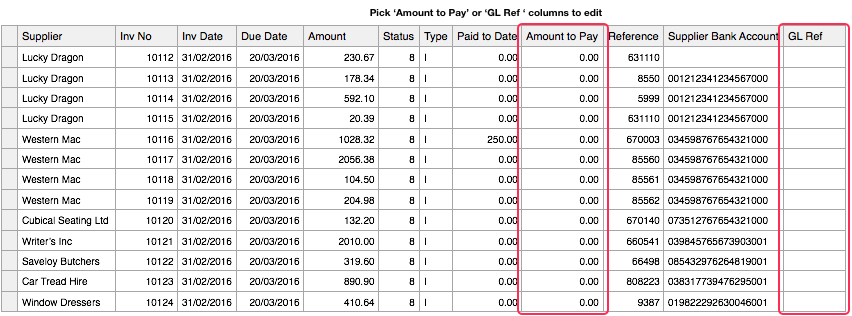
Editable Fields
While clicking anywhere on a line will select the line, some fields are editable and on being clicked, a pop-up window will be displayed for editing the field. The editable fields are the 'Amount to Pay' and 'GL Ref' fields. These actions are outlined in more detail below.
 Editable Fields
Pay the Amount Owing on All Invoices
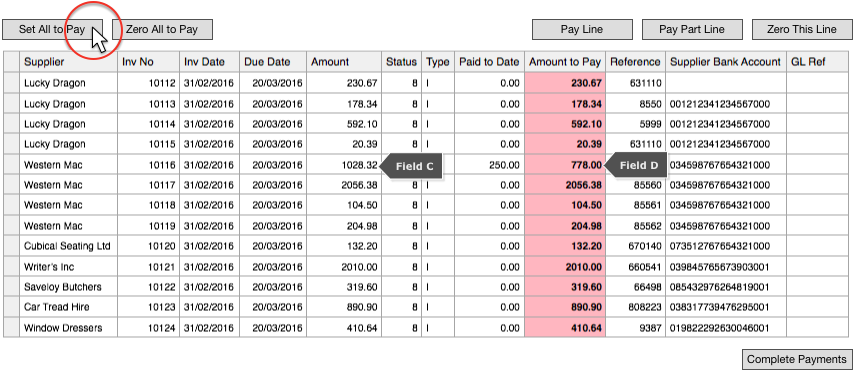
If you click 'Set All to Pay', Printcost will, for all invoices listed, update the 'Amount to Pay' fields with the amount owed, that is, the invoice amount less what has been paid to date.
For example, The invoice amount in Field C is $1028.32. A previous payment of $250.00 is already recorded in the Paid to Date column. The amount to pay (Field D) is automatically filled with difference of $778.00
Note: On clicking 'Set All to Pay', any part payments that you entered manually will be replaced with the full amount owed. Part Payments are outlined in more detail below.
 List of Invoices for Payment
Zero All to Pay
Clicking 'Zero All to Pay' replaces all amounts in the 'Amount to Pay' column with $0.00
Pay One Line
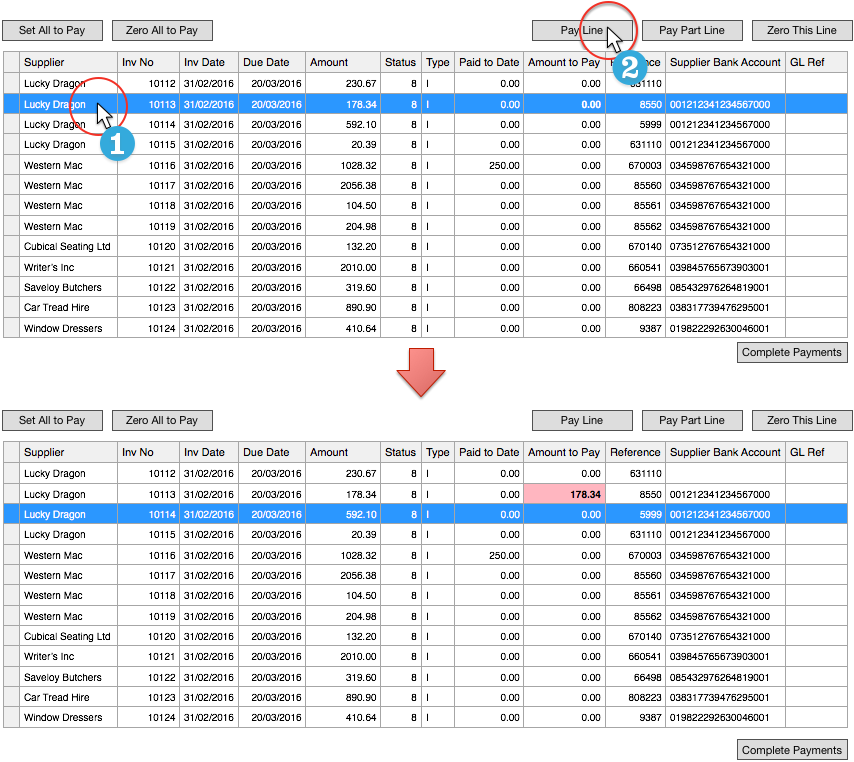
Selecting a line, then clicking 'Pay Line' will automatically fill the line's 'Amount to Pay' field with the amount owing.
Note: If a part payment was entered manually, and you select this same line then click 'Pay Line' the part payment amount will be replaced with the full amount owed. Part Payments are outlined in more detail below.
 Pay One Line
Zero This Line
Selecting a line, then clicking 'Zero this Line' replaces amount in the selected line's 'Amount to Pay' field with $0.00
Part Pay One Line
Selecting a line's 'Amount to Pay field' displays a window where you can enter the amount to be paid. This is useful for when you only want to pay part of the invoice.
Note: You can also select a line, then click 'Part Pay Line'.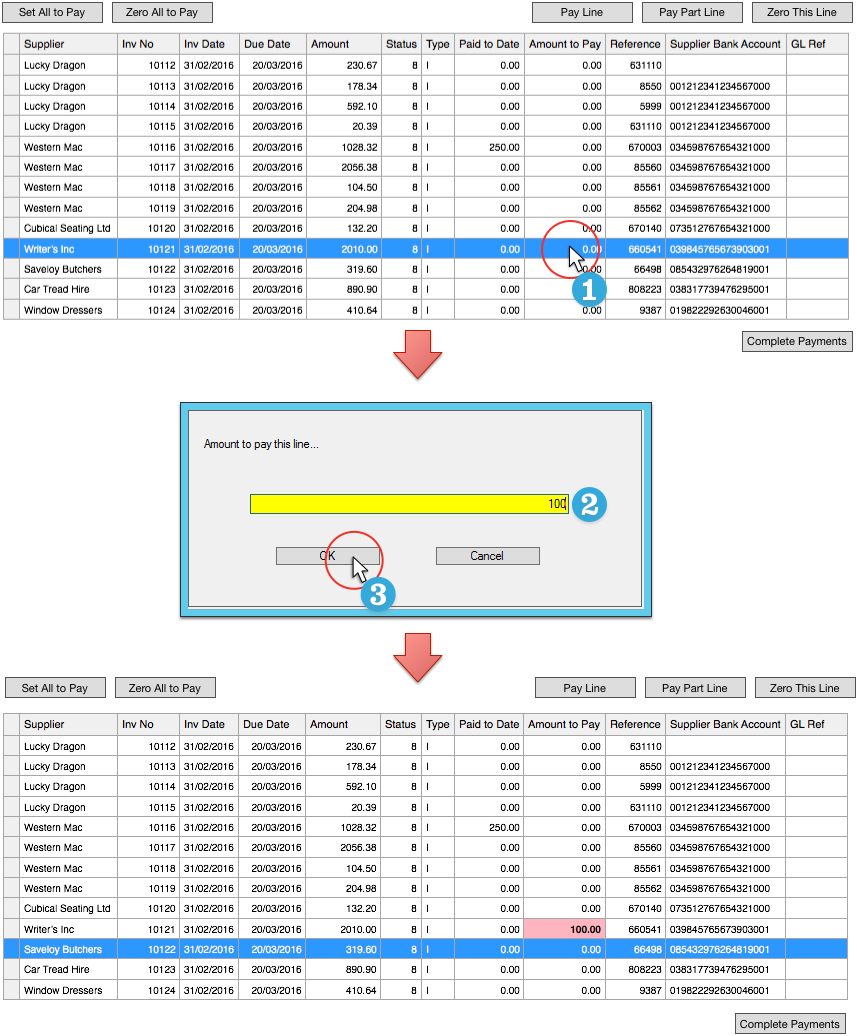 List of Invoices for Payment
Apply a GL Reference Across a Supplier's Payments
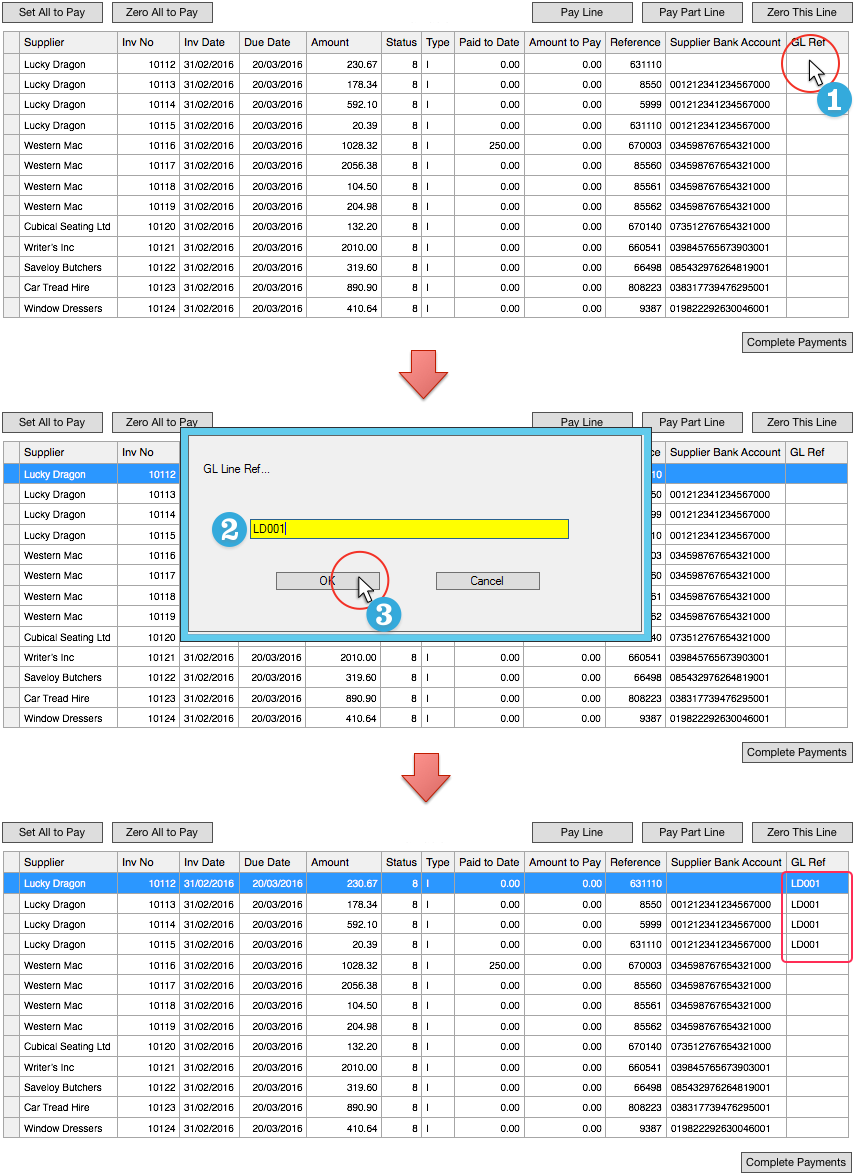
When you add or modify a reference to a GL Ref field, the reference will be applied to all GL Reference fields for the supplier.
Note: The GL Reference field is used by Printcost. It is not exported to the batch file.
 List of Invoices for Payment
Credits
When set to pay, credits are highlighted yellow. When confirming payment details, you will have the opportunity to apply the credit to one or more invoices, thereby reducing the amount to be paid.
 Supplier's Invoices to Pay and a Credit
Confirming Payment Details
When you have selected your invoices to pay, you can confirm the payment details.
Before You Begin
Before confirming payment details, ensure the relevant transactions have been set to pay in the Supplier Payments window.
To confirm payment details:
- Click Complete Payment.
- Result: The Supplier Payment Details window is displayed.
- Credits
Before the Supplier Payment Details window is displayed, you may be asked to allocate any credits to one or more invoices.
Clicking No, skips the invoice so you can apply the credit to the relevant invoice.
You can change the value and apply part of the credit to the invoice, and the remainder to one or more other invoices.
Clicking 'Apply all credits' credits the amount/s to the invoices as displayed. Once the credits have been applied, the Supplier Payment Details window is displayed.
If you subsequently cancel the payments processes, the credits are not undone. - Missing Bank Account Numbers
You may also be asked what to do with any transactions that have missing bank account numbers. These may be for individual payments that were paid by cash, cheque or through online banking. They may also have been paid as a single direct credit batch payment online, in which case they will appear on your bank statement as one combined transaction. These transactions will not exported from Printcost to the direct credit file.
- Click Pay Now.
- Result: You will be requested to check the direct credit file for errors.
- The file is located in your data directory.
- Click Yes.
- Result: The Remittance Advice window is displayed.
What's Next?
Remittance advices can now be printed or emailed direct from Printcost.
Notes:
- Upon printing or emailing a PDF of each remittance will also be saved in the Remittances folder in your data directory.
- You can set remittances to be printed or emailed for particular suppliers.
- A default account contact can now be set in Suppliers (for remittance email address)
- Printcost's standard Remittance Advice shows previous credits and payments so that suppliers are aware when credits have been applied.