
Customer Record Set-Up
On this page:
Table of Contents:
- Displaying an Existing Customer Record
- Creating a Customer Record from Scratch
- Creating a Customer Record from an Existing Record
Displaying an Existing Customer Record
There are a number ways to locate and display a customer record. To avoid confusion, only one of these ways is described below. As Printcost becomes more familiar, you will discover shortcuts.
Prospective Customers
If you are looking for a prospective customer that is designated *prospect, use the Quotes File.
Prospective customers that are designated *Prospect are not listed in the Customer File.
To display an existing customer record:
- On the left-menu, under Work, click Customers.
- If the Filter - Customer File window is displayed, go to Step 2.
- If the Customer File window is displayed, go to Step 4.
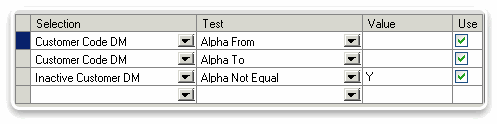
- Ensure that Show All is selected (ticked) and filters are as follows:
- Row 1: Selection = Customer Code DM, Test = Alpha From, Value = , Use = Ticked
- Row 2: Selection = Customer Code DM, Test = Alpha To, Value = , Use = Ticked
- Row 3: Selection = Inactive Customer DM, Test = Alpha Not Equal, Value = Y, Use = Ticked
- Note: If you know the clients name, you can add another filter, for example, narrow the search by entering the following row:
- Row 4: Selection = Customer Code DM, Test = Alpha Starts With, Value = X , Use = Ticked
- Substitute X with the first letter of the customers name.
- Click Proceed.
- Result: The Customer File window displays a list of customer records that fit the filter criteria.
- Locate and select the relevant customer record.
- Note: If you cannot find the relevant customer record, go to Step 2 and adjust the filters.
- Note: You can click on the tables headers to sort the table by, for example, code, name, phone number and contact.
- On the top-left button bar, click Details.
- Note: Alternatively, double-click the relevant customer record to display its details.
- Result: The customer record's details are displayed.
 Standard Filter Options
Creating a Customer Record from Scratch
Before you begin
Ensure that you have the following information at hand:
- Customer Code
Note: Your company may have a standard way of formatting customer codes. - Customer (Company) name
- Customer address
- Contact details of at least one person.
Note: You can enter more than one person's contact details. You can also designate a person as the:- Primary contact, e.g. Managing Director or the person with whom job orders will be discussed, and
- Accounts Payable contact, i.e., the person who will be processing and paying your company's invoices.
- Display the Customer File window. To do this, on the left-menu, under Work, click Customers.
Note: If the Filter - Customer File window is displayed, click Proceed.
To create a new customer record from scratch:
- On the Customer File window, top-left button bar, click New Customer.
- Result: The Create a New Customer frame is displayed.
- In the New Customer Code field, type a unique code for the customer,
then click OK.
- Note: Codes are not case sensitive. The maximum number of characters permitted is ten. Only use letters and numerals. Do not use special such as exclamation marks, hashes, dollar signs, accent andampersand.
- Result: Fields for entering customer contact details are displayed.
- Complete the Name and Address, and Postcode fields.
- Note: Type in the postal address. Delivery addresses will be entered later.
- (Where relevant) In the Analysis frame, select the relevant
- Complete the Contact Details fields for a contact.
- Do you want to add another set of contact details?
- If Yes, click New Contact, in the Contact Name list, select the new Contact Name field ( at this stage, either empty or displaying a telephone number), then go to Step 6.
- If No, go to Step 7.
- (Optional) Designate a primary contact.
- Note: The first person added to the list of contacts will be automatically designated as the primary contact and can be identified by an asterisk.
- Example: The primary contact may be the person in the customer's company who responsible for issuing job orders to your company.
- Note: To designate another person as the primary contact, on the Contact Name list, select the relevant contact, then click Set Default.
- Result: An asterisk is displayed next to the selected contact.
- Note: If you do not want anyone designated as the primary contact, click No Default Contact.
- (Optional) Designate an accounts payable contact.
- Note: This is the person who will be processing and paying your company's invoices.
- Note: To designate a person as the accounts payable contact, on the Contact Name list, select the relevant contact, then set Default.
- Result: A dollar sign ($) is displayed next to the selected contact.
- Note: If you do not want anyone designated as an accounts payable contact, click No A/c Contact.
- (Optional) In the Customer File Notes field, add, modify or delete
any notes about the customer as required.
- Example: 'Joe's Birthday is 28 Feb 2009'.
- (Optional) In the Pop-up Notes field, add, modify or delete any notes
that may be imortant when displaying a quote record or a job record.
- Example: 'Ensure that the job meets the deadline. Penalties (in the customer's contract) apply if the job is not delivered on time.'
- (Optional) Add a customer log note.
- Note: To do this, click Add Customer Log Note, type a log entry, then click OK.
- Example: 'Ian contacted the customoer to confirm acceptance of the quote.'
- Result: The note is displayed, and date and time stamped with your user code.
- Note: While the log note remains editable, as an entry, it cannot be deleted.
Creating a Customer Record from an Existing Record
When creating a new customer record from an existing record the following information is copied into the new record:
- primary contact
- mark-ups and dicounts
- invoice type
- email settings
Information, such as history and balances are not copied.
The advantages of copying an existing customer record include:
- creating customer records for multiple branches or departments that belong to the same parent company, and
- reduces the time spent keying in the same general information.
Before you begin
Ensure that you have the following information at hand:
- Customer Code
Note: Your company may have a standard way of formatting customer codes. - Customer (Company) name
- Customer address
- Contact details of at least one person.
Note: You can enter more than one person's contact details. You can also designate a person as the:- Primary contact, e.g. Managing Director or the person with whom job orders will be discussed, and
- Accounts Payable contact, i.e., the person who will be processing and paying your company's invoices.
- Display the Customer File window. To do this, on the left-menu, under Work, click Customers.
Note: If the Filter - Customer File window is displayed, click Proceed.
To create a new customer record from scratch:
- On the Customer File window, top-left button bar, click New Customer.
- Result: The Create a New Customer frame is displayed.
- Select the 'Copy Details from Current Record' check box.
- In the New Customer Code field, type a unique code for the customer, then click OK.
- Note: Codes are not case sensitive. The maximum number of characters permitted is ten. Only use letters and numerals. Do not use special such as exclamation marks, hashes, dollar signs, accent andampersand.
- Result: Fields for entering customer contact details are displayed.
- Complete the Name and Address, and Postcode fields
- Note: Type in the postal address. Delivery addresses will be entered later.
- (Where relevant) In the Analysis frame, change the relevant options.
- Complete the Contact Details fields for a contact.
- Do you want to add another set of contact details?
- If Yes, click New Contact, in the Contact Name list, select the new Contact Name field ( at this stage, either empty or displaying a telephone number), then go to Step 6.
- If No, go to Step 7.
- (Optional) Designate a primary contact.
- Note: The first person added or the existing contact that was copied will already be designated as the primary contact and can be identified by an asterisk.
- Note: The primary contact may be the person in the customer's company who is responsible for issuing job orders to your company, or the person to talk to about any changes.
- Note: To designate a person as the primary contact, on the Contact Name list, select the relevant contact, then click Set Default.
- Result: An asterisk is displayed next to the selected contact.
- Note: If you do not want anyone designated as the primary contact, click No Default Contact.
- (Optional) Designate an accounts payable contact.
- Note: This is the person who will be processing and paying your company's invoices.
- Note: To designate a person as the accounts payable contact, on the Contact Name list, select the relevant contact, then set Default.
- Result: A dollar sign ($) is displayed next to the selected contact.
- Note: If you do not want anyone designated as an accounts payable contact, click No A/c Contact.
- (Optional) In the Customer File Notes field, add, modify or delete
any notes about the customer as required.
- Example: 'Joe's Birthday is 28 Feb 2009'.
- (Optional) In the Pop-up Notes field, add, modify or delete any notes that may be imortant when displaying a quote record or a job record.
- Example: 'Ensure that the job meets the deadline. Penalties (in the customer's contract) apply if the job is not delivered on time.'
- (Optional) Add a customer log note.
- Note: To do this, click Add Customer Log Note, type a log entry, then click OK.
- Example: 'Ian contacted the customoer to confirm acceptance of the quote.'
- Result: The note is displayed, and date and time stamped with your user code.
- Note: While the log note remains editable, as an entry, it cannot be deleted.