Invoicing
On this page:
Table of Contents:
- Invoicing Process
- Setting Up a Charge Record
- Invoicing a Charge Record (Creating an Invoice)
- Invoicing Multiple Jobs in One Go
- Crediting an Invoice
- Printing an Audit Trail of Invoices (After Batch Invoicing)
- Printing an Audit Trail of Invoices (Invoiced this Month)
- Printing an Audit Trail of Posted Invoices
Invoicing Process
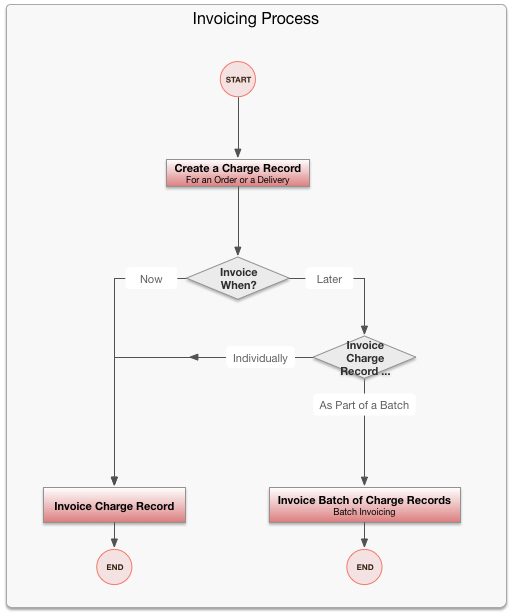
The following flowchart shows the stages of the invoicing process.
 Invoicing Process
Setting up a Charge Record
You can locate items to charge from the:
- Sales Order window
To display the Sales Order window, on the left-menu, click Select Work, then click Sales Orders - Jobs window, or
To display the Jobs window, on the left-menu select Work, then click Jobs. - Invoices window
To display the Invoices window, on the left-menu, select Work, then click Customer Charging.
Note: With Printcost, you can send your invoices immediately or later. If you choose to invoice later, the invoice number and date is not assigned, and the charges remain editable. Printcost doesn't regard an invoice as being complete until the invoice number and invoice date are set. Until this happens, Printcost treats the invoice as an editable draft. This editable draft is referred to as a charge record, or charge.
Consolidation of Charges into One Invoice
Charges are typically prepared for an order. If the order requires two or more deliveries, the customer can be charged per delivery. Also, depending on the rules that have been set up for each of your customers, charges that are prepared over time can be consolidated into one invoice. Consolidation can be acheived by:
- customer
Note: All charges that have been prepared but not invoiced for the customer are consolidated into one invoice. - customer order
Note: All the charges that relate to a particular customer order (excluding anything that has already been invoiced) are consolidated into one invoice. - despatch docket for items despatched together, or
Note: The charges relating to a client's items that are despatched together (excluding anything that has already been invoiced) are consolidated into one invoice. - sales order for items sold together.
Note: The charges relating to a sales order (excluding anything that has already been invoiced) are consolidated into one invoice.
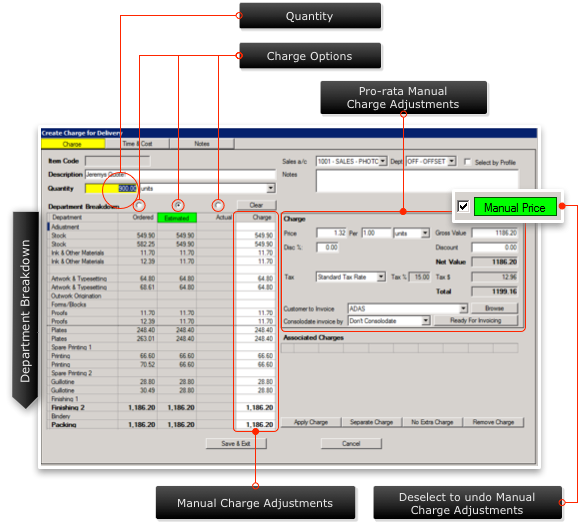
'Create Charge for…' Window
In the Create Charge for window, you can:
- change the quantity
Note: You may want to do this to split the charge further. - select one of three charge options
Note: Selecting a charge option (Ordered, Estimated or Actual) will copy its values into the Charge column. - edit the values in the Charge column
Note: When you edit a value, the Manual Price checkbox is displayed and automatically selected. - edit the values in the Charge fields to the right of the Charge column,
Note: Any adjustments you make in these fields will automatically update Charge column with pro-rata adjustments to the department breakdown. The Manual Price checkbox will also be displayed and automatically selected. - edit values in both the Charge column and Charge fields to the right of the Charge column.
Note: If you edit fields in both the Charge column and the Charge fields to the right of the Charge column, the Ordered, Estimated and Actual columns will be deselected and will no longer serve as a basis for your charging Ð pro-rata or otherwise. - undo any manual changes by de-selecting the Manual Price checkbox.
 'Create Charge for…' Window
Charge Options
Ordered
Select 'Ordered' if you want to charge, or base manual charges on the values at the point the order was created or last updated.
Estimated
Select 'Estimated if you want to charge or base manual charges on the production costs.
Note: This may have changed after the order was created or last updated.
Actual
Select 'Actual' if you want to charge or base manual charges on actual costs (time and materials) recorded on the factory floor.
The steps below assume that you will be working from the Jobs window.
Before you begin
Before setting up charges for invoicing, ensure the Jobs File window is displayed.
Note: to do this, on the left-menu select Work, then click Jobs.
To set up charges for invoicing:
Follow these steps to create a ready-to-invoice charge record.
- On the Job File window, click Sel
- Note: Sel is short for select and can be located on the button bar at the top of the Jobs File window.
- Result: The Selection window displays a range of quickpicks.
- From the list of quickpicks, click 'Jobs Delivered Not Invoiced', then click Select
- Result: The jobs that are delivered and jobs that are yet to be invoiced are displayed.
- Select a job, then click Details.
- Result, the job's details are displayed.
- Click Invoice Details
- Result: A list of orders or deliveries that can be invoiced, is displayed.
- Note: You can invoice by order or delivery.
- Click 'Charge by Order' or 'Charge by Delivery'
- Note:Typically there is only one order, but there may be more.
- Click the relevant order or delivery, then click Create Charge.
- Result: The 'Create Charge for…' window is displayed.
- (Optional) Make manual adjustments.
- Note: For more information, see the information at the start of this topic and the screenshot above.
- Ensure the relevant customer is selected in the 'Customer to Invoice' drop box.
- Ensure the relevant consolidation option is selected in the 'Consolidate Invoice By' drop box.
- (Optional) Check the time and cost, and notes.
- Note: To do this, at the top of the window, click the Time & Cost button, and the Notes button.
- Click Ready for Invoicing.
- Result: The Edit Charge window displays a preview of the invoice.
- Click Invoice Later.
- Result: The charge is highlighted mauve and listed under 'Ready for Invoicing' in the Jobs File window.
Note: In Step 11, you could have clicked Save & Exit and the charge would have remained editable. In Step 12, you could have clicked Invoice Now and created the invoice. The reason for guiding you through the Invoice Later path of the invoicing process is so that you can become familiar with the whole invoicing process. Once you are familiar with the whole process, feel free choose another option at Stages 11 and 12.
Choosing Save & Exit saves the charge as an editable record. Choosing Ready to Invoice followed by Invoice Later creates a charge record that can be invoiced at any time. Being Ready to Invoice, it is not editable, however, you can revert the record back into an editable state by, on the Job File window, clicking Not Ready. Once the invoice is created, it cannot be undone. However, you can create a credit note if required.
What Next?
To create the invoice, see 'Invoicing a Charge Record (Creating an Invoice)' or 'Invoicing Multiple Jobs in One Go' below.
Invoicing a Charge Record (Creating an Invoice)
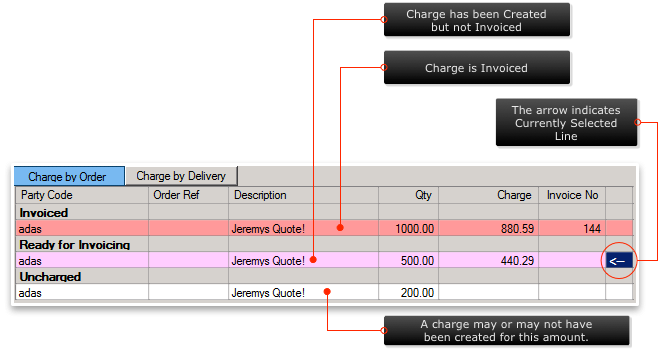
Once you have created a charge record, you can invoice it at any time. The following picture shows a charge that has been broken down into three smaller charges. one has been invoiced, one is ready to invoice, and the third is yet to be charged. For example, you might do this because there are to be three deliverys for an order and each delivery is to be invoiced separately.
 Colour Coding of Charges and Invoices
The picture (above) shows the colours that are used to identify items for which :
- an invoice has been created (pink background).
- a ready-to-invoice charge record has been set up (pale-pink background, and
- a charge record may have been set up (white background)
The arrow indicates the line that is currently selected.
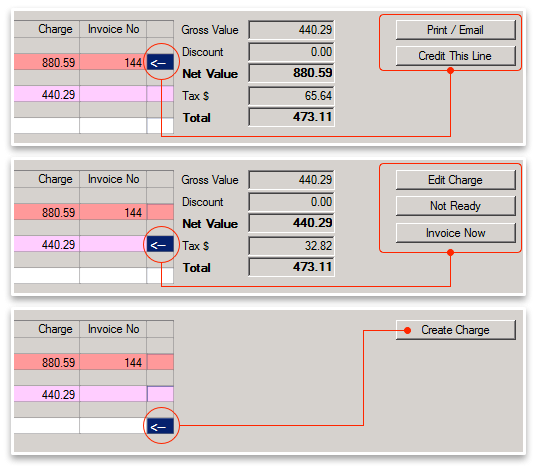
 Options for Selected Charge / Invoice
Depending on what you have selected, the buttons on the right of the window will change. If you select a line of items that:
- have been invoiced, you can print or email the invoice, or credit this line.
- are ready to invoice, you can edit the charge, change its status to not ready, or invoice the charge now.
- has not been charged, you can create a charge
On creating the invoice, today's date and an invoice number will be applied to the invoice and the invoice will be highlighted pink.
Note: If you want to invoice two or more invoices at the same time, see 'Invoicing Multiple Jobs in One Go' below
Before you begin
Before invoicing a charge record, ensure that:
- the charge record has been set up.
Note: For more information, see 'Setting Up a Charge Record' above. - the Invoices frame of the Jobs File window is displayed for the relevant job.
To invoice a charge record (create an invoice):
Follow these steps to creat an invoce for a ready-to-invoice charge record.
- Select the relevant charge line.
- Note: The charge record will be highlighted pale-pink / mauve.
- Click Invoice Now.
- Result: The invoice window requests you to select the invoice date and (optional) the invoice time.
- If relevant, change the invoice date and time.
- Click Invoice.
- Click Close
- Result: The invoice is listed on the Jobs File window as invoiced.
Invoicing Multiple Jobs in One Go
With Printcost, you can either print all your ready-to-invoice invoices in one go, or email them.
To print multiple jobs in one go:
- On the left-menu, under A/Cs Receivable, click Print Invoices.
- Result: The Batch Invoicing window displays a list of ready-to-invoice invoices.
- Click Print Invoices.
- Result: The invoices with a status of 'Ready to Invoice' are printed.
To email multiple jobs in one go:
- On the left-menu, under A/Cs Receivable, click Print Invoices.
- Result: The Batch Invoicing window displays a list of ready-to-invoice invoices.
- Click Email.
- Result: A field for an email message is displayed./li>
- (Optional) Complete the email message field, and add any recipients that you want to CC or BCC into the relevant email fields.
- Click Email Invoices.
- Result: The invoices with a status of 'Ready to Invoice' are emailed.
- Note: For contacts that do not have an email address and for customers who are set to 'Don't Email', the invoices will be printed instead.
What's Next?
Print an audit trial of invoiced jobs.
Deliver/post the invoice.
Crediting an Invoice
Once created, invoices cannot be undone. However, you can create a credit.
Before you begin
To credit an invoice, on the Jobs File window, ensure that the relevant invoice is displayed.
To credit an invoice:
- On the Job's File window, under Invoice Details (or Invoice), select the relevant invoice.
- Note: Invoices are highighted pink.
- To the right of the window, click Credit This Line.
- Result: You will be asked if you want to a credit against the charge?
- Note: The full amount will be credited. You cannot partially credit the invoice.
- Click Yes.
- Result: The Create Credit window is displayed.
- Note: This is very similar to the 'Create Charge for…' window.
- Click 'Ready to Credit'
- Result: The credit note is displayed in the Create Credit window.
- Click Credit Now.
- Result: The Credit window requests you to select the credit date and (optional) the credit time.
- Click Credit.
- Result: The credit note is created and assigned an credit number.
- Click Close.
- Result: The credit is listed on the Jobs File window as a negative value (in brackets).
Printing an Audit Trail of Invoicing (After Batch Invoicing)
Before you begin
Before printing an audit trail, ensure that all the relevant invoices have been printed and Batch Invoicing window is displayed.
To print an audit trail on invoiced orders (after batch processing):
- Click Printing.
- Note: The Printing button is located at the top of the window.
- Result: The Printer Control Screen window is displayed.
- Note: If reports are not listed, click Reports.
- Select '656 Charge Headers - Invoice Data'
- Result: The report is displayed.
- Click Print.
- Result: The report is printed.
Printing an Audit Trail of Invoicing (Invoiced this Month)
Before you begin
Before printing an audit trail, ensure that the relevant invoices have been printed.
To print an audit trail on invoiced orders (invoiced this month):
- On the left-menu, under Work, click Invoices.
- Result: The invoices window is displayed.
- At the top of the window, click 'Sel'.
- Result: The Selection window is displayed.
- Click 'Invoiced this Month', then click Select.
- Result: A list of invoices for this month is displayed.
- Click Printing.
- Note: The Printing button is located at the top of the window.
- Result: The Printer Control Screen window is displayed.
- Note: If reports are not listed, click Reports.
- Select '656 Charge Headers - Invoice Data'
- Result: The report is displayed.
- Click Print.
- Result: The report is printed.
Printing an Audit Trail of Posted Invoices
Before you begin
Before printing an audit trail, ensure that:
- all the relevant invoices have been posted or emailed, and
- the Post Invoicing window is displayed.
To print an audit trail on invoiced orders:
- Click Printing.
- Note: The Printing button is located at the top of the window.
- Result: The Printer Control Screen window is displayed.
- Note: If reports are not listed, click Reports.
- Select '657 Charge Lines - Posting Information'
- Result: The report is displayed.
- Click Print.
- Result: The report is printed.