
Modify Quote
When using Xpert to calculate a quote, Xpert applies your company's house rules when performing the calculations. With the Xpert Results frame, you can modify the following results:
- Quantity (Rate Quantity)
- Charge Rates and Breaks
- Lift, and
- Factor
You can also:
- add processes and rates
- remove processes and rates, and
- using the Totals frame, modify mark-ups and discounts.
On this page:
Table of Contents:
- Modifying a Quantity
- Modifying a Charge Rate
- Modifying Lift
- Modifying Factor
- Adding a Process
- Deleting a Process
- Deleting a Rate Line
- Re-calculating a Quote with Xpert
- Modifying Mark-Ups and Discounts
Modifying Quantities
Xpert automatically determines, for example, the number of times a process is to be performed, and therefore quoted for. Using the Xpert Results frame, you can modify this quantity to reflect yhe actual number of times a particular task or operation, e.g. wash-up, is to be performed.
Caution: Any modifications that you make may be lost if Xpert is used to recalculate the quote. For information about avoiding this loss when using Xpert, see 'Re-calculating a Quote with Xpert', later in this document.:
Before you begin:
Ensure that the relevant quote record has been selected and the Xpert Results frame is displayed.
The steps below are only relevant if Xpert has already been used to calculate the quote.
To modify quantities:
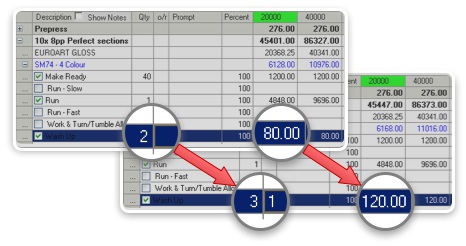 Override Rate Quantity
Follow these steps to correct the number of operations involved in a particular process.
- On the Xpert Results frame, select the relevant rate line.
- Note: To locate the relevant rate line, use the + symbols to expand printing parts and processes. In the table, only rate lines have a checkbox.
- Result: The relevant rate line is highlighted.
- Note: More information may be displayed in a pop-up frame. You can close this by clicking its X (close) button.
- In the Qty column, overtype the relevant quantity.
- Example: Change the number of wash-ups.
- Result: The o/r field displays the difference between the original value calculated by Xpert and the value that you entered. Also, the pricing is updated automatically.
Modifying Charge Rates
Using the Xpert Results frame, you can modify charge rates and breaks, for example, to pass on cost savings to customers or additional costs that are not applied by Xpert.
Caution: Any modifications that you make may be lost if Xpert is used to recalculate the quote. For information about avoiding this loss when using Xpert, see 'Re-calculating a Quote with Xpert', later in this document.:
Before you begin:
Ensure that the relevant quote record has been selected and the Xpert Results frame is displayed.
The steps below are only relevant if Xpert has already been used to calculate the quote.
To modify charge rates:
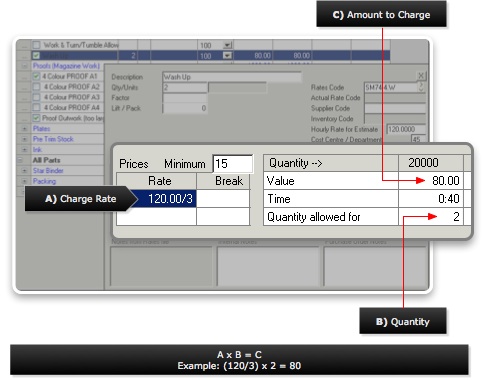 Override Rate
- On the Xpert Results frame, select the relevant rate line's description.
- Example: Wash Up
- Note: To locate the relevant rate line, use the + symbols to expand printing parts and processes. In the table, only rate lines have a checkbox.
- Result: The relevant rate line is highlighted and more information is displayed in a pop-up frame.
- (If required) On the pop-up frame, in the Rate field, overtype the existing rate.
- Note: The existing rate may be expressed as a fraction, e.g., the hourly rate divided by a number.
- (If required) In the Break field, overtype the existing break, then press Tab
- Verify that your changes have been made.
- Note: Changes within the pop-up frame may not be displayed straight away. To display your latest changes, click Xpert Results. This will refresh all the data. To see all your changes, you may have to use the + symbols to expand the relevant printing part and process and reselect the relevant rate line.
- Result: The Value fields (see right) will be updated to reflect your changes.
Modifying Lift / Pack
Using the Xpert Results frame, you can modify the number of lifts to reflect the actual number of times, for example, paper needs to be physically handled.
Example: If someone has 1000 sheets to lift, but can only lift 100 sheets at a time, then the number of lifts equals ten.Note: You may also want to use Printcost's Lifts to account for guillotining or drilling.
Caution: Any modifications that you make may be lost if Xpert is used to recalculate the quote. For information about avoiding this loss when using Xpert, see 'Re-calculating a Quote with Xpert', later in this document.:
Before you begin:
Ensure that the relevant quote record has been selected and the Xpert Results frame is displayed.
The steps below are only relevant if Xpert has already been used to calculate the quote.
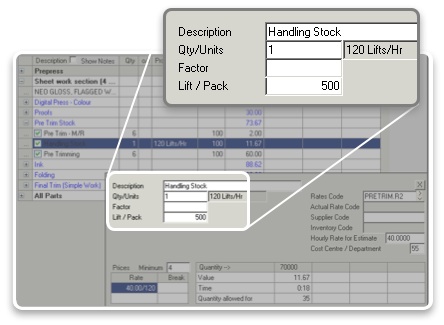 Modify Lift
To modify lift / pack:
Follow these steps to correct the suggested number of physical lifts required to move a particular material.
- On the Xpert Results frame, select the relevant rate line's description.
- Example: Handling Stock
- Note: To locate the relevant rate line, use the + symbols to expand printing parts and processes. In the table, only rate lines have a checkbox.
- Result: The relevant rate line is highlighted and more information is displayed in a pop-up frame.
- On the pop-up frame, in the Lift / Pack field, type/overtype the required number of lifts.
- Note: The existing rate may be expressed as a fraction, e.g., the hourly rate divided by a number.
- (If required) In the Break field, overtype the existing break, then press Tab
- Verify that your changes have been made.
- Note: Changes within the pop-up frame may not be displayed straight away. To display your latest changes, click Xpert Results. This will refresh all the data. To see all your changes, you may have to use the + symbols to expand the relevant printing part and process and reselect the relevant rate line.
- Result: The Value fields (see right) will be updated to reflect your changes.
Modifying Factor
Using the Xpert Results frame, you can modify the factor to more accurately reflect the quantity of a particular material, e.g., setting ink coverage to 30% (expressed as 30/100), or to reflect the purchase cost if more material has to be purchased than is required.
Caution: Any modifications that you make may be lost if Xpert is used to recalculate the quote. For information about avoiding this loss when using Xpert, see 'Re-calculating a Quote with Xpert', later in this document.:
Before you begin:
Ensure that the relevant quote record has been selected and the Xpert Results frame is displayed.
The steps below are only relevant if Xpert has already been used to calculate the quote.
To modify factor:
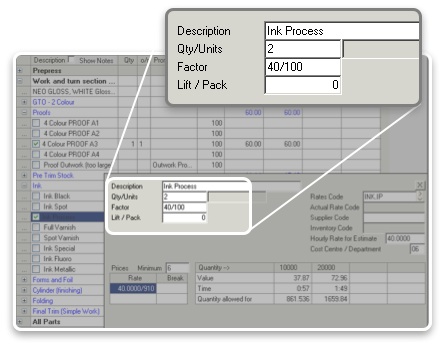 Override Factor
Follow these steps to increase or decrease the quantity of, for example, ink that has been allowed for.
- On the Xpert Results frame, on the table, select the relevant rate line's description.
- Example: Ink Process
- Note: To locate the relevant rate line, use the + symbols to expand printing parts and processes. In the table, only rate lines have a checkbox.
- Result: The relevant rate line is highlighted and more information is displayed in a pop-up frame.
- On the pop-up frame, in the Factor field, type/overtype the required
factor.
- Note: If less than 1, express as a number out of 100. Leaving the field empty equates to a factor of 1 or 100/100.
- Verify that your changes have been made.
- Note: Changes within the pop-up frame may not be displayed straight away. To display your latest changes, click Xpert Results. This will refresh all the data. To see all your changes, you may have to use the + symbols to expand the relevant printing part and process and reselect the relevant rate line.
- Result: The Value fields (see right) will be updated to reflect your changes.
Adding a Process
On the Xpert Results frame, you can add processses to your quote. When added, Xpert will automatically perform the relevant calculations, automatically incorporating existing rates as required, and adjusting your quote accordingly.
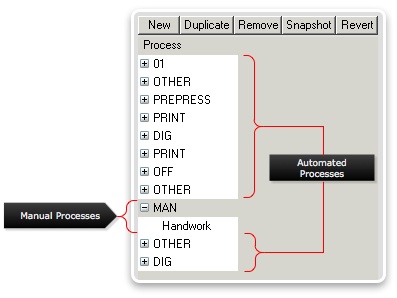
In Printcost, there are two types of process. These are:
- automated processes, and
- manual processes.
Caution: Any automated processes that you add to a quote may be deleted by Xpert if using Xpert to recalculate the quote. For information on how to avoid this loss when using Xpert, see 'Re-calculating a Quote with Xpert', later in this document.:
Note: Manual processes that you add to a quote are not be affected by Xpert when recalculating.
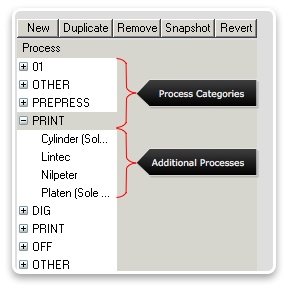
Note: The additional processes shown (right) may differ from what is displayed on your copy of Printcost.
 Additional Processes
To add a process:
- On the right- side of Xpert Results frame, select the part, e.g., Printing Part that you want to add a process to.
- Result: The relevant part is highlighted. More information about the part information may be displayed in a pop-up frame.
- On the left side of the Xpert Results frame, click the relevant category.
- Result: A list of additional processes that you can add to your estimate is displayed.
- Caution: Take care not to click a process unintentionally. Clicking a process will add it to your quote.
- Click the process that you want to insert.
- Result: The process is added to the table on the right-side. The processes rate lines will be displayed automatically. Where relevant, the process's rates will be calculated automatically using from your company's house rules.
Deleting a Process
Using the Xpert Results frame, you can delete processes that are not relevant to the quote.
Caution: Any automated processes that you delete from a quote may be added back into the quote by Xpert, if using Xpert to recalculate the quote. For information on how to avoid this loss when using Xpert, see 'Re-calculating a Quote with Xpert', later in this document.:
To delete a process:
- On the right-side of Xpert Results frame, select the process that you
want to delete from the quote.
- Result: The relevant process highlighted. More information about the process may automatically be displayed in a pop-up frame.
- Caution: Ensure that you have selected the process that you want to remove. Deleting a Part will remove all of its corresponding processes and rates. Removing a process will remove all of its corresponding rates.
- On the left side of the Xpert Results frame, click Delete.
- Result: You will be requested to confirm the deletion of the process.
- Click Yes.
- Result: The process and its corresponding rate lines are removed from the estimate.
Deleting a Rate Line
Using the Xpert Results frame, you can delete rate lines that are not relevant to the quote.
Caution: Any rate line that you delete from a quote may be added back into the quote by Xpert, if using Xpert to recalculate the quote. For information on how to prevent this from happening, see 'Re-calculating a Quote with Xpert', later in this document.:
To delete a rate line:
- On the right-side of Xpert Results frame, select rate that you want
to remove from the quote.
- Result: The relevant rate is highlighted. More information about the rate may automatically be displayed in a pop-up frame.
- Caution: Ensure that you have selected the rate that you want to remove. Deleting a Part will remove all of its corresponding processes and rates. Removing a process will remove the process and all of its corresponding rates.
- Note: Rate Lines are easy to identify. Only rate lines have a check box.
- On the left side of the Xpert Results frame, click Delete.
- Result: You will be requested to confirm the deletion of the rate line.
- Click Yes.
- Result: The process and its corresponding rate lines are removed from the estimate.
Re-Calculating a Quote with Xpert
Caution: Using Xpert to recalculate the
quote after you have modified the Xpert Results frame, may result in unintended
changes to the quote. That is, all automated processes and rates that
you have added, modified or deleted using the Xpert Results frame, may
be reversed.
Note: Xpert does not reverse manual processes and rates, for example handwork,
that have been added, modified or removed using the Xpert Results frame.
Prior to Xpert recalculating the estimate, you can turn some of the automation off — automation that would otherwise overwrite and reverse the manual changes that you have made to the quote.
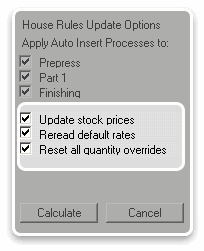
When using Xpert, there are a number of check boxes that are normally selected (ticked). Three of these check boxes are:
- Update Stock Prices
- Reread Default Rates
- Reset All Quantity Overrides
Caution: De-selecting (if already selected), or selecting (if already de-selected) these checkboxes will affect the outcome of Xpert's calculations. Please ensure that you are clear about what will happen to your quote before selecting and deselecting these check boxes.
 Xpert Update Options
To stop Xpert from re-applying paper rates:
To stop Xpert from re-applying the rate for paper (from the rates file), de-select 'Update Stock Prices'.
Note: This prevents rates (for paper) that have been modified on the Xpert Results frame, from being reversed by Xpert.
To stop Xpert from re-applying other rates:
To stop Xpert from reapplying rates (other than paper rates), de-select 'Reread Default Rates'.
Note: This prevents any rates that have been modified on the Xpert Results frame, from being reversed by Xpert.
To stop Xpert from clearing quantity overrides:
To stop Xpert from clearing quantitity overrides, that is, changes that have been made to quantities (and reflected in the Qty and o/r columns on the Xpert Results frame), de-select 'Reset all Quantity Overrides'.
Note: After Xpert re-calculates, it displays a window that identifies which items will be affected. With ths window, you can prevent these changes from being implemented by de-selecting the relevant checkboxes.
Modifying Mark-Ups and Discounts
With Printcost, standard mark-ups to your labour and materials are applied by Xpert using the house rules that are set up for your company. The steps below describe how to adjust these mark-ups and discounts for a particular quote.
You can for example, adjust the mark-up on an individual item and/or adjust the overall markup that is applied across all items. You can also provide the customer with a discount. The discount that you select may be determined by, for example, the selected sales representative, or customer.
Note: This procedure is optional. Depending on how your company has set up Printcost, your price adjustments may have already been performed.
Before you begin
Ensure that the:
- Quotes File window is currently displaying the relevant quote record.
Note: If the relevant quote record is not displayed, on the left menu, click Quotes, then double-click the relevant quote record.
To adjust mark-ups and discounts:
- On the Quotes File window, top-left button bars, click Totals.
- Result: Pricing options, rounding options and a table showing a summary of costs, tax and profit is displayed
- (Optional) At the top-left of the window, update the pricing options.
- Result: The table on the right-side is automatically updated where relevant.
- Example: Mark-up % - This adjusts the mark-up that is applied over and above any departmental mark-ups where applicable.
- Example: Discount % - This applies the discount across the board.
- Example: Currency and Rate - These identify the customers currency factor the exchange rate into the pricing
- Example: Unit of Measure and Description.
- Example: Tax Rule - Select the relevant sales tax rule.
- (Where relevant) Apply or stop the overall mark-up from being applied to an individual department.
- Result: The table on the right-side is automatically updated where relevant.
- Notes:
- To apply the overall mark-up on top of the departmental mark-up, ensure the relevant department's Overall check box is selected.
- To stop the overall mark-up from being applied on top of the departmental mark-up, ensure the relevant department's Overall check box is de-selected
- (Optional) Beneath the Job Title field, select the relevant departments and overtype their mark-ups.
- Result: The table on the right-side is automatically updated where relevant.
- Example: Select None to remove any rounding.
- Example: Select Total to round the estimated totals..
- Example: Select Department to round individual department pricing.
- (Optional) On the table, overtype the Adjustment or Estimated Total fields.
What's Next?
Print and post, or email the quote to the customer.